Merciful Miller
<questlist 50> / <questlist merciful miller>
All the millers you've known have been greedy, underhanded, and self-serving bastards. Perhaps you could take up the trade and be different from the rest of them. Rumors floating through the bazaar in Wayhaven speak of a beautiful young woman who could use the help of a kind miller. Perhaps you should find her and see what you can do?
Search in the Realm of Fantasy
Thinking : (7/10)Exploring : (6/10)Fighting : (0/10)
Quest Point Value : 25Designed for Levels: 5+
Created by : Asheratyluk
Once per Reboot : No
Quest Instructions
(last solved and updated: February 2023)Summary: You'll start the quest by talking to a specific girl (her innocent brother has been thrown in jail). Your task at this point will be to collect wheat, mill it, and bake her a loaf of bread with a chisel inside so that she can deliver it to her brother in jail.
-
From Fantasy, you'll need to find Nyess, "A young woman", in the Wayhaven Bazaar. She is often just south and east from Fantasy portal, but she will move around the bazaar, which surrounds the portal. -
<portal, s, e> -
<follow nyess, say hi>Nyess stifles a sob and curtseys before you.
Nyess says: You look different than the rest, will you help me? -
<say help>Nyess says: Everyone I've asked doesn't want to get involved.
Nyess sighs. -
<say involved>Nyess says: My beauty is a curse to me and those I hold dear.
-
<say curse>Nyess says: I seem to attract all the wrong sort of men.
Nyess says: This time my poor brother has to suffer because of it. -
<say brother>Nyess sobs, unable to hold back the tears.
Nyess says: He's been imprisoned because of me. -
<say imprisoned>Nyess says: It all started about a fortnight ago.
Nyess says: When Crett took an interest in me. -
<say crett>Nyess trembles with anger and perhaps a twinge of disgust.
Nyess says: Crett is the scum of the earth.
Nyess says: He only cares for himself, and just wants me for a play thing.
Nyess says: I told him nicely that I'm not interested, but he persisted.
Nyess says: He'd come calling at the house where my brother and I lived.
Nyess says: Jonin protected me and would send him away.
Nyess says: Until a week ago...
Nyess says: ...when Crett came and had Jonin arrested. -
<say arrested>Nyess says: Crett works for the city as a tax collector.
Nyess says: He reported that Jonin was refusing to pay and had him arrested. Nyess says: After the cityguard left, Crett said that he could set things right for my brother if properly persuaded.
Nyess says: UGH! That creep! -
<say jonin>Nyess says: That's my brother. He's been wrongfully imprisoned because of Crett.
-
<say cityguard>Nyess says: I know some of the guards. Jaamis sneaks me in to my brother's cell when possible.
Nyess says: He even lets me take Jonin food sometimes...
Nyess says: But he won't help me free my brother. -
<say jaamis>Nyess says: Jaamis is probably the last honest guard in the city.
Nyess says: But he is already risking much by letting me see my brother. -
<say cell>Nyess says: Jonin thinks he could break out if he could remove one of the bars on the window of his cell.
-
<say bars>Nyess says: Jonin says a file or chisel would work, but I would have to conceal it somehow to sneak it past the guards.
Nyess says: If you could figure out a way to hide a tool in some food and give it to me, I can smuggle it into Jonin's cell.
Nyess says: No one in the city will help me in fear of what Crett might do, but I've heard of a miller to the north that will do anything if the price is right.
Nyess says: Please hurry, Crett won't wait forever... -
Go to Aruwin's Windmill (directions from Wayhaven portal) -
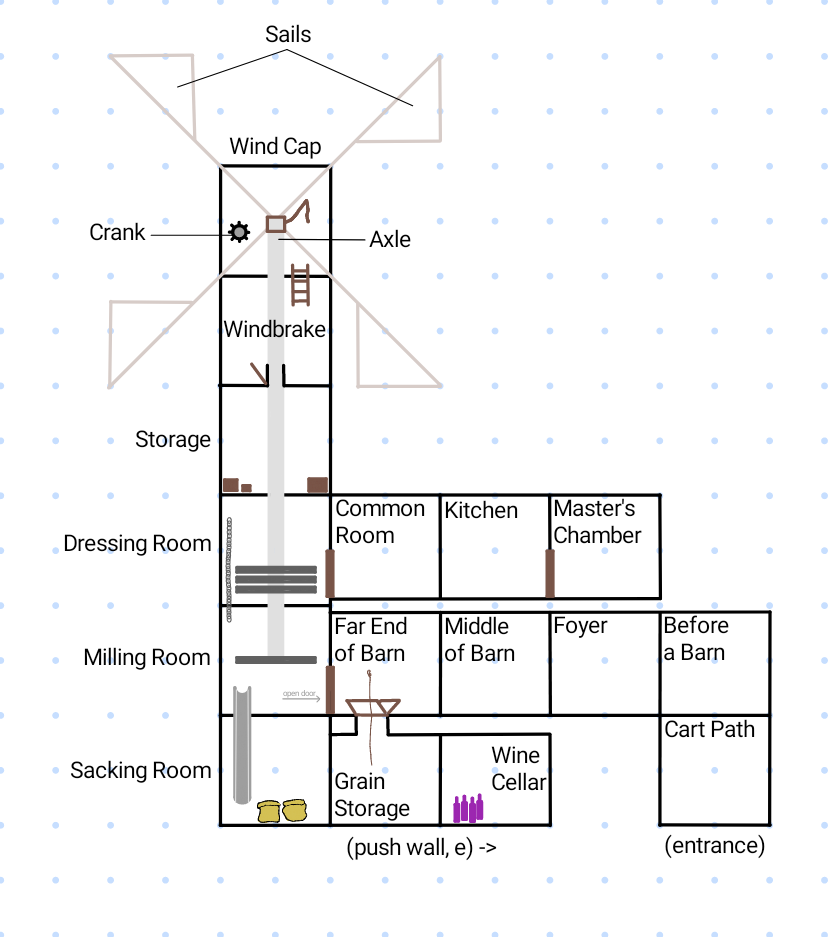
<12n, leave, 9n, path, n>Qinfo Note: This area contains 16 rooms. There are several things to search/look at, and many of them are relevant. Because of this, every room will be referred to by its short description. Everything here should be in proper order:
-
Before a Barn -
<search grass>- you may find a scythe, if not, it can also be found later in the Storage room. -
Collect the berries. When you look at the bush, it will inform you of how to get the berries as well as what kind of berries to get -
-
<look at bush, collect raspberries> -
<look at bush, gather blackberries> -
<look at bush, pick blueberries>
-
-
Go to the Foyer -
<w, swipe ledger> -
Go to the Far End of Barn to lower yourself down to the Grain Storage -
<2w, untie rope, open trapdoor, hook [your name here], lower [your name here]> -
Correct the pallets (and you'll pocket a parchment) -
<double-check sacks, double-check pallets, double-check inventory>You notice two of the pallets don't match the tally sheet in the ledger. One is short a sack and the other has an extra. You quickly shift the extra sack to the pallet that is short, correcting the tallies. While doing so you notice a piece of parchment in the dust under one of the pallets and quickly pocket it.
-
Find the secret opening -
<push wall, e>and you'll enter the Wine Cellar -
While in the Wine Cellar, you can talk to Ex-Journeyman Masak for backstory (though it may not be necessary to complete the quest) -
<say hi>Masak eyes you suspiciously.
Masak says: What do you want?
Masak says: It wasn't my fault. -
<say death>Masak says: Drayin was one of the apprentices.
Masak says: He was our best sacker. He died because Aruwin is nothing more than a drunk.
Masak says: I got the mage who enchanted this room to curse him too. -
<say curse>Masak chuckles.
Masak says: I spoke to the mage privately about Aruwin's drinking when he was enchanting this room. Masak says: I convinced him to only let master Aruwin get two bottles a day from the shelves.
Masak smirks and then frowns.
Masak says: I guess it didn't do Drayin any good though. -
<say drunk>Masak points at the shelves.
Masak says: You don't think these are just for show do you?
Masak says: Anyhow, one day we were all working and I heard a thunderous crash from the milling room.
Masak says: When I got to the room I saw the "master" passed out on the floor.
Masak pauses, nearly in tears.
Masak says: Looking through the hole I saw Drayin, crushed by the runner stone.
Masak says: I was such a fool! When the constable, Drayin's father, came Aruwin quickly placed the blame on me.
Masak says: I was stunned. Masak says: The next thing I knew, my apprenticeship was ended and my life was ruined. -
Go to the Storage room.
<2w, 3u>The Storage room can be the home to many items. If they are not found now, you should find them later throughout the quest.
-
Acquire the scroll (though do NOT read the scroll yet) -
<search cases, break seal> -
If you still need the chisel and scythe:
Get the chisel -<look at chisel, nab chisel>
Find the scythe -<look at joist, search joist> -
Return to the Middle of Barn -
<2d, open door, 2e, pedal, sharpen scythe, swipe tongs, pickup ember, get coal> -
Continue looking for the chisel if it was not found in the Storage room -
<borrow chisel> -
Dressing room -
<look at pile, look at items, fish chisel out of pile> -
Go to the Cart Path - (directions from Middle of Barn)
<2e, s> -
While on Cart Path: (if you still haven't located the scythe)
<look at flatbed, look at canvas, look at metal, search metal> -
You'll need to harvest wheat (a farmer may attack you) -
<harvest summer wheat>--- repeat this at least FOUR MORE times, or for as many as you can.81 : Farmer
-
Optional:
Find the book, 'Gussimir's Milling Principles' (it is a very long winded description of how you mill flour, which can vaguely assist in understanding the process you are about to endure) -
<>Get the key from Master Aruwin to get inside his room for the book (he moves around inside the mill). You can either kill him and take the key or pay him 200 coins for it -
<say deal>. He may alternatively want a bottle of wine which can be found in the wine cellar.You whisper to Aruwin: deal Aruwin ponders a moment.
Aruwin says: You look pretty smart... here's what I can do for you.
Aruwin says: I'll give you access to the books in my study in exchange for 200 coins.
Aruwin says: With the information in there you could use the mill to fill your own order.<give 200 coins to aruwin>Aruwin says: A deal's a deal. Here's the key to my room.
Go to the Master's Chamber (directions are starting from where you lowered yourself into the grain storage) -
Aruwin hands you a small steel key.
Aruwin says: The manual is in there somewhere.<w, 2u, open door, 2e, unlock door, open door, e, look at bookshelves, peruse titles>and you should now have a copy of Gussimir's Milling Principles. -
Pick up the rest of the ingredients starting in the Kitchen -
<w, search cabinets>(you should now have dough in your inventory) -
<search pantry>- you should now have a honey pot in your inventory -
<get milk> -
<look at dishes>- Note what the description tells you to do as it changes the syntax to get the bowl.-
<nab bowl> -
<take bowl>
-
-
Go to the Common Room -
<w, look at nest>(you should now have an egg in your inventory) -
Find the sack. You need a sack to collect the flour following the next milling steps. There are at least 3 places you may find it:
-
Common Room:
<look at cot, look at pillow, empty and take the pillow> -
Storage: (directions from Common Room)
<w, u, look at string, look at sack, tug the sack out> -
Cart Path: (directions from Storage)
<2d, 4e, s, look at path, look at pull-offs, search weeds, look at wheel, look at thistles, move thistles, look at void, look at cart, look at flatbed, look at buckboard, look at sack, yank the sack out>
-
Common Room:
-
By now, you should have the following items in your inventory -
1 A canvas sack.
1 An ancient vellum scroll (unrolled).
1 A chicken egg.
1 A ceramic bowl.
1 A jug of milk.
1 A small honey pot.
1 A book entitled "Gussimir's Milling Principles" (open).
1 A small steel key.
1 A piece of bread dough.
1 A metal chisel.
1 A scrap of parchment.
1 A pile of charcoal briquettes.
1 A ledger book.
1 A pair of tongs holding a hot ember.
1 A bunch of fresh berries.
5 A pound of wheat grain. -
Read this first, as understanding the mill can help speed this process along --
There are several rooms of interest here that all work together. At the very top of the mill is where the fans wind sails are controlled. You face them to the wind and raise/lower them to get the axle spinning 'adequately', which will turn the mill several rooms below.
Just under this room is the Brake Room. If the brake is engaged, the axle will not spin.
Two rooms below the Brake Room is the Dressing Room, which is where you prepare the flouring millstone you need to use by 'dressing' it with the chisel, then lower it via chain into the next room below, the Milling Room.
In the Milling Room the stone turns and grinds the wheat. The gap in the stone must be adjusted, and the chute which drops grain into the mill stone must be adjusted to drop grain.
Below that is the Sacking Room, which catches the prepared wheat from above. You gather this with a sack from the area.
With all of that being said, there is a chance during this process that a room involved might reset, which could very well disrupt the process and result in 'under processed' or 'over processed' wheat. It might be worth checking everything over a few times as you go. If you got more than one wheat in the first room, you have multiple tries to make it work. Now on to the instructions for milling. -
First you will want the correct stone in the milling room to use. When you begin the quest, the hulling millstone is in the Milling Room, but you need to follow the directions given so that you can swap it for the flouring millstone. Go to the Dressing Room -
Directions from Common Room -<w>
Directions from Storage -<d>
Directions from Cart Path -<n, 4w, u>
-
Once in the Dressing Room, first step is removing the hulling millstone and replace it with the prepared flouring millstone -
<lower chain, d, hookup hulling, u, raise chain, unhook hulling, dress flouring, hookup flouring, lower chain, d, unhook flouring>Note: If the<unhook hulling>syntax did not work,<unhook set 1>has also been successful. - You're in the Milling Room, and you should now see - A set of flouring millstones rigged and ready to use.
-
Now you'll need to look at the gap, see if it needs to be adjusted -
<look at gap>
To increase gap -<pull lever 1>
To reduce gap -<push lever 1>
<look at gap>after each adjustment. Do this until you read - The gap between the stones look good. -
Now use the second lever to engage the wheel -
<push lever 2>You push the lever engaging the cog with the grinding shaft and runner support.
-
Move the chute to be above the millstone -
<swivel chute>You swivel the chute over the millstones.
-
Open the flow gate -
<swing gate open>You swing the flow gate open.
-
Go to the Windbrake -
<3u, look at mechanism, disengage brake, climb ladder>(the ladder is a hidden exit to the Wind Cap) -
Step 47: Once in the Wind Cap, prepare to spend a very long time in this room -
<raise sails>THREE times to start it. -
Summon the wind (you can read the scroll one more time to summon the wind if this attempt does not work) -
<read scroll>and wait for an emote about the wind.As you incant the words you feel wisps of wind swirling around you. Raw power flows from the scroll to the surrounding air. The very air shimmers and then suddenly tendrils of light radiate outwards, through walls and all barriers, to the sky above.
After a few moments the wind steadies and gently caresses you.
A soft voice whispers into your ear: Receive my blessing and be filled with joy, for my very breath bestows life unto thee. -
Verify the winds direction -
<look at vane>The weathervane is a sculpted bronze dragon belching forth a broad flame. The flame serves as the guide fin of the vane, catching the wind and rotating the dragon. The dragon's tail ends in a spade and indicates the direction of wind, it is currently pointing north-northeast.
-
<turn crank clockwise>(you can also<turn crank counter-clockwise>) - to match the winds direction. For example, if the vane is pointing northeast, turn the crank until it is northeast as well. -
Once the crank has been matched to the vane, the axle will start turning. This is a tedious process. Keep looking at the axle. You will see messages about it speeding up, slowing down, as well as the current state. you need to see it moving adequately. If it is going too fast, lower the sails, too slow, raise the sails. -
<look at vane, look at axle>- After each adjustment, watch the axle to see how it is responding, until you see -The wind axle is adequately rotating.
While you're waiting for the axle to rotate adequately, feel free to check the following rooms below (but be quick about it) -
As SOON as The wind axle is adequately rotating quickly move on to the next step!
<d, disengage brake, 3d, look at stones>(to make sure they're not dull),
<look at gap>(to make sure the gap still looks good),
<push lever 2>(to make sure the cog is still engaged),
<swing gate open>(to make sure it's still open),
<3u, climb ladder, look at axle>(to make sure it's still turning),
<look at vane>(to make sure your crank is still in the same direction as the vane) -
Go to the Far End of Barn to load the wheat and open the chute which will deliver wheat to the stone -
<4d, open door, e, load wheat, pull lever> -
Go to the Milling Room -
<w, look at stones>- assuming everything is in place, you will see a room message that your wheat is being processed -The millstones rotate, processing some of the contents of the hopper.
Note: If you don't see this room message, something in one of the rooms may have reset.<look at stones>to see if they're dullThe top and bottom stones are symmetrical. The grooves are designed in such a way as to scissor the individual grains over and over again as the stone spins and pushes the grains outwards. The millstones'
As seen in the above example, the grooves are dull and need to be redressed.
grooves are dull and need to be redressed .
The set of millstones has been rigged for use. -
<u, lower chain, d, hookup flouring, u, raise chain, unhook flouring, dress flouring, hookup flouring, lower chain, d, unhook flouring> -
Go to the Sacking Room -
<d, look at cone>
In here you can<look at cone>to see how your wheat turned out. If the axle was spinning too fast, it can be over processed, or if the millstone is not dressed, it will be under processed. This can also happen if the gap is too large or small. The millstone or brake etc can unfortunately 'reset', and need to be checked again, re-engage the cog with the lever, swivel chute, etc (whew!). If you are getting under processed, look at the millstone and see if it is 'dull', and follow step 59. This can take a few tries, so having the extra harvest wheat is very helpful.Severely over processed wheat flour.
Under processed wheat flour.
Perfectly processed wheat flour. ← this is what you need -
If you do not have Perfectly processed wheat flour., go
<u>and return to step 47. -
To collect your wheat, be sure to have your sack -
<pull cord>You move the sack in place and pull the cord collecting the goods.
-
Perfectly milled wheat will appear in your sack. If you got under/over processed wheat in the sack, just
<get all from sack>and try again. -
Once you have your Perfectly processed wheat flour, the milling is now done! Time to wrap this up as the rest is very easy. Head to the Kitchen -
<2u, open door, 2e> -
Kitchen -
<start fire, get flour from sack, mix ingredients>You begin to make the dough:
You add the milk, honey, and yeast.
Then after a few minutes you add the egg and flour.
Then you knead the dough.
Then you let the dough rise.
Then you add the berries and knead the dough some more...
Then you let it rise again...
..and voila, you have bread dough ready for baking!
Now's the time to 'insert' any last minute ingredients... -
<insert chisel>You insert the chisel into the dough and shape the loaf as to hide it within.
-
<bake bread>You place the dough in the center of the oven and watch with hungry eyes as it begins to bake.
The kitchen is slowly filled with the heavenly aroma of fresh baked bread.
After what seems to be an eternity the bread is finally ready. The loaf has puffed up somewhat and the crust is a luscious golden brown. You mouth is already watering as you take the bread from the oven. Nyess better appreciate this, because you're ready to gobble this up! -
Return to Wayhaven -
<2w, d, open door, 4e, s, path, 9s, enter, 12s>
WARNING: correct syntax is required at this next step or the quest will fail and you will have to start from the beginning. Ensure you type "nyess" here, NOT "woman"!
-
Find Nyess -
<give bread to nyess>
As stated at the warning before this step, if you attempt to 'give bread to woman', the quest will fail and you will have to try again!You give Nyess the loaf of honey whole-wheat bread with Chisel hidden inside.
Nyess says: Thank you so much!Quest solved!
Nyess says: I'll get this to my brother right away!
Nyess kisses you and hurries out of the room.