Crystals of Ao
<questlist 95> / <questlist crystals of ao>
Four Crystals.
Four Dragons.
One Queen.
One Quest.
Are you the Hero she seeks?
Search in the Realm of Fantasy
Thinking : (6/10)Exploring : (10/10)Fighting : (10/10)
Quest Point Value : 90Designed for Levels: 60+
Created by : Rumor
Once per Reboot : No
Quest Instructions
This walk-through is based on the notes written by Prism.(last solved and updated: May 2022)
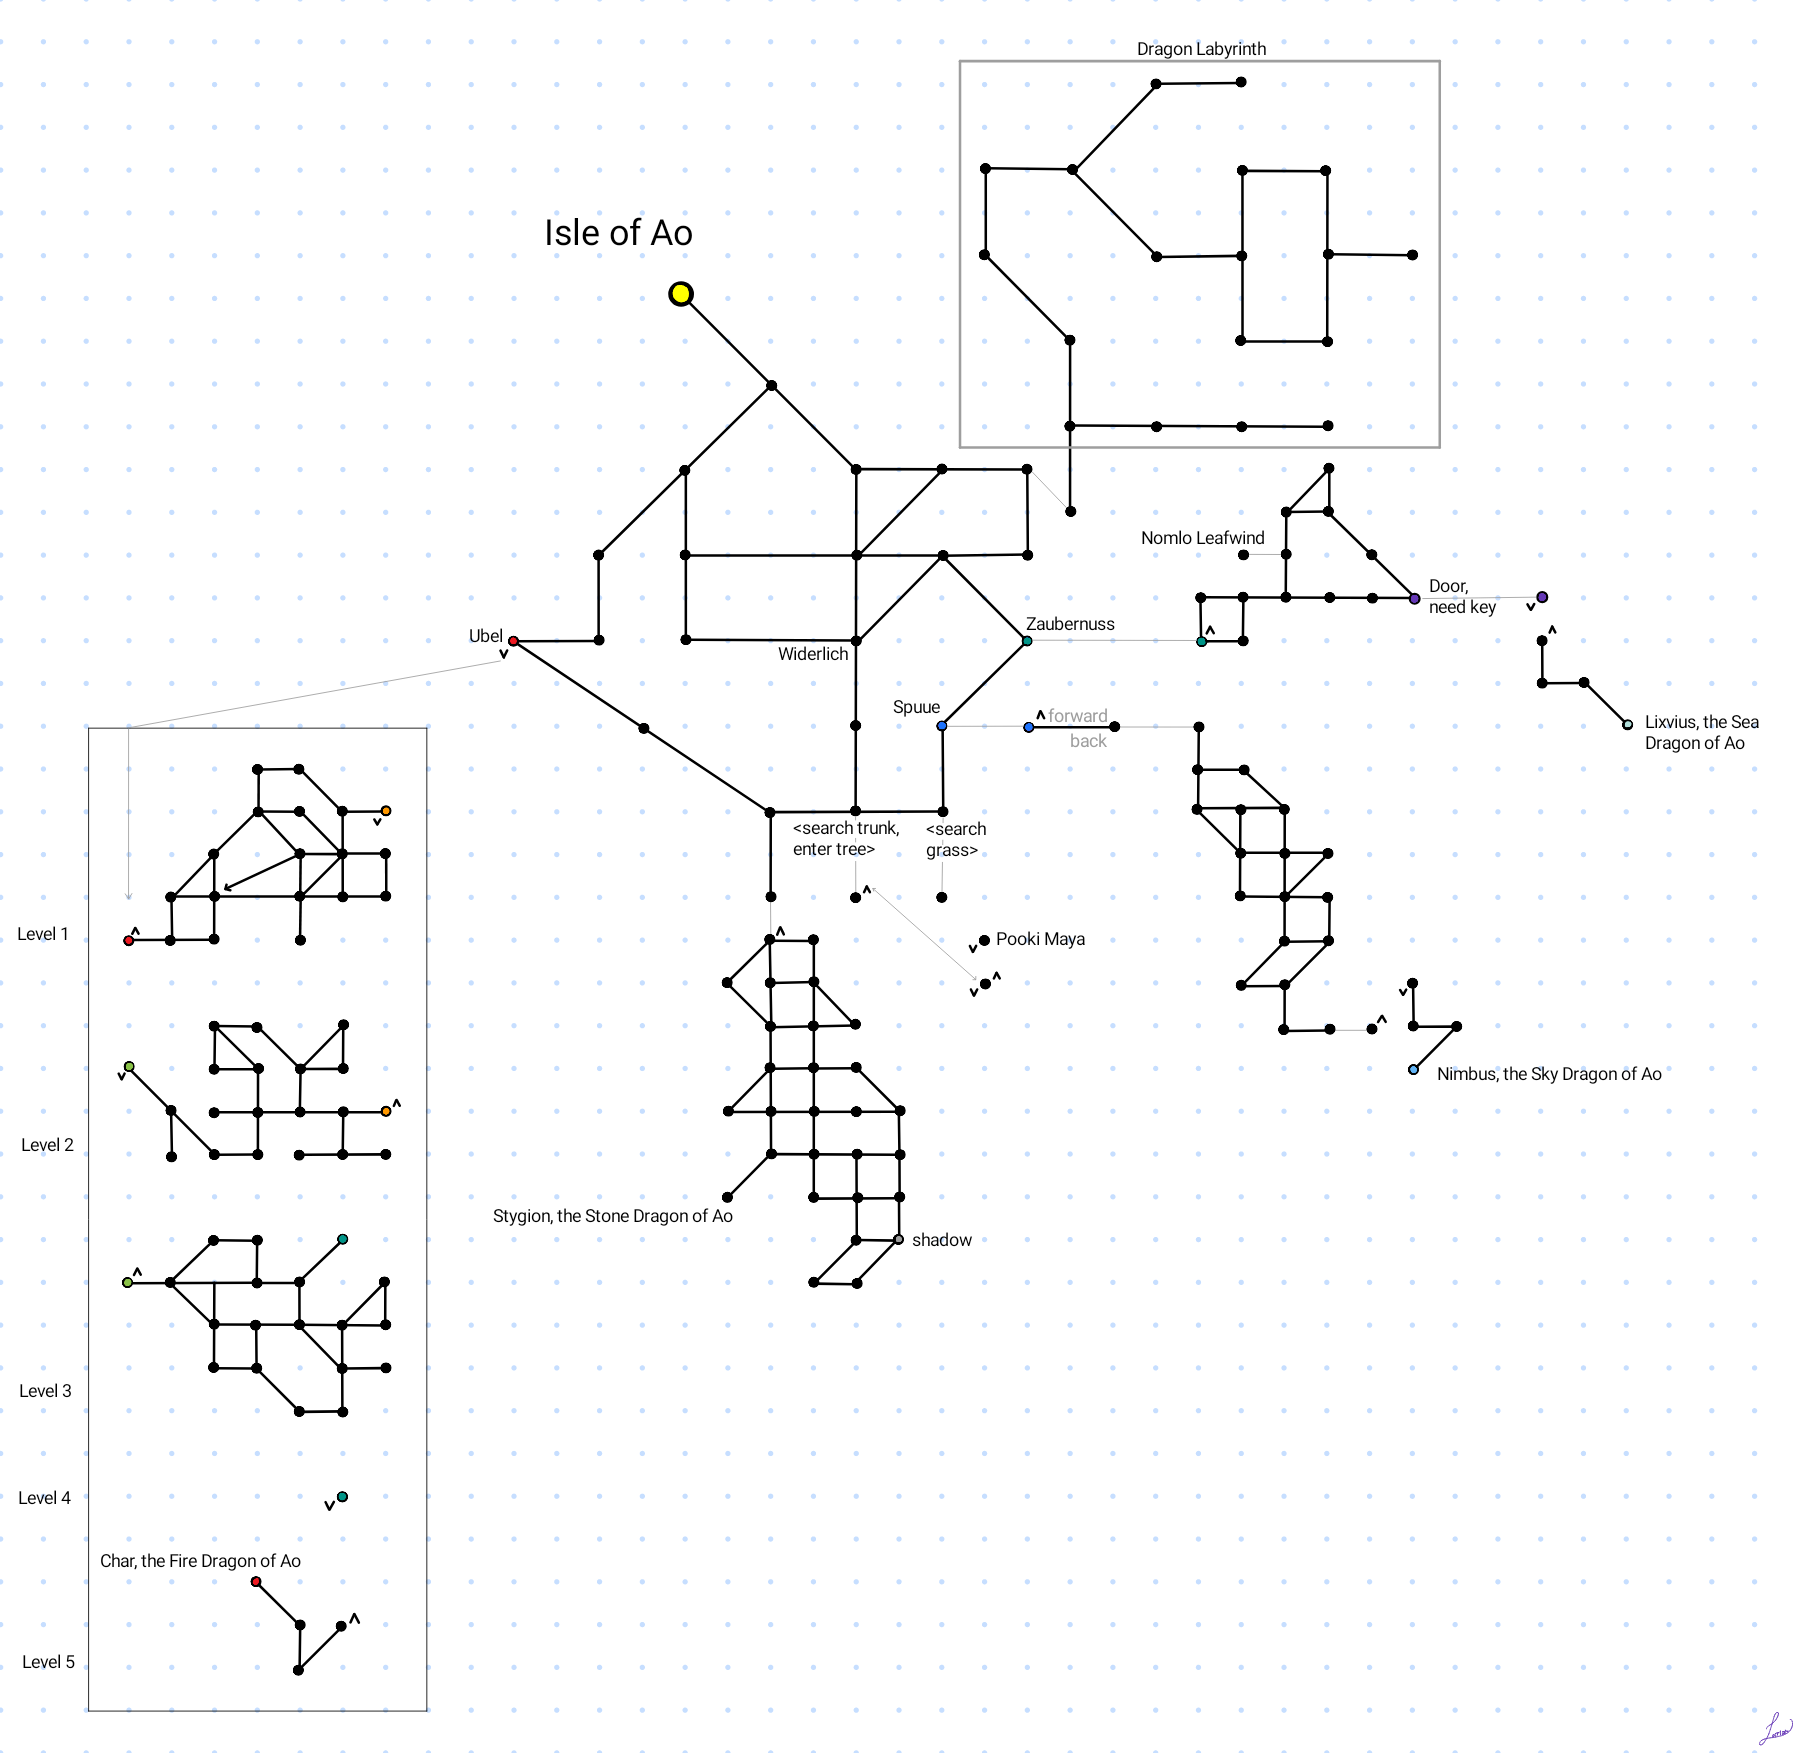
Objective: Get the four crystals from the four dragons of Ao and return them to Queen Pooki Maya. To do so, you will have to travel to many areas created by Rumor.
Important Quest Notes: You'll need at least 3,000 coins in order to buy a ferry pass and rent a carpet (at least 2 times). Additionally, if you have followers, it WILL have the potential to not grant you the item(s) you need to move on to the next step. When fighting dragons, either leave them in another room (in a room outside of the labyrinths) or don't summon them.
-
Travel to the Isle of Ao.
From Fantasy -<portal, 7w, 8s, e, buy pass, charter ao> -
Head towards the secret entrance -
<2se, 2s, kill widerlich>60k : Widerlich
-
Find the Queen -
<2s, search trunk, enter tree, 2u> -
<say hi>Pooki Maya says: Hello Locrian. Have you come seeking the Faerie Folk?
-
<say quest>Pooki Maya looks at you closely.
Pooki Maya says: Indeed, I have a quest if you are up to the task. Eons ago, the dragons stole the crystals that harbor the faerie folk. Collect all four crystals and proffer them to me. I will be forever in your debt if you succeed! -
<say crystals>Pooki Maya says: If you wish to help me, kneel before me and I will grant you the clarity to begin your quest.
-
<kneel pooki>As you kneel before Pooki Maya, she magically grants you the clarity necessary to pass the dragon's gate.
-
Locate the first dragons labyrinth. Head towards the shores -
<2d, out, w, 2nw, kill ubel>62k : Ubel
-
Find the hidden entrance -
<look at drop, climb ladder, enter>Important Note: You'll come across MANY aggressive enemies in ALL of the Dragon Labyrinth's.
270k : Ophidian Guardian
275k : Ophidian General
130k : Ophidian Shaman
233k : Ophidian Tracker
155k : Ophidian Warrior
98k : Ophidian Worker -
Make your way through the labryinth. Note: I will list the direct path to Char, the Fire Dragon, but while travelling through the labryinth, you will lose your footing and end up in a different room within that same level. If possible, refer to the map when this happens to reorient yourself.
-
<2e, 2n, ne, n, e, se, e, d> -
<3w, s, w, 2nw, d> -
<4e, ne, search northern wall, search script, d> -
<sw, n>
-
-
Original qinfo states that Char is Class 1 million and NOLEAVE, so make sure you prepare yourself. He is not aggressive -
<nw, kill char>636,030 : Char, the Fire Dragon of Ao
As the mighty dragon slumps into death, a small trinket falls from his claws and into your grasp. A thought rings clearly in your mind, take this crystal and seek its match across the eastern waters of the isle. -
You should now have the Red Crystal of Ao in your inventory. Leave this labryinth -
<se, s, ne, u, search wall, flip switch>
Make your way out of level 3 -<sw, 4w, u>
Make your way out of level 2 -<2se, e, n, 3e, u>
Make your way out of level 1 -<w, nw, w, s, 2sw, s, w, exit, climb cliff> -
Head towards the 2nd dragon labryinth -
<e, n, 2ne, se, s, e, se, kill zaubernuss>73k : Zaubernuss
-
Search the bay for the secret entrance -
<search bay, enter>Grasping the crystal you won from Char, you scan the bay for any sign of your next destination. On the far side of the water, you see the faint outline of a distant island. You excitedly dive into the water, swimming with all your might in order to reach the mysterious shore.
-
Just like in the first labyrinth, you will slip and fall somewhere through the labyrinth which brings you to a different room on the same floor. You'll have to reorient youself again. Find Nomlo Leafwind in the hidden room -
<n, 2e, n, search wall> -
<say help>Nomlo nods enthusiastically.
Nomlo says: My foot is caught in the hole. If you will free me, I will tell you a secret before I go!
Nomlo asks: Can you help me? -
<free nomlo>Working quickly, you manage to free Nomlo's foot from the hole. He smiles as he rubs his foot gingerly.
Nomlo says: Thank you so much!
Nomlo says: I need to depart before the Ophidians find us, but let me offer you this secret in return for your assistance. I buried a key in Xaxis long ago. It's protected with magic, but if you had my magic shovel, you just might be able to retrieve it. It could be just the thing you need to further your quest!
With that, Nomlo turns and sprints away into the darkness! -
Go to the library to research Tookwich -
<exit, s, 2w, s, exit, swim back> -
<nw, n, w, 2nw, board ferry>...wait -
<w, 5n, 2e, 2s, lookup tookwich>After an exhaustive search you finally find something relevant. Excerpt from the journals of Nomlo Leafwind:
Tookwich, the place of my birth, the home I left behind to seek my adventures out in the world. I haven't seen that quiet little town in decades now, though I doubt much has changed. A secret place, not visited often by strangers.
Long ago we hobbits were a more social lot. I'm not saying we were adventurers like the elves or explorers like the dwarves, but you'd see us on the roads from time to time. Not anymore.
The rampaging orcs saw to that. Filthy creatures. Destroyed our homes, killed our kin. After the Mage Wars concluded we slowly disappeared from the common knowledge of most folk.
We helped grow the forest thick and wild around our town to hide it from sight. We stopped our travels, keeping to ourselves and shutting out the evil that grows daily throughout the realm.
I agreed with this position for the sake of our families, for the sake of our history. I knew we weren't the warring sort. Don't get me wrong, we had our share of glory over the centuries, but all in all we were a peaceful honest folk. Not meant for the villainy and bloodthirst that runs rampant today.
My town lives on I'm sure. Safe and secure in its hidden portion of the northern forests. I had to leave myself. Always a bit different I'm afraid. A different blood runs through my veins. Some say I'm a half breed, although my mother never admitted as much. Whatever the reason, I needed to move on. To explore the lands regardless of the danger. Someday I'll return home. I was born there, figure I ought to be buried there as well. -
Go to Tookwich now -
<2n, 2w, 3n, 7e, 12n, leave, 10n, 7w, n, path> -
Find Janbee Leafwind -
<se, 3s, se, search wall, kill janbee>27,329 : Janbee Leafwind
-
<pull latch, search tools>- you should now have a Magic Shovel in your inventory -
Travel to Xaxis -
<out, nw, 3n, nw, path, 13s, 6w, rent carpet> -
Find the key. This may or may not have multiple locations around the city -
-
<4e, 4s, w, dig up soil> -
<4e, 4s, dig up soil> -
if not found in location 1 or 2,
<dig up soil>in every room until you find the key
-
-
Exit Xaxis -
-
to exit -
<e, 4n, 4w, hop carpet> -
to exit -
<4n, 4w, hop carpet>
-
to exit -
-
Go back to the Isle of Ao -
<n, 12e, enter, 5e, 8s, e, charter ao>...wait -
Enter the Labryinth for the Sea Dragon -
<2se, s, e, se, search bay, enter> -
Find the hidden door that needs the key (remember, you'll possibly slip while inside the labyrinth and appear in a different room, reorient yourself if this happens) -
<n, 5e> -
<unlock door>Slipping the iron key into the keyhole, you take a deep breath and slowly turn the key to the right. A great rumbling emanates from hidden hinges in the rock wall on the side of the door as the entire section of rock swings open to reveal a hidden chamber. The door immediately begins to swing shut again, so you duck inside just before it slams shut behind you.
-
More aggressive enemies on your way to Lixvius, the Sea Dragon of Ao -
<d, s, e, se> -
<kill lixvius>666,089 : Lixvius, the Sea Dragon of Ao
As the mighty dragon slumps into death, a small trinket falls from her claws and into your grasp. A thought rings clearly in your mind, take this crystal and seek its match beneath the home of the Great Goblin. -
Make your way back to the shores -
<nw, w, n, u, flip switch> -
<5w, s, exit, swim back> -
Kill Zaubernuss since he blocks your way sw -
<kill zaubernuss>73,205 : Zaubernuss
-
<sw, look at drops, slide down drop> -
Make your way to the Great Goblin (aggressive enemies along this path) -
<forward, forward>90k : Maelicious
151k : Gibbergeist -
<search bed>- and you'll be brought to the Dragon Labyrinth for Nimbus. -
As is the same with the other labyrinth's, you will slip and be transported into another room of the labryinth. Re-orient yourself and continue on with the path -
<2s, se, s, e, s, sw, e, s, e, search wall, search dust, trace symbol> -
Aggressive enemies on your way to the dragon -
<u, s, e, sw, kill dragon>678,992 : Nimbus, the Sky Dragon of Ao
As the mighty dragon slumps into death, a small trinket falls from his claws and into your grasp. A thought rings clearly in your mind, take this crystal and its like to the golden tower. Seek the Supreme Archmage to learn his secret! -
Leave the labryinth -
<ne, w, n, d, flip switch, w, n, w, ne, 3n, 2w, 2n, climb up, back, back, u> -
Go back to Xaxis -
<ne, nw, w, n, 2nw, board ferry>...wait -
<w, 8n, 5w, leave, 12w, s, rent carpet> -
You'll have to kill many Sand and Stone Golems on your way to the top of the tower -
<2w, 2se, enter, se, u, w, u, ne, u>107,018 : Sand Golem
105,690 : Sand Golem
128,030 : Stone Golem
121,748 : Stone Golem
184,646 : Steel Golem
189,372 : Steel Golem -
<say quest>Tristar Auruetian says: You've heard of the crystals, have you? Well forget them. They are buried for good, just as they should be.
-
<say secret>Tristar Auruetian says: You want to know my secret? Find Christos. Kill him. Offer me proof of his demise. Only then will I reveal my secret.
-
Go back to the Isle of Ao -
<d, sw, d, e, d, nw, exit, 2nw, 2e, hop carpet> -
<n, 12e, enter, 5e, 8s, e, charter ao>...wait -
<2se, 2s, kill widerlich>62,338 : Widerlich
-
Find the secret path -
<2s, w, search ground> -
<s, enter>- and now you're in the 4th labyrinth -
As is with the previous 3 labryinth's, work your way through, re-orient yourself when you lose your footing -
<5s, 3e, 2s, search shadow, enter circle> -
<search corpse>Despite your revulsion, you dig your hands deeply into the corpse, searching for something worth looting. You come up with something truly disgusting and immediately drop it upon the floor. It looks like the dead mage's decomposing heart!
-
<get heart> -
<exit, 3n, 2w, 4n, w, u, n> -
<e, 4n, 2nw, board ferry>...wait -
<w, 8n, 5w, leave, 12w, s, rent carpet, 2w, 2se> -
Aggressive golems coming up while you travel through the Tower -
<enter, se, u, w, u, ne, u, offer heart>Tristar Auruetian takes the dead heart from you with an evil smile.
Tristar Auruetian says: Thank you for giving me the proof I need of Christos' demise. The secret to finding Stygion is to possess three of the four crystals of Ao along with a vial of magic powder I've spirited away somewhere around here. By sprinkling the powder at Stygion's door, you can then enter Stygion's passage below the cliffs on the southern end of the Isle. -
<d, sw, d, e, search drawers>You find a tiny vial in one of the drawers!
-
You should now have a tiny vial of red powder in your inventory. Go back to the Isle of Ao -
<d, nw, exit, 2nw, 2e, hop carpet, n, 12e, enter, 5e, 8s, e, charter ao> -
<2se, 2s, kill widerlich>61,846 : Widerlich
-
<2s, w, s, enter, 5s, sw, sprinkle powder>Dubious as to whether it will work, you nevertheless attempt to sprinkle the vial of red powder upon the door. Miraculously, the cork in the vial disintegrates and the powder splashes along the door, making the rock translucent. Before doubt can set in, you step through the door and wind up on the other side!
-
Aggressive Guardian's along the way -
<d, s, w>347,753 : Ophidian Guardian
335,533 : Ophidian Guardian -
<sw, kill dragon>766,926 : Stygion, the Stone Dragon of Ao
As the mighty dragon slumps into death, a portal appears before you and a small trinket falls into your grasp. A thought rings clearly in your mind: Return the four crystals to the Faerie Queen. Your quest is almost complete! -
You should now have the Black Crystal of Ao in your inventory. Now return all 4 crystals to Pooki -
<enter portal, ne, 5n, u, n, e, enter tree, 2u> -
<proffer crystals>As you proffer the Crystals of Ao to Pooki Maya, she smiles joyously.
Pooki Maya says: You have returned my people to me! I am forever in your debt.
Pooki Maya continues: As a token of my appreciation, I hereby grant you eternal access to the forbidden hunting grounds of the Ophidians that you so valiantly defeated. They use this place to hone their fighting skills, but you have proven yourself to be their equal in the ways of war. Seek the entrance on the northeastern corner of the isle!
Quest complete!
To get to the forbidden hunting grounds: <2d, out, 4n, 2e, search plants, se, enter>
Or
To return to Fantasy: <2d, out, 4n, 2nw, board ferry> ...wait <w, 8n, 7e, portal>
See also: Aon marble quest