Heart of the Cosmos
<questlist 47> / <questlist heart of the cosmos>
The cosmos is in dire straits. Its heart has somehow become damaged and the energy that sustains all being is pouring out into nothingness. If nothing is done about it soon, we may no longer need to worry about existence. Apparently the incarnations of the cosmos have created a conduit for mortals to traverse, in hopes that someone will be able to help.
NOTE: You may seek assistance with the fighting of one monster in this quest. You will know which one. For everything else, you are on your own.
Search in the Realm of Chaos
Thinking : (4/10)Exploring : (3/10)Fighting : (9/10)
Quest Point Value : 25Designed for Levels: 35+
Created by : Takamori
Once per Reboot : No
Quest Instructions
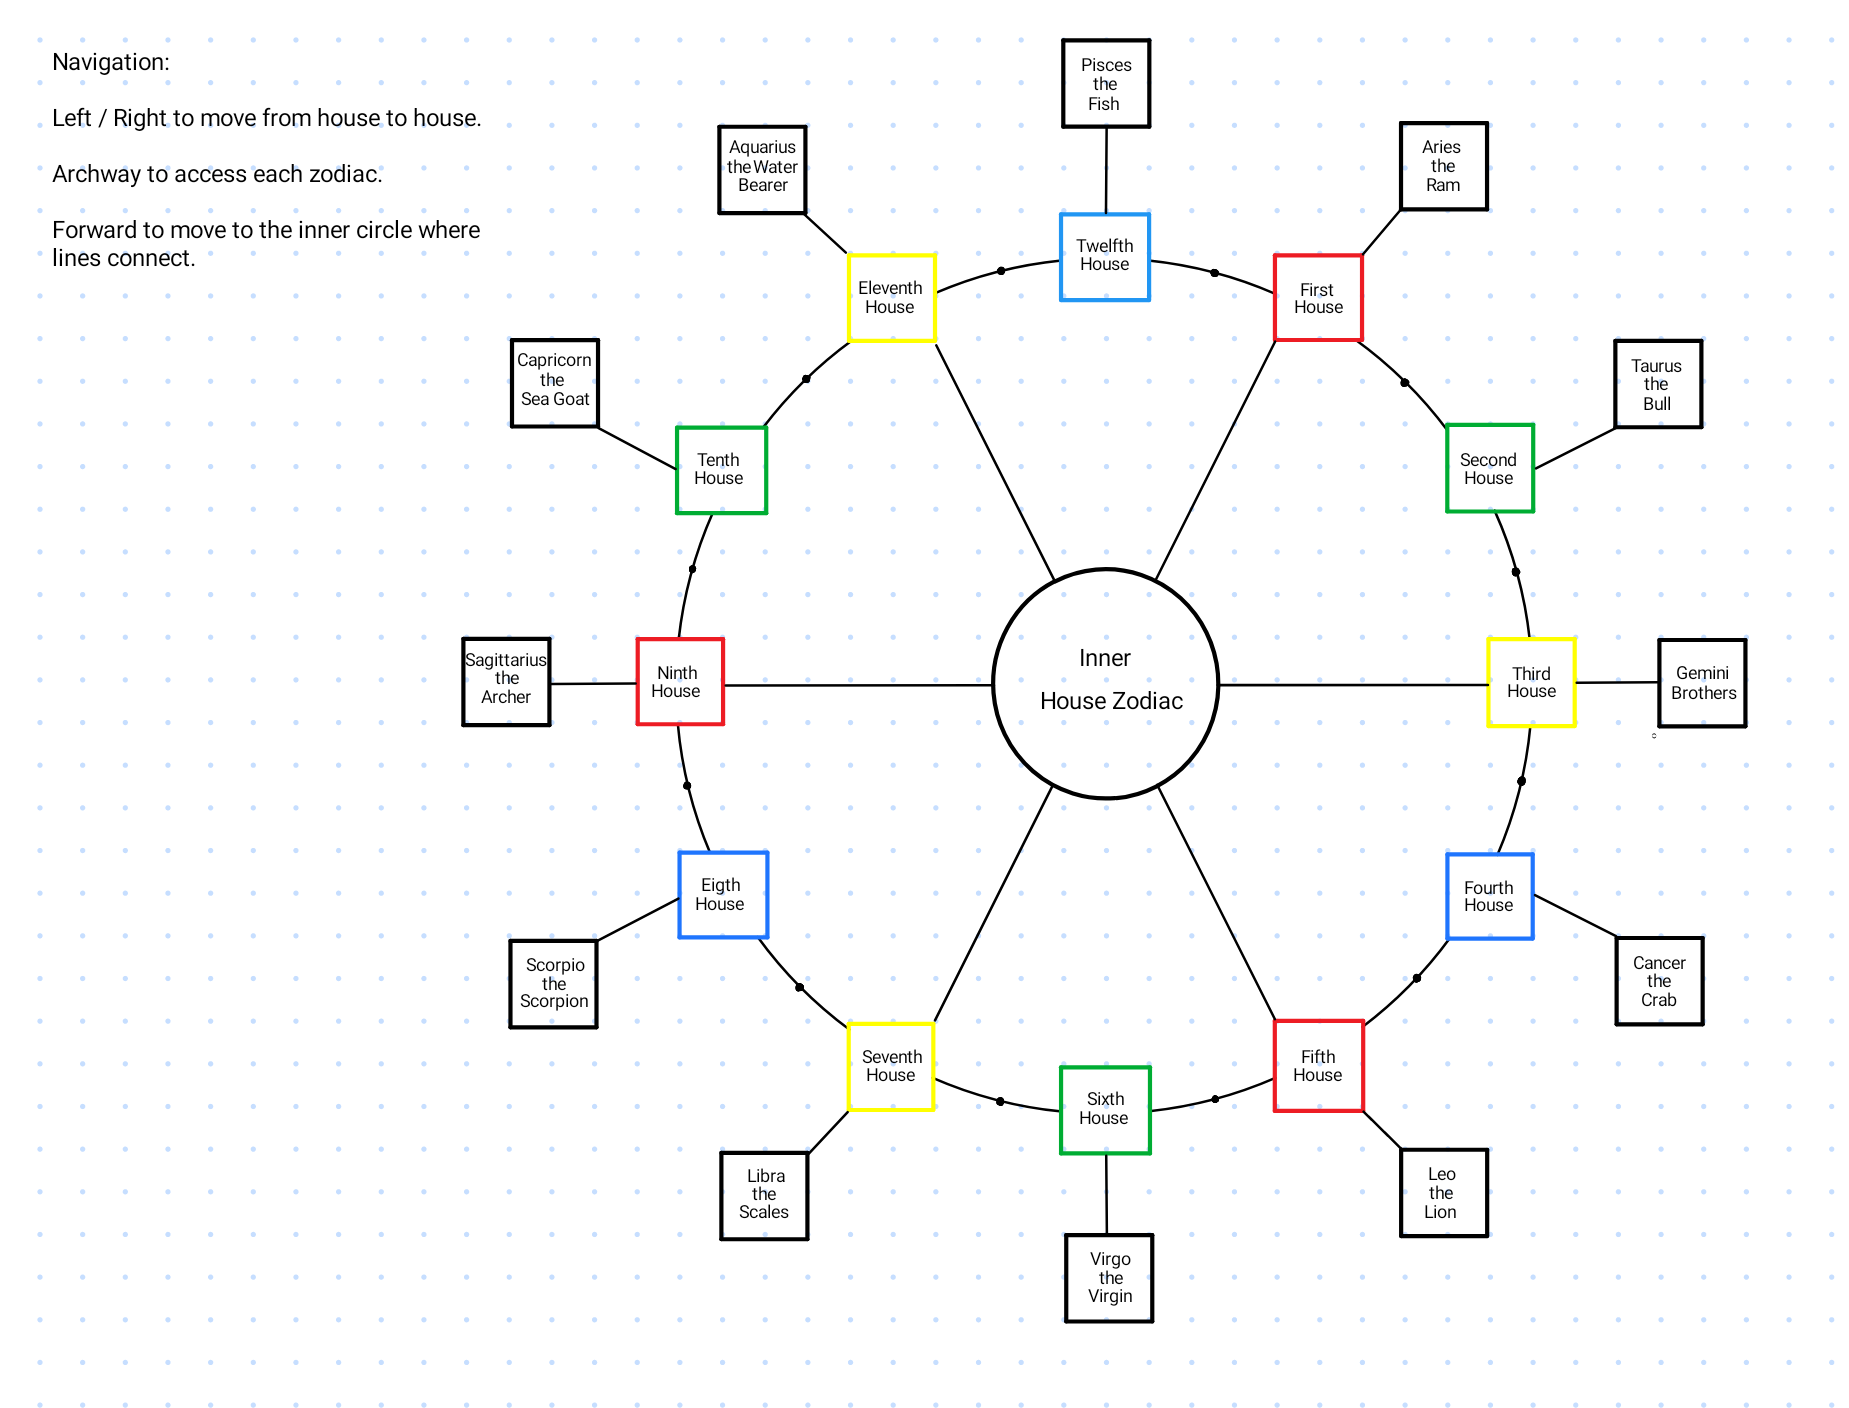
(last solved and updated: December 2022)IMPORTANT NOTE: The area is a big circle of astrological houses (going left or right will inevitably get you back to the same room you're in), with hallways in-between each house. Within each house is an archway leading you to a room with the appropriate sign and while standing in a house, your exits are portal, right, archway, and left (with forward being an extra exit in houses 1,3,5,7,9, and 11). Your goal is to go into each archway, kill the mob that is inside and get the gem that they drop. DO NOT try to put the gems in a sack as they will drop and break, causing you to wait until the room resets to kill the enemy again.
Consider this quest to be like a puzzle. You need to
<search marking> along your journey to find YOUR clue. Clues can be different from one player to the next, so pay close attention to your clue in order to solve the puzzle. You'll also need to search the rainbow before you enter into each archway so that you can find the HUGE shards that are hidden.
Example of the clue given:
<search marking>
There is a small design next to the marking. It is a small diagram showing four dots of the same size, but of four different colors.
The clue from the marking above tells us that once we have all of the shards, we need to place all of the SMALL shards into the grooves and forge, then all of the MEDIUM shards in the grooves and forge, then all of the LARGE shards into the grooves and forge, and finally place all of the HUGE shards into the grooves and forge.
Another possible clue given is:
<search marking>
There is a small design next to the marking. It is a small diagram showing four dots of the same color, but of four different sizes.
The clue from this marking tells us that once we have all of the shards, we need to place the shards with the same COLOR into the grooves and forge instead of all of the same sizes like the other clue.
More detail will be given after all shards are collected.
-
Locate the USA Today Newspaper that roams around (A piece of USA(r) Today) -
<study horoscope>and this will bring you to the cosmos area. -
Presuming that you're inside the First House (if not, travel
<left>until you are). -
Acquire the small ruby shard within the First House -
<archway, kill ram>16,393 : Aries the Ram
-
<get shard, archway, left, left> -
Search for your clue and a huge shard in the Second House -
<search rainbow>(you should find and automatically pick up a large hunk of an emerald) -
Acquire the small emerald shard within the Second House -
<archway, kill bull>32,388 : Taurus the Bull
-
<get shard, archway, left, left> -
Acquire the small diamond shard within the Third House-
<archway, kill brother>32,258 : A Gemini Brother
14,303 : A Gemini Brother -
Step 9:
<get shard, archway, left, left> -
Acquire the small sapphire shard within the Fourth House -
<archway, kill crab>35,068 : Cancer the Crab
-
<get shard, archway, left, left> -
Search for your clue and a huge shard in the Fifth House -
<search rainbow>(you should find and automatically pick up a large hunk of a diamond) -
Acquire the medium ruby shard within the Fifth House -
<archway, kill lion>20,778 : Leo the Lion
-
Step 14:
<get shard, archway, left, left> -
Acquire the medium emerald shard within the Sixth House -
<archway, kill virgo>- Virgo is not hard, but constantly pleads for you to stop fighting, therefore you have to constantly re-engage combat29,923 : Virgo the Virgin
-
<get shard, archway, left> -
Search for your clue and a huge shard in the hallway between the Sixth and Seventh Houses -
<search rainbow, left>(you should find and automatically pick up a large hunk of sapphire) -
Acquire the medium diamond shard Seventh House -
<archway, kill libra>17,771 : Libra the Scales
-
<get shard, archway, left, left> -
Find your clue in front of the Eighth House! -
<search marking>- and remember what it says. -
Acquire the medium sapphire shard within the Eighth House -
<archway, kill scorpion>35,946 : Scorpio the Scorpion
-
<get shard, archway, left, left> -
Acquire the large ruby shard within the Ninth House -
<archway, kill archer>34,047 : Sagittarius the Archer
-
<get shard, archway, left> -
Search for your clue and a huge shard in the hallway between the Ninth and Tenth Houses -
<search rainbow, left>(you should find and automatically pick up a large hunk of a ruby) -
Acquire the large emerald shard within the Tenth House -
<archway, kill capricorn>16,135 : Capricorn the Sea-Goat
-
<get shard, archway, left, left> -
Acquire the large diamond shard within the Eleventh House -
<archway, kill aquarius>31,556 : Aquarius the Water Bearer
-
<get shard, archway, left, left> -
Acquire the large sapphire shard within the Twelfth House -
<archway,kill fish>15,373 : Pisces the Fish
-
<get shard, archway, left, left> -
At this point, you should have 4 small shards, 4 medium shards, 4 large shards, and 4 huge shards, with each size containing a ruby, sapphire, diamond, and emerald (if not, make another round to search every room for anything you may have missed). Presuming that you're standing in the First House,
<forward, look at flags> - There are four standards placed symmetrically about the room. Each bears a plain flag of a different color. One flag is solid red, one is solid blue, one is solid white, and one is solid green.
-
Original qinfo states: the order of the flags gives you a clue on the order to combine the gems in.
During the time this quest was completed, the flags were listed in order from red, blue, white, and green. Therefore, the syntax typed in was -<push red flag, push blue flag, push white flag, push green flag>
IMPORTANT: Eternus will apear now. As soon as you kill him,<get hammer, hold hammer>!!! It's very important that you hold it, otherwise it will just fly away from you.
Additionally, as stated in the questlist information, you do not need to be the one to kill Eternus if you can't tank above class 100k mobs. It's only important that you be the one to get and hold the hammer. -
Now,
<kill eternus>132,103 : Eternus, The Smith of the Cosmos
-
At this point, you need to refer to the marking that you found while going from house to house. Remember, your clue will be specific to how you play out this next step. So far, there's a possibility of four different clues and there could be more. In what order you place the colors is up to you as long as you follow your clue directions. Below are some examples of what has worked.
-
If your clue read, "There is a small design next to the marking. It is a small diagram showing four dots of the same size, but of four different colors.", then you need to do the following (color placement was based on order of the flag colors):
<place small ruby in groove 1>
<place small sapphire in groove 2>
<place small diamond in groove 3>
<place small emerald in groove 4>
<forge>
<place medium ruby in groove 1>
<place medium sapphire in groove 2>
<place medium diamond in groove 3>
<place medium emerald in groove 4>
<forge>
<place large ruby in groove 1>
<place large sapphire in groove 2>
<place large diamond in groove 3>
<place large emerald in groove 4>
<forge>
<place huge ruby in groove 1>
<place huge sapphire in groove 2>
<place huge diamond in groove 3>
<place huge emerald in groove 4>
<forge>
-
If your clue read, "There is a small design next to the marking. It is a small diagram showing four dots of the same color, but of four different sizes.", then you need to do the following (assuming color placement would be based on order of the flag colors):
<place small ruby in groove 1>
<place medium ruby in groove 2>
<place large ruby in groove 3>
<place huge ruby in groove 4>
<forge>
<place small sapphire in groove 1>
<place medium sapphire in groove 2>
<place large sapphire in groove 3>
<place huge sapphire in groove 4>
<forge>
<place small diamond in groove 1>
<place medium diamond in groove 2>
<place large diamond in groove 3>
<place huge diamond in groove 4>
<forge>
<place small emerald in groove 1>
<place medium emerald in groove 2>
<place large emerald in groove 3>
<place huge emerald in groove 4>
<forge> -
If your clue read, "There is a small design next to the marking. It is a small diagram showing four dots. The middle two are the same color, but the surrounding two are different.", then you need to do the following (assuming color placement would be based on order of the flag colors):
<place small emerald in groove 1>
<place small ruby in groove 2>
<place medium ruby in groove 3>
<place small diamond in groove 4>
<forge>
<place medium emerald in groove 1>
<place small sapphire in groove 2>
<place medium sapphire in groove 3>
<place medium diamond in groove 4>
<forge>
<place large sapphire in groove 1>
<place large emerald in groove 2>
<place huge emerald in groove 3>
<place huge ruby in groove 4>
<forge>
<place large ruby in groove 1>
<place large diamond in groove 2>
<place huge diamond in groove 3>
<place huge sapphire in groove 4>
<forge> -
If your clue read, "It is a small diagram showing four dots. The last two are the same color, but the first two are different.", OR "There is a small design next to the marking. It is a small diagram showing four dots. The first two are the same color, but the last two are different." then you need to do the following:
syntax will be updated soon (hopefully)
<place small ruby in groove 1>
<place medium ruby in groove 2>
<place small diamond in groove 3>
<place medium diamond in groove 4>
<forge>
<place small emerald in groove 1>
<place medium emerald in groove 2>
<place small sapphire in groove 3>
<place medium sapphire in groove 4>
<forge>
<place large sapphire in groove 1>
<place huge sapphire in groove 2>
<place large ruby in groove 3>
<place huge ruby in groove 4>
<forge>
<place large diamond in groove 1>
<place huge diamond in groove 2>
<place huge emerald in groove 3>
<place large emerald in groove 4>
<forge>
-
If your clue read, "There is a small design next to the marking. It is a small diagram showing four dots of the same size, but of four different colors.", then you need to do the following (color placement was based on order of the flag colors):
-
Once you're done forging each set, you'll have this in your inventory:
A Beautiful Sapphire
Note: It has been noted that you may end up with dull gems. If this happens, you can still proceed with the remainder of the quest, don't worry (but you may not be able to get a stat boost from it).
A Beautiful Emerald
A Beautiful Ruby
A Beautiful Diamond -
<place ruby in groove 1, place sapphire in groove 2, place diamond in groove 3, place emerald in groove 4, forge, get gem>-
<hold gem>and it will give you indefinite +3 INT and +3 WIS, but only as long as you're holding it. This quest can be repeated later on, up to this step if you're only interested in the stat boost. If you continue with the quest though, you will drop the gem during the next step and lose the stat bonuses.
(many thanks to Kirwan's bravery to hold this very special gem in order to figure out that it gives you a stat bonus)
-
-
<staircase, heal cosmos>You plunge the Gem of the Zodiac deep into the sphere's wound! The gem flares brightly as you release your grip on it. You drop The Gem of the Zodiac (brilliant).
Quest complete!
Return to Chaos: <staircase, archway> (this will spit you out at one of the house entrances, keep going left until you're in the First House), <portal> - You'll now be somewhere in chaos (when I did it, I only had to go 2w to get to vortex, but you might have been transported somewhere else)