3K has a number of dungeons available which are personalized instances of specific areas. It can be your own private area to slay enemies or you can join up with others. Some of these dungeons can be scaled to increase or reduce the challenge, and others can not. Some have enemy resets linked to the instance, and some reset on the natural mud timer. Whatever the case, you should be able to find all the details you need here!
Many thanks to the 3k Wiki (this Wiki may no longer be online) and its many contributors for the scaler info which we have used to populate the tables here. The mirror for the 3k Wiki can alternatively be found here: 3k Wiki Mirror. Please feel free to contact us with any additional details you would like to see added here.
How to Scale Dungeons
Dungeon scaling changes from one dungeon to the next, and you will find few similarities between them. Scaling a dungeon to be equal to your mud level may also prove to be a challenge, as other factors can influence the compatibility significantly, most importantly would be your guild level. To scale, you simply type <scale #>, then step into the dungeon.
<scaler 0> will clear your scaler and cause any dungeon you enter to scale equal to your mud level. <scaler 1> will set it to the the lowest value in your scaler range. <scaler 150> will set it to the largest value in your scaler range (150 is the maximum scaler level). Scaling can be set as low as (Mud Level * 0.75) or as high as (Mud Level + 5). Purchasing the Scaler VAF's 1 and 2 will allow for lower and higher ranges.
Reset Type
Natural - Mobs will naturally reset inside the dungeon, and you can use eternal powers normally within the area. Timed - Mobs will only reset once the 'Can Reset' dungeon timer has reached 0. Mobs and room cannot be refreshed with eternal powers or other items.
Dungeons Command
List of Dungeons
Click on header to sort dungeons by column...
is equal to 1 known light source needed for the area.
Click on row to expand for more information.
Name
Class
(low)
Class
(high)
Aegis Global
[Kikipopo]
From Science: <enter, u, 4n, d, 18n, 25e, 4n, e, bridge, e, 2se, 2e, enter> Return to Science: <exit, 2n, w, enter>
From Science: <enter, u, 4n, d, 18n, 25e, 4n, e, bridge, e, 2se, 2e, enter> Return to Science: <exit, 2n, w, enter>
Area/Rating:
Science Aegis [Kikipopo] Monster class:
1.0000030000
30k to
1.0129000000
129M
Hit around:
No
Alignment:
Neutral / 181 mobs counted
Rewards:
Coins -
Reputation:
Aegis Global (see 'goal' in details)
Reset Type:
Timed, mobs will not respawn until dungeon has fully reset.
Dungeon Timer:
4 hours
Scaling:
Yes
Area Details:
Note titled 'Aegis Global (Rumor, Mon Jan 29 20:01:45 2007):
Aegis Global has never been very friendly to outside inquiries. A defense contractor of its size and power can afford to choose its own clients. No need to advertise.
That's what makes recent events so disturbing. The doors to its New York City headquarters stand wide open. There are whispers on the streets that something terrible has happened there. Something unnatural. And deadly.
This underground complex is large and anyone adventurous enough to look deeper into its recent mysterious circumstances should come prepared for any number of dangers. If you don't make it back in one piece, don't claim you weren't warned.
First few floors recommended for players level 50+. Lower levels... If you have to ask, don't try them.
Goal - Decrease your reputation to -25k to earn approval from Master Gunnery Sergeant Roosevelt Brown (located on level 5). <nod>, and he'll give you a passcard to access the vault on Level 7 (which is where the bodyarmor and shield can be located). Type <reps> to see your current reputation with Aegis Global.
Items - All four items; Flamethrower, Bodyarmor, Faceplate, and Forceshield are BoP (also known as Bind on Pickup). The resistances remain the same throughout each scaler (whether it's scaler 65 or 150), though you'll notice that the title description will change - example: 'Aegis Faceplate [polished]' at scaler 65 will turn into 'Aegis Faceplate [shimmering]' at scaler 150. It appears as though your SMD increases for the better with each description change. More details are being acquired and will be updated as we get them. As for the flamethrower, the weapon class increases as your scaler increases.
RESISTANCES: Bodyarmor: 65 edged, 65 blunt, 30 fire, 30 ice, 30 acid, 50 energy, 30 radiation Faceplate: 15 edged, 15 blunt, 30 fire, 15 ice, 30 acid, 30 electric, 15 energy Forceshield: 32 edged, 32 blunt, 20 fire, 20 ice, 20 acid, 30 energy, 20 radiation (block chance changes based on scaler) Flamethrower: fire damage (weapon class changes based on scaler)
*Note: Robots in Aegis do not drop corpses and you cannot use the passcard from one scaler on a different scaler, so make sure you <dispose passcard> once you leave the area.
Timed, mobs will not respawn until dungeon has fully reset.
Dungeon Timer:
6 hours
Scaling:
Yes
Area Details:
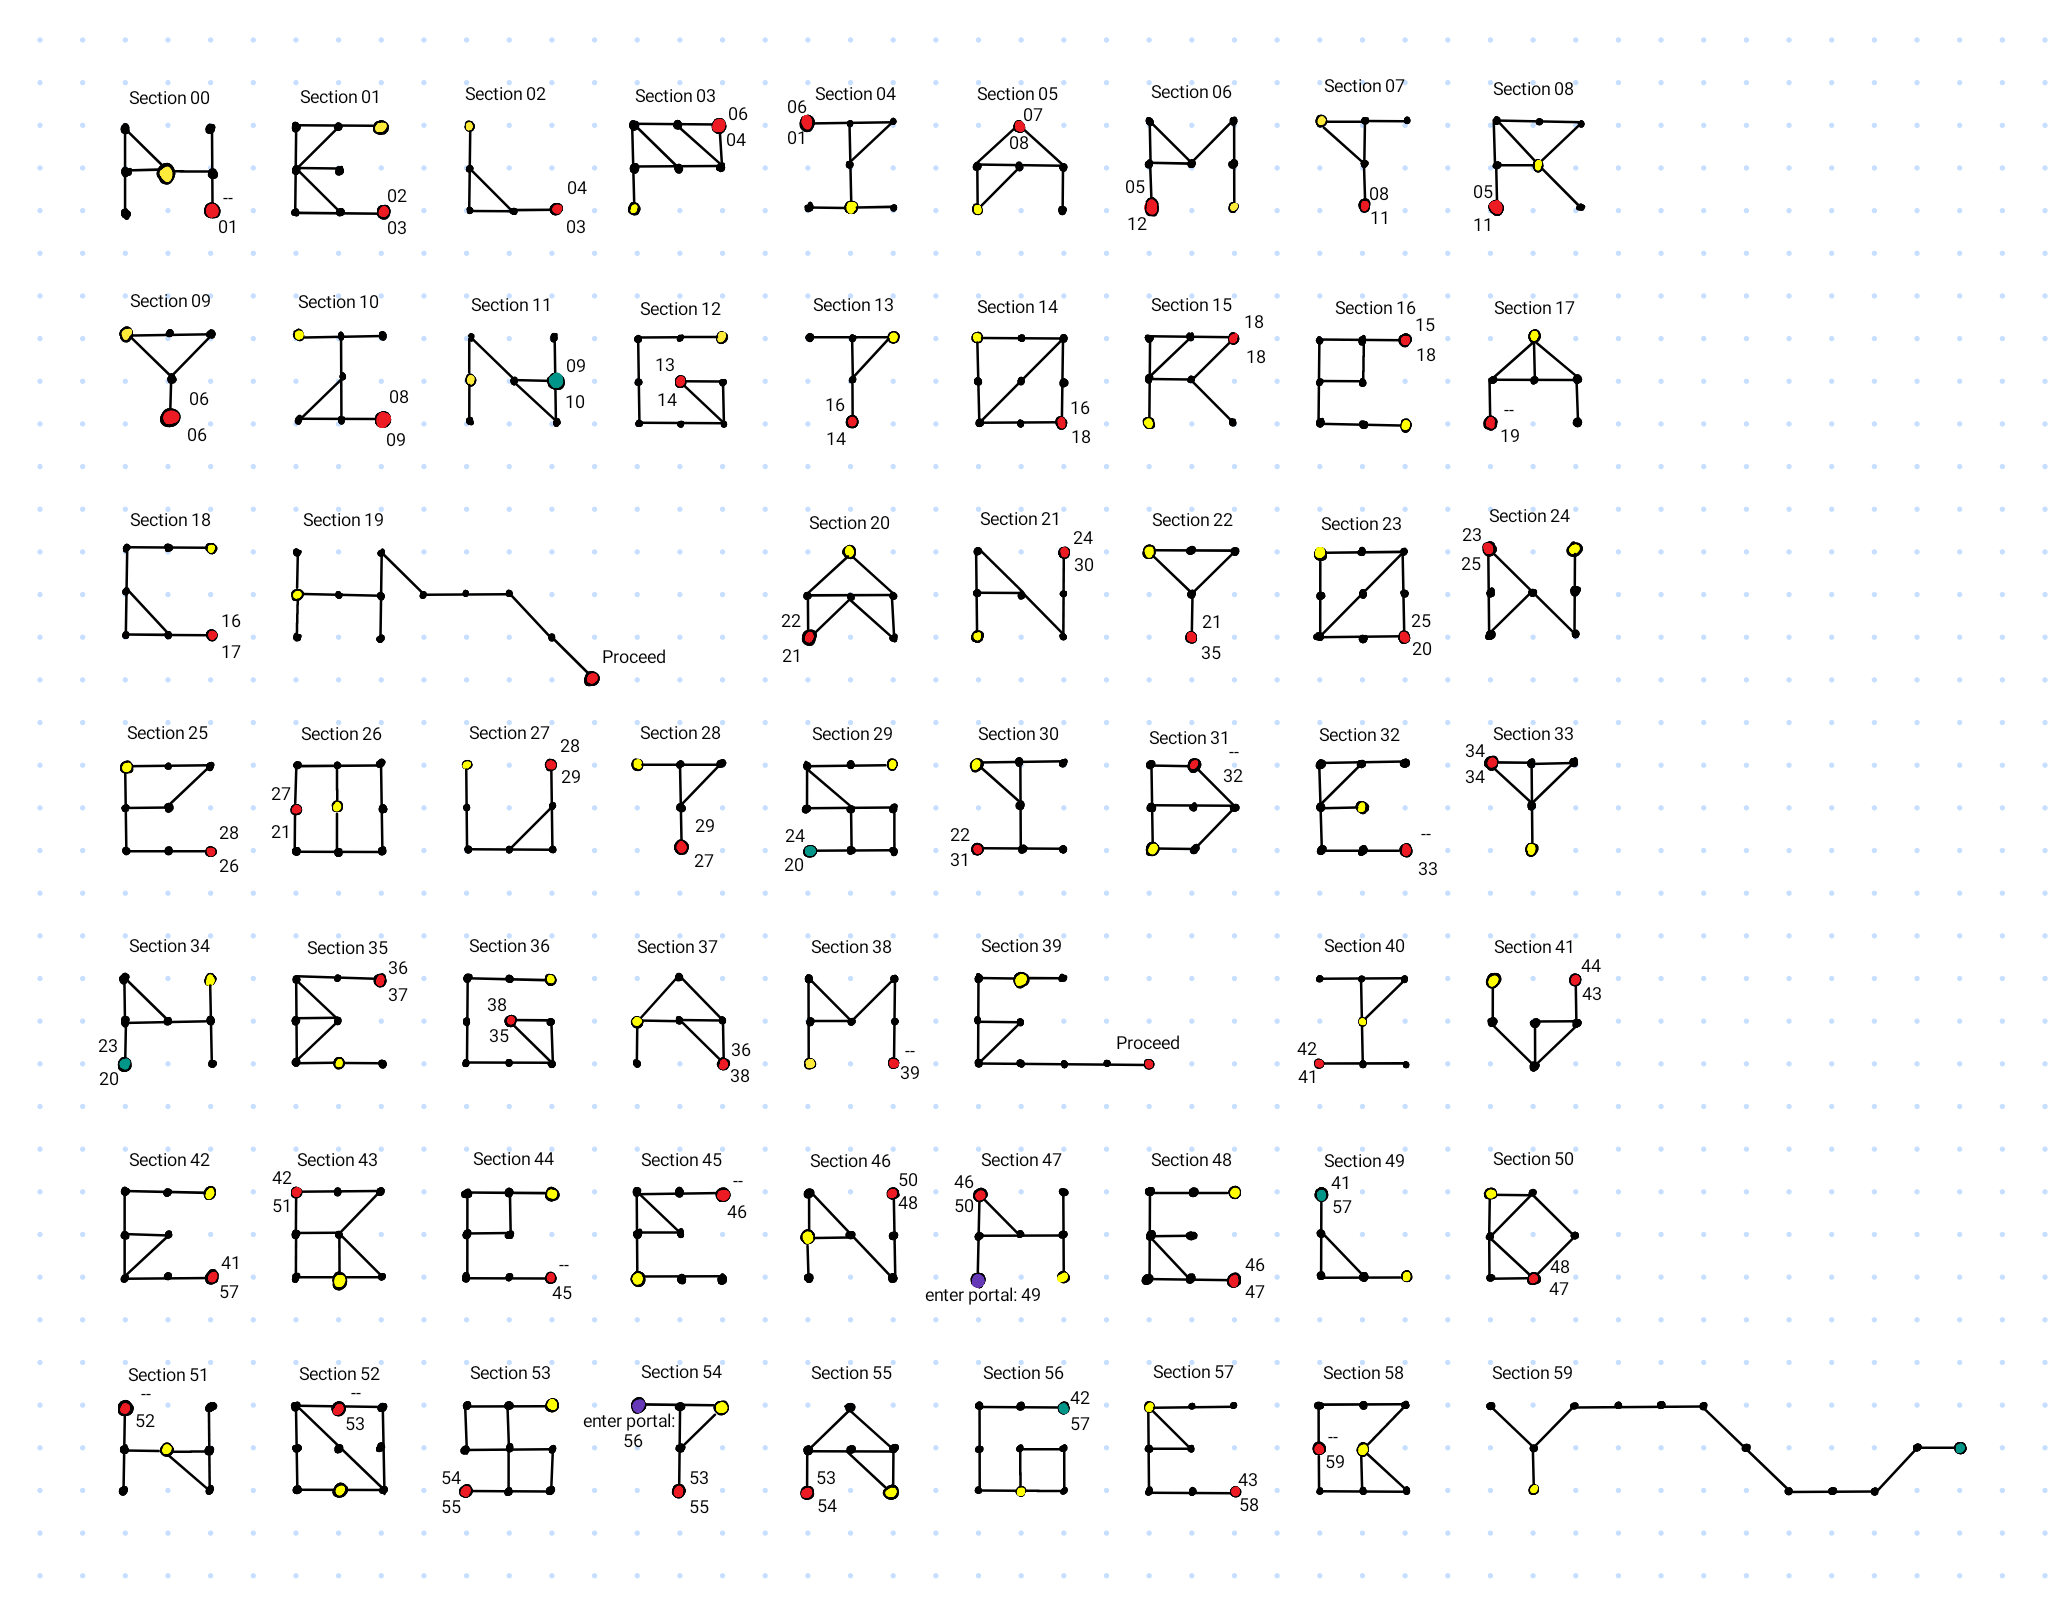
Stat Boost available with mission. This is a fairly simple dungeon and not diverse, with 1 room and 1 mob for each letter of the alphabet, but it has a lot to offer with the quest and missions!. The biggest challenge here is that letters will have a single damage type they use with their melee attacks that can range across each available type. Help Dwayne, the alphabet serial killer, and seek revenge for him (you can kill the letters in any order too). Items found in this area are not kept and will be removed from your inventory upon departure from the area.
Map of Area
Class sizes sorted by Dungeon Scaler for Alphabet
Scaler
Class
Mobs/Extra Info
10
374 - 826
15
2k - 4k
20
7k - 9k
25
14k - 17k
26
14k - 17k
30
22k - 25k
35
30k - 34k
40
40k - 45k
45
51k - 55k
50
57k - 65k
55
78k - 93k
59
91k - 104k
60
96k - 105k
65
124k - 138k
70
160k - 171k
75
168k - 187k
80
225k - 258k
85
305k - 346k
90
359k - 404k
91
460k - 508k
95
487k - 579k
100
616k - 676k
105
686k - 746k
110
696k - 767k
115
764k - 851k
120
915k - 1M
121
853k - 902k
125
1.1M
130
1.2M
135
1.1M - 1.2M
140
1.3M
141
1.3M
144
1.5M
145
1.2M - 1.5M
146
147
148
149
150
1.5M
1.0000000092
92
1.0004928894
5M
Anchorman
[Rumor]
From Chaos: <enter, 3e, 2s, 2e, s, 2w, buy 4, theatre, 2w, watch> Return to Chaos: <exit, 2e, s, 2e, n, 2w, 2n, 3w, vortex>
From Chaos: <enter, 3e, 2s, 2e, s, 2w, buy 4, theatre, 2w, watch> Return to Chaos: <exit, 2e, s, 2e, n, 2w, 2n, 3w, vortex>
Area/Rating:
Chaos Anchorman [Rumor] Monster class:
1.0001200000
1.2m to
1.0003500000
3.5M
Hit around:
Alignment:
Good
Rewards:
Coins - 25,500
Reputation:
None
Reset Type:
Natural, mobs will respawn approximately every 30-45 minutes.
Dungeon Timer:
2 hours
Scaling:
No
Area Details:
<<< A MESSAGE FROM THE CHAOS BUREAU OF FAIR WARNINGS >>> This area contains adult language and sexually suggestive content. The area may not be appropriate for younger players or for players who find Will Ferrell comedies offensive. <<< YOU HAVE BEEN WARNED >>>
Per the warning sign provided before entering, this area is not meant for younger players as it's based off of the movie, Anchorman.
There are at least two known random drops in the area, A totally badass trident (seriously badass) which has a 75 (edged) Weapon Class, as well as a Gold Channel 4 signet ring which will provide special defense against melee attacks.
Map of Area
This dungeon is not a scaling dungeon.
Scaler
Class
Mobs/Extra Info
1 - 150
1.3M - 3.4M
Trident obtained after killing Brick Tamland.
1.0001200000
1.2m
1.0003500000
3.5M
Android Showroom
[Andeddu]
From Chaos: <enter, 3e, 2s, 2e, 2n, flick switch> Return to Chaos: <leave, 2s, 2w, 2n, 3w, vortex>
From Chaos: <enter, 3e, 2s, 2e, 2n, flick switch> Return to Chaos: <leave, 2s, 2w, 2n, 3w, vortex>
Area/Rating:
Chaos Android Showroom [Andeddu] Monster class:
1.0000000034
34 to
1.0062800000
62.8M There is no additional information available
Hit around:
Alignment:
Neutral
Rewards:
Coins - None
Reputation:
None
Reset Type:
Natural, mobs will respawn approximately every 30-45 minutes.
Dungeon Timer:
6 hours
Scaling:
Yes
Area Details:
Mobs in this area are primarily named after many of the initial Android OS release versions.
*Note: Android mobs do NOT drop corpses in this dungeon and it is said that they must be killed in a specific order to progress. This order is: Cupcake Donut Eclair Froyo Gingerbread Honeycomb Ice Cream Sandwich Jelly Bean KitKat Lollipop Marshmallow Nougat Oreo Development Alpha Beta 1.0 1.1
Map of Area
Class sizes sorted by Dungeon Scaler for Android Showroom
Fantasy Banshee's Lair [Revelation] Monster class:
1.0000000035
35 to
1.0152000000
152M
Hit around:
No
Alignment:
Unknown
Rewards:
None
Reputation:
None
Reset Type:
Both (Natural and Time) - First levels of area are natural resets, last level is time.
Dungeon Timer:
3 hours
Scaling:
Yes
Area Details:
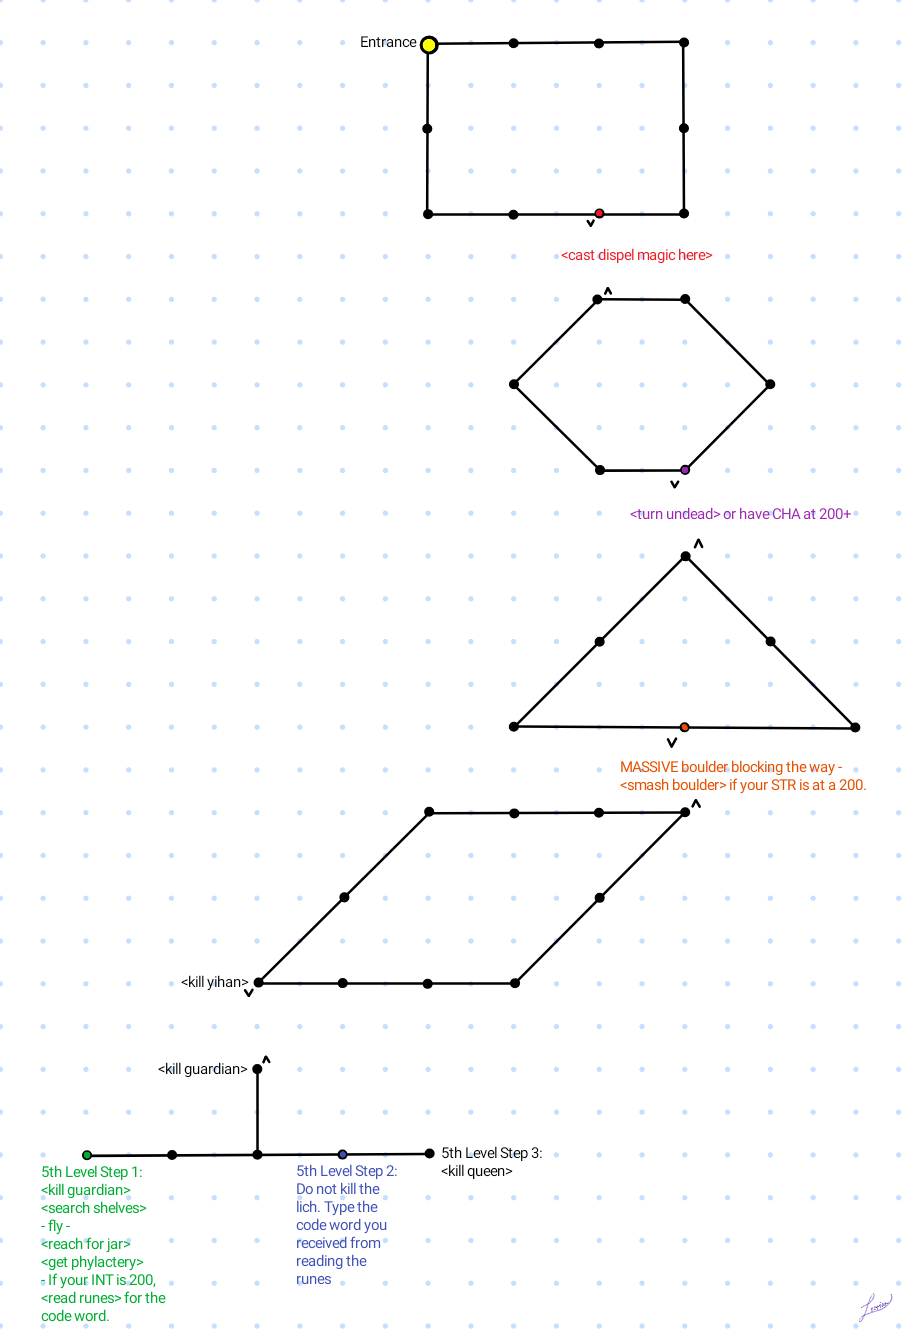
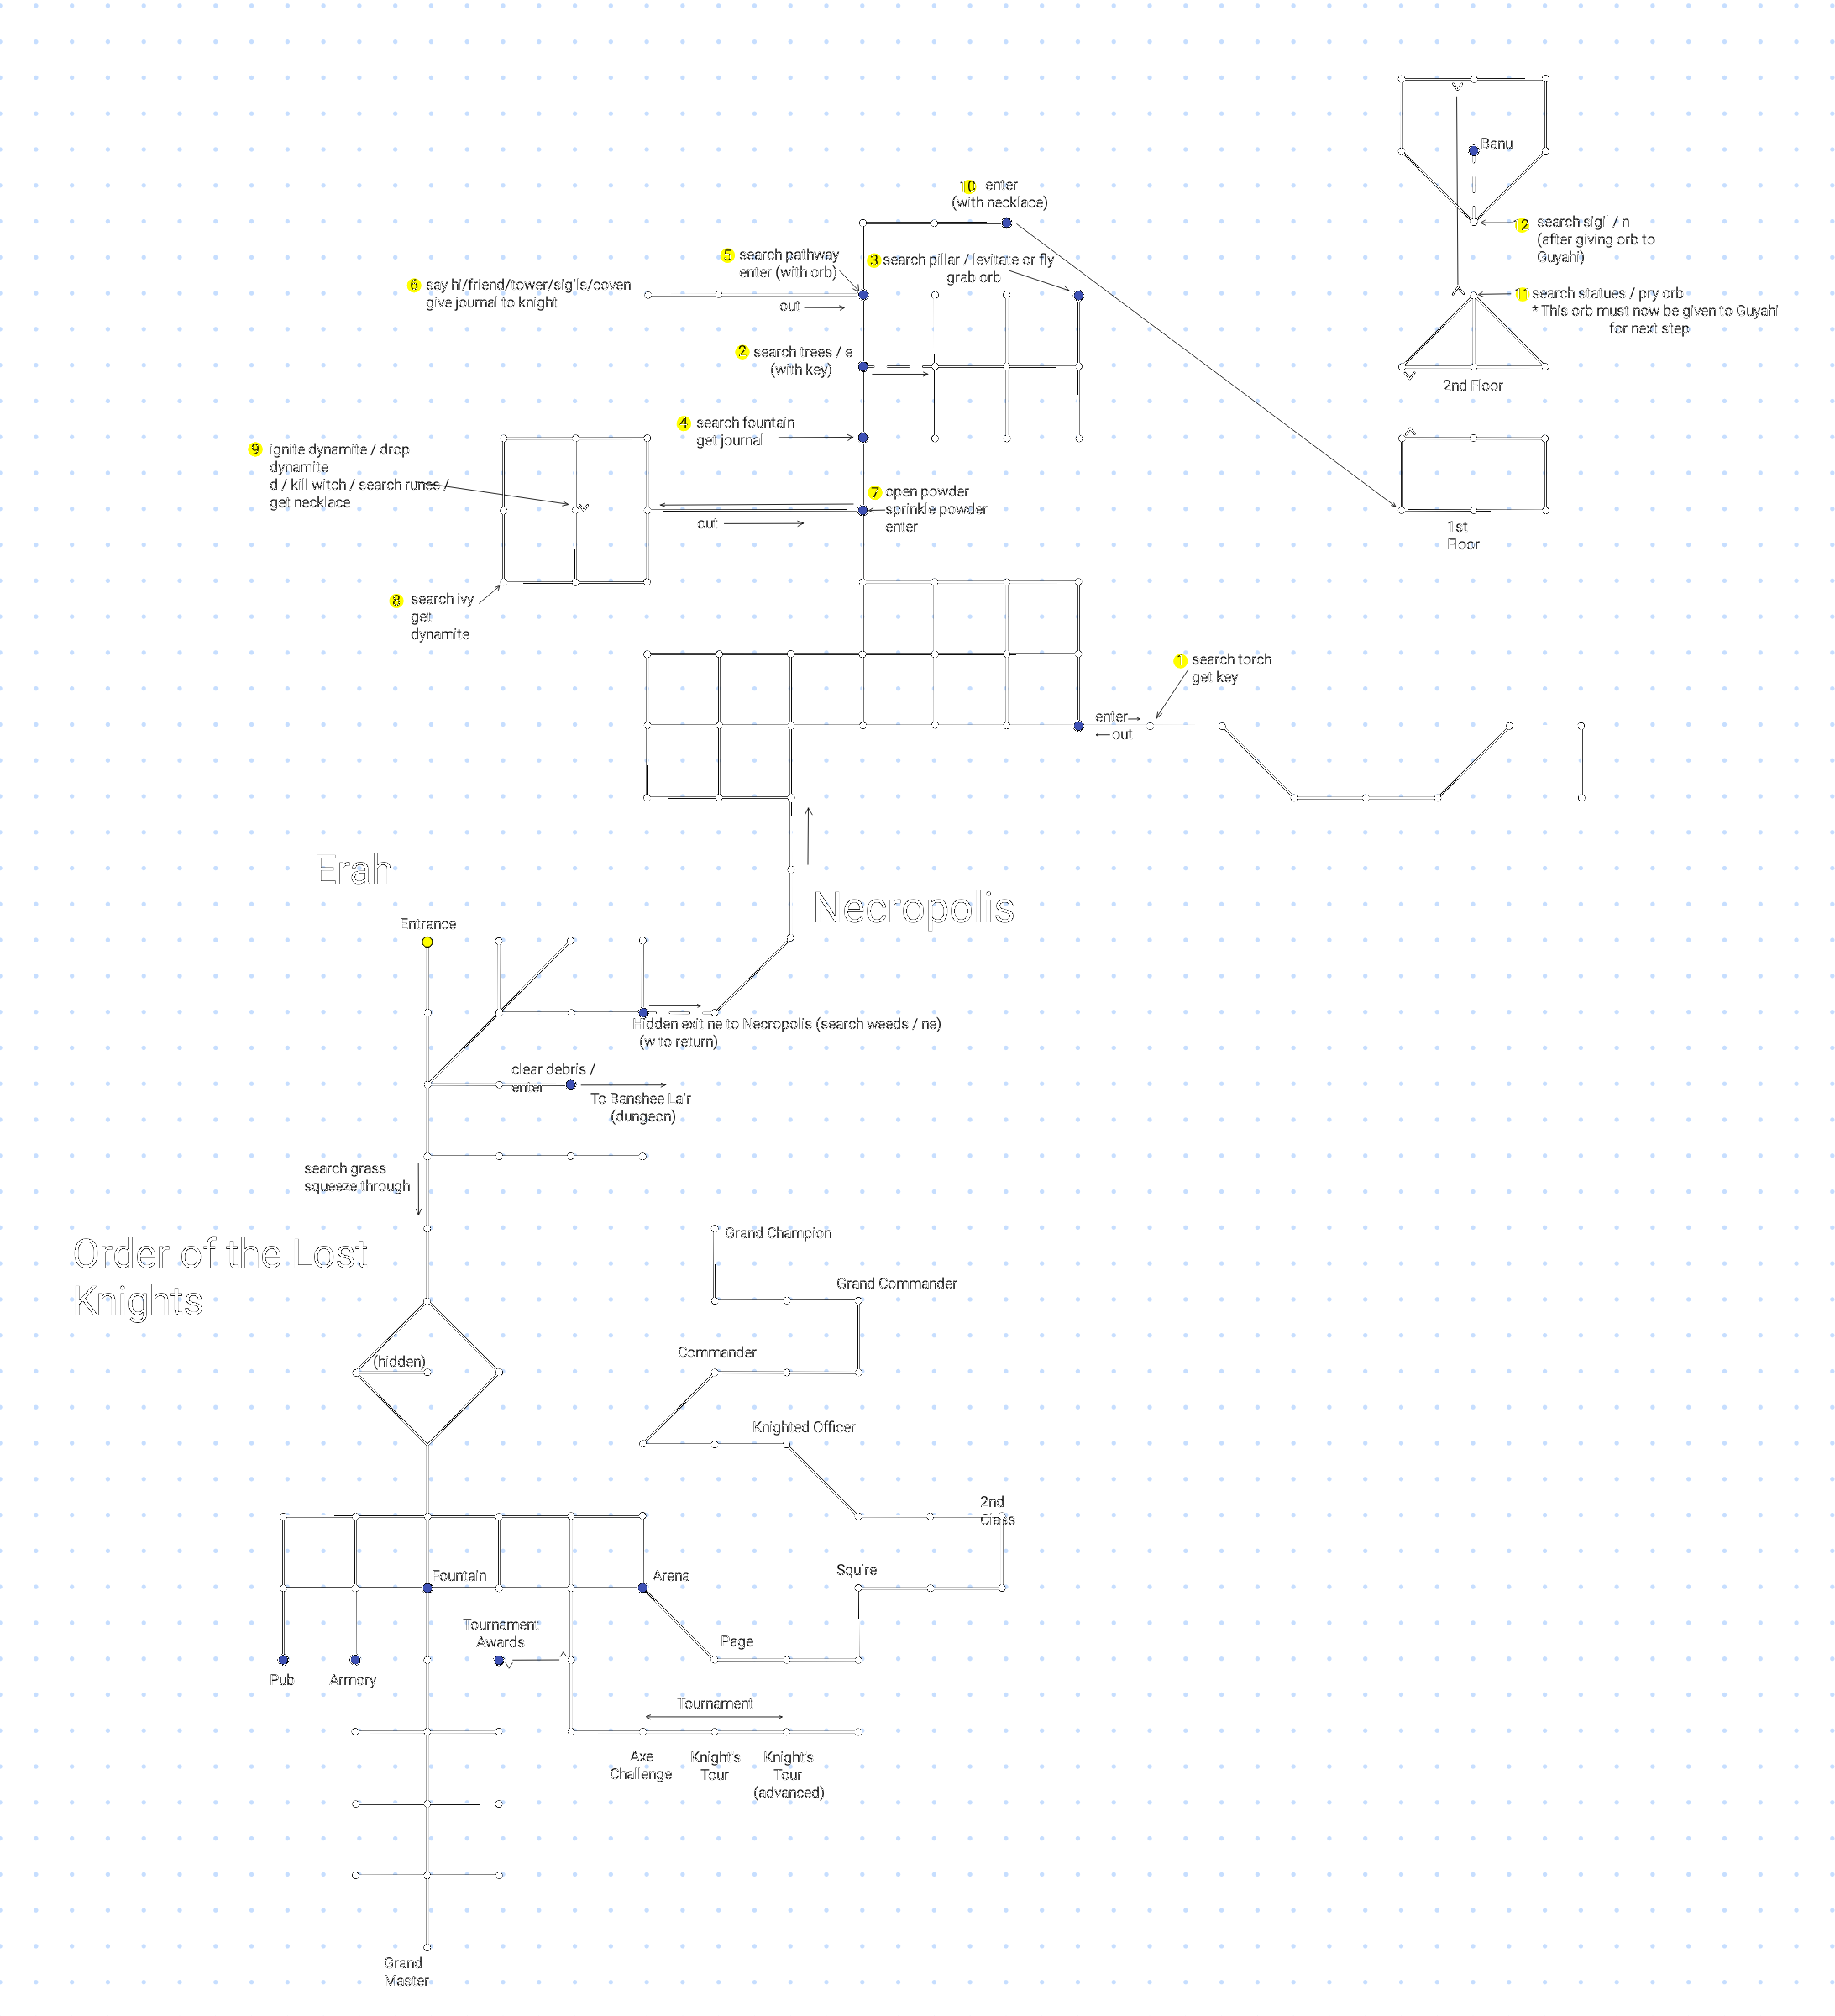
Stat Boost (INT) available when you wear Guyahi's Amulet and enter combat. This dungeon is designed to work with party members from various guilds. Level 1: You need to be able to remove magic. - From entrance - <2s, 2e, [guild command to remove magical barrier], d>
Guilds that can dispel: Bards - <dispel magic on here> Juggernauts - <xcore, take core, insert core> Mages - <dispel magic here> Necromancers - <dispell> Priests - <dispel magic> Psicorps - <actuate psychic disjunction> Alternatively, if you've acquired Banu's cloak, you can use the cloak to <dispel>
Level 2: You need to be able to move the blocker (see below), or have a minimum Charisma stat (note: stat requirement changes based on scaler level). - <sw, se, e, [guild command to remove blocker], d>
Guilds that can remove the blocker: Changeling - While in skunk form, <spray> Fremen - <voice mob to leave west> Jedi - <focus misdirect on [MOB] to the [direction]> Necromancer - <turn undead> Priests - <repulse>
Level 3: You either need explosives, or have a minimum Strength stat (note: stat requirement changes based on scaler level). - <2sw, e, smash boulder> Level 4:<2sw, 3w, kill yihan, d> Level 5: You need to be able to fly/levitate AND have a minimum Intelligence stat (note: stat requirement changes based on scaler level) to read runes. <s, 2w, kill guardian, search shelves, fly/levitate, reach for jar, get phylactery, read runes, 3e>. Now type (don't say it, just type it) the code word you received from reading the runes. - <e, kill queen> Note: The queen will not return if an Eternal (refresh room power is used. Note about the Amulet: Autoloading Guyahi's Amulet, which has no parenthetical description, has +1 INT boosts that dissipate in ~one round. The other effects are present as well, but noticably diminished compared to the other versions.
Map of Area
Class sizes sorted by Dungeon Scaler for Banshee's Lair
Scaler
Class
Mobs/Extra Info
15
137k - 908k
Queen: 609k Amulet: (dull)
20
154k - 1M
Queen: 1M Amulet: (dull) INT 80 is sufficient for the runes.
35
216k - 2.2M
Queen: 2M Amulet: (dull) +1 to +2 INT, ~1 minute duration STR 133 is sufficient to clear the boulder. INT 80 is NOT sufficient for the runes. INT 91 IS sufficient for runes.
55
650k - 5.8M
Queen: 5.3M
65
801k - 8.2M
Queen: 7.7M
80
891k - 10.7M
Queen: 13.2M Amulet: (shining) +1 to +5 INT, ~2 min duration 200 STR works for boulder 275 INT works for runes
100
3.2M - 17M
Queen: 23.1M Amulet: (shining)
110
Queen: 33M Amulet: (bright)
120
6.3M - 28.6M
Queen: 42M Amulet: (bright) STR 175 is sufficient for the boulder.
125
10.2M - 41.7M
Highest scaler for best amulet Queen: 62.9M Amulet: (glowing)
130
Queen: 68M Amulet:
140
18.1M - 55.3M
Queen: 144.7M
146
16M -
Queen: 151M
150
16M - 53M
Queen: 151M Amulet: (glowing) : up to +8 INT bonus with ~5 minute duration.
1.0000000035
35
1.0152000000
152M
Bombfreaks' Alley
[Syd]
From Science: <enter, u, 4n, d, 8n, 2e, path> Return to Science: <path, 2w, 8s, u, 4s, d, out>
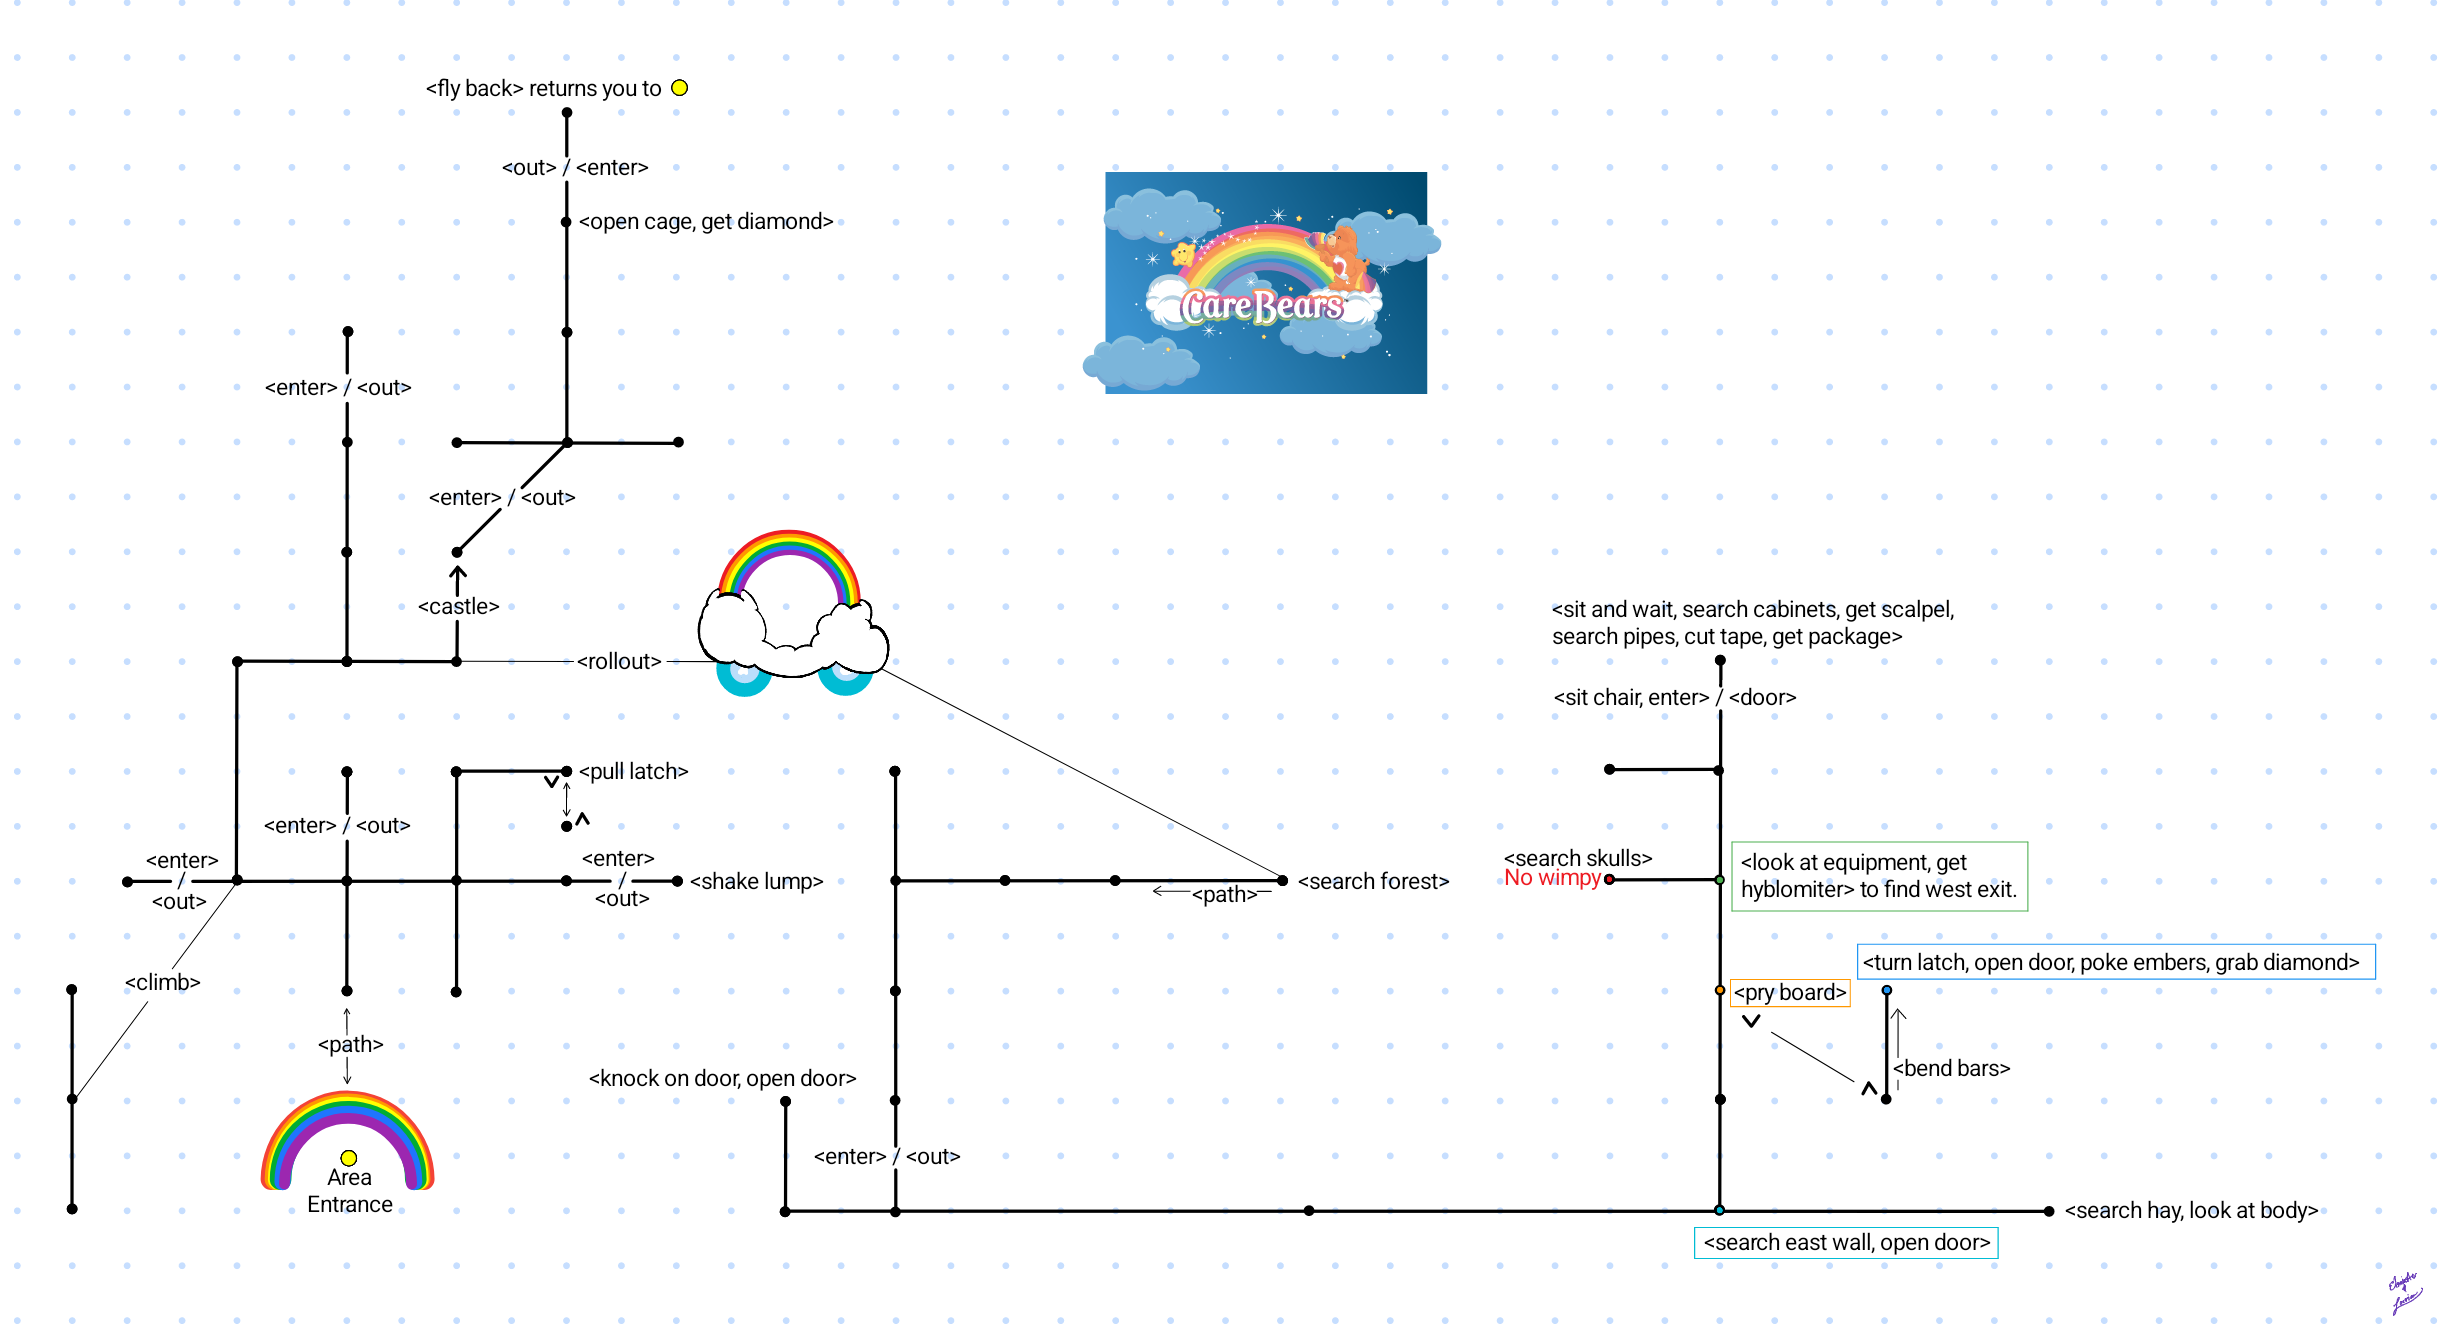
Note titled 'Something strange is happening... (Turnhold, Wed Nov 09 09:13:10 2022): To whom it may concern: There's been alot of noise coming from over the rainbow lately, in the ever-changing Realm of Chaos. Adventurers are returning from exploring the new changes, with tales of cute and cuddley bears, who seem to have re-vamped their entire living area!
Care Bears 2.0 is live!
This is a scaling dungeon, for ALL levels! For you bigger players, bring your "A" game, because these Bears don't care if you go splat. -Turnhold
Previously designed by Groosh, this area was turned into a dungeon by Turnhold in November of 2022. Come explore the land of Care-A-Lot, visit the cousins in the forest, "take care" of the big bad Professor Cold-Heart in the factory, and relinquish the evil Noheart of his power within his castle.
NOTE: this is a great area to help level your skull rune and phoenix rune for the Rod of Lordly Might.
Stat Boosts available from several pieces of gear. Depending on the scaler you enter will determine the Stat boost you receive from the items. Note: for <60 level characters - stat boosts for autoloading Care Bear gear will not carry over across reboots.
Items: {legendary} +15 Stat boosts and 99 WC 10% Block chance : Tenderheart's Shield, 33 edged33 blunt33 mind33 energy
150
19.4M - 90M
Items: {legendary} Level 50 required for some gear. +15 Stat boosts and 100 WC ~10% Block chance : Tenderheart's Shield, 33 edged33 blunt33 mind33 energy
1.0000000908
908
1.0132500489
133M
Carnegie Hall 2.0
[Balthus and Pfunk]
From Science: <enter, u, 3e, d, e, path, 15n, 19e, 3n, e, bridge, 2e, n (find 'Scruffy looking man' in the area, he wanders, and buy ticket) enter> Note: Entrance is the same as the 1.0 version, but if you have the ticket from the Scruffy looking man, you will be placed in 2.0. Return to Pinnacle (Chaos): <out, s, 2e, enter>
From Science: <enter, u, 3e, d, e, path, 15n, 19e, 3n, e, bridge, 2e, n (find 'Scruffy looking man' in the area, he wanders, and buy ticket) enter> Note: Entrance is the same as the 1.0 version, but if you have the ticket from the Scruffy looking man, you will be placed in 2.0. Return to Pinnacle (Chaos): <out, s, 2e, enter>
Area/Rating:
Science Carnegie Hall 2.0 [Balthus and Pfunk] Monster class:
1.0000012000
12k to
1.0016200000
16.2M
Hit around:
No, but there are room effects on the 2nd floor.
Alignment:
Neutral
Rewards:
Reputation:
None
Reset Type:
Timed, mobs will not respawn until dungeon has fully reset.
Dungeon Timer:
8 hours
Scaling:
Yes
Area Details:
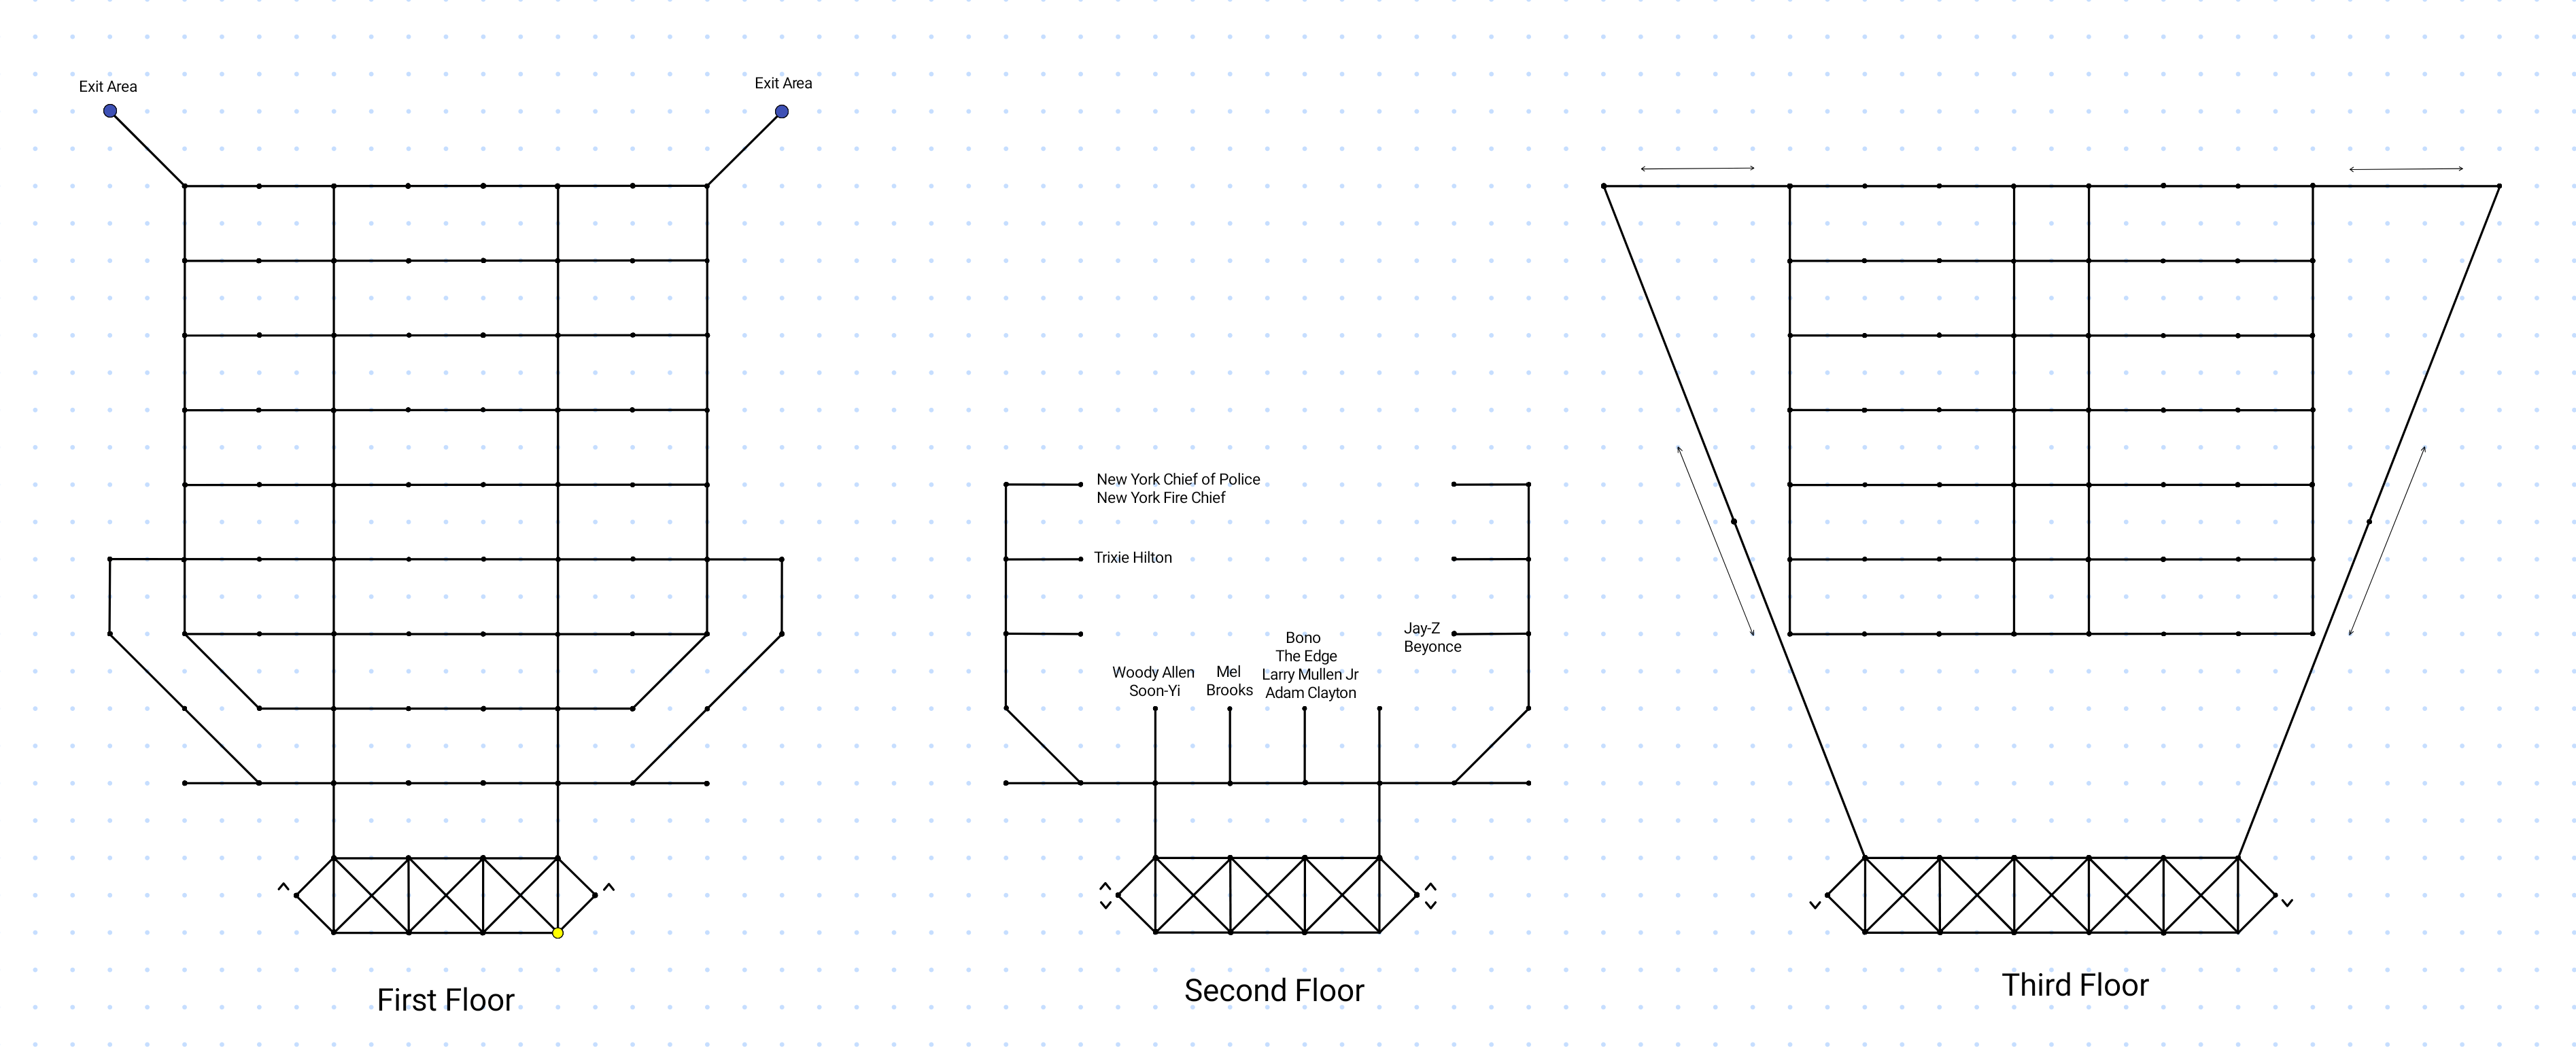
Carnegie has a number of celebrities that occupy the second floor. While some have been marked on the map, which celebs happen to spawn, and which room they are in will vary. Some interesting items of note here are the 'shades' dropped by Bono in the U2 room (all mobs here will assist and may block exits, meaning this can be a tough fight at higher scalers), a second popular item is the firemans axe that can be found on the New York fire chief (does not always drop), which will increase WC over time with use.
Map of Area
Class sizes sorted by Dungeon Scaler for Carnegie Hall 2.0
Scaler
Class
Mobs/Extra Info
15
6k - 20k
17
12k - 39k
20
11k - 47k
25
41k - 71k
30
46k - 95k
Ushers: 67k-70k Angry: 95k
33
75k - 161k
46
250k - 600k
48
300k - 860k
54
394k - 1M
59
425k - 1.2M
65
174k - 5.6M
Al: 1.4M [Blasts you off the balcony] Bono: 1.6M Soon-Yi: 388k [Throws you off the balcony]
Note: Refer to previous notes on mobs, as this scaler may have the same effects. Adam: 4.2M Bono: 6.2M Edge: 7M Larry: 7M Mel: 6.4M Trixie/FooFoo: 7M/1.1M
1.0000012000
12k
1.0016200000
16.2M
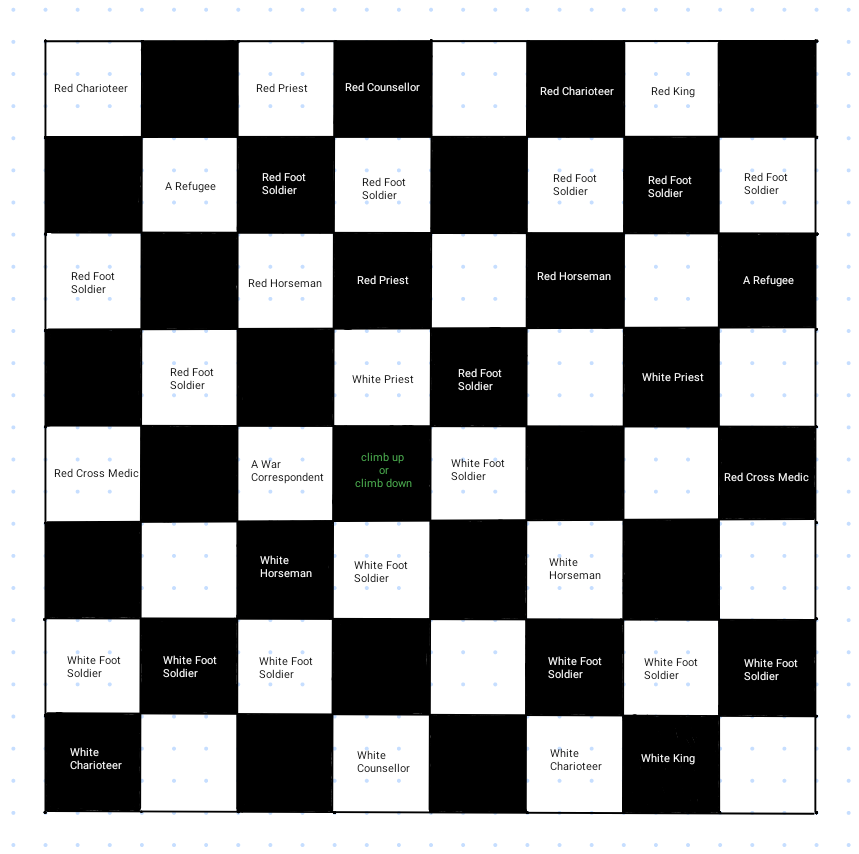
Chess Board
[Tiro]
From Chaos: <enter, e, climb pipe> Return to Chaos: <slide, w, vortex>
From Chaos: <enter, e, climb pipe> Return to Chaos: <slide, w, vortex>
Area/Rating:
Chaos Chess Board [Tiro] Monster class:
1.0000000092
92 to
1.0007300000
7.3M
Hit around:
No
Alignment:
White - Good Animals - Neutral Red - Evil
Rewards:
Coins - 3,838
Reputation:
None
Reset Type:
Natural, mobs will respawn approximately every 30-45 minutes.
Dungeon Timer:
2 hours
Scaling:
Yes
Area Details:
This dungeon has a jump point when moving from scaler 81 to 82. At 82 the mob classes increase significantly compared to previous increments. Here and beyond, mobs will begin to dodge attacks, and will have multiple attacks per round.
Map of Area
Class sizes sorted by Dungeon Scaler for Chess
Scaler
Class
Mobs/Extra Info
5
<150
15
2k - 4k
17
3k - 6k
20
7k - 9k
22
8k - 9k
23
8k - 12k
25
8k - 11k
2 hits/round
28
9k - 16k
29
10k - 17k
30
16k - 19k
31
17k - 20k
32
18k - 21k
33
19k - 25k
34
20k - 25k
35
23k - 28k
36
23k - 31k
37
27k - 33k
38
30k - 36k
39
32k - 39k
40
44k - 51k
+ specials
41
44k - 52k
42
47k - 56k
43
48k - 62k
44
51k - 65k
45
54k - 67k
46
59k - 77k
47
62k - 84k
48
62k - 81k
49
68k - 87k
50
69k - 89k
51
72k - 98k
52
74k - 96k
53
87k - 112k
54
95k - 112k
55
131k - 165k
57
134k - 161k
59
155k - 177k
60
166k
63
180k - 190k
64
232k
65
196k - 281k
70
349k - 371k
72
294k - 366k
73
354k - 449k
75
365k - 458k
77
406k - 552k
78
401k - 547k
79
500k
80
459k - 615k
81
446k - 589k
82
1M
Dodges, 3 attacks/round
83
1.05M
84
1.075M
85
1.25M
86
1.3M
88
1.3M - 1.6M
90
1.5M
92
1.7M - 2M
95
1.9M - 2.3M
96
1.9M - 2.4M
97
2.3M - 2.8M
100
2.8M - 3M
101
2.5M - 3.1M
102
2.5M - 3.1M
103
2.5M - 3.1M
105
2.8M - 3.1M
110
3.14M - 3.74M
113
3.6M - 4.4M
115
4.1M
116
3.3M - 3.8M
120
3.9M - 4.5M
121
3.8M - 4.4M
125
4.6M
130
4.9M - 5.7M
133
4.8M
135
4.9M - 5.9M
140
5.5M
145
5.9M - 6.5M
150
5M - 6.8M
1.0000000092
92
1.0007300000
7.3M
Death Taco
[Lime]
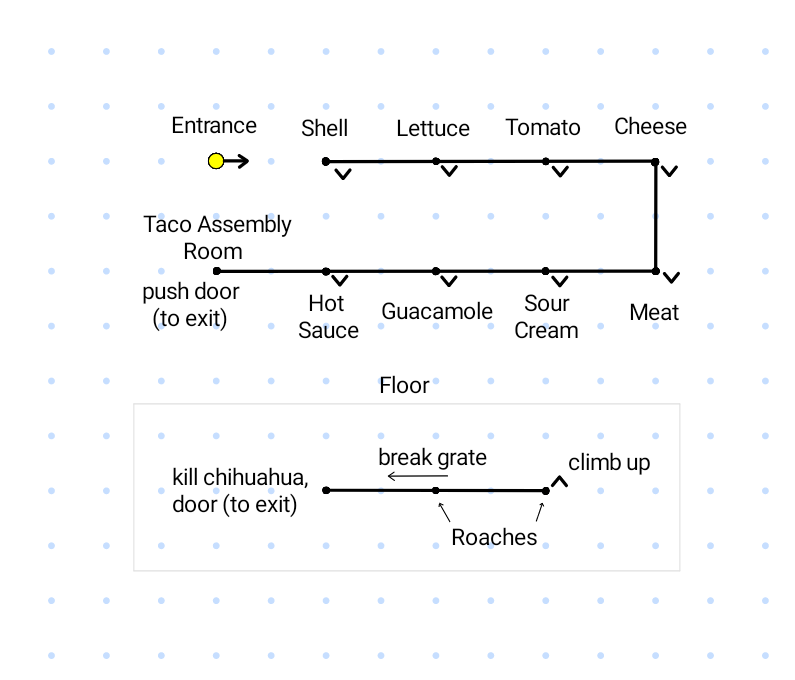
From Chaos: <enter, 4w, e, n, w, 2n, taco> Return to Chaos: <out, 2s, e, s, 2w, 3e, vortex> Return to Chaos if you're still in the ingredients area: <d, (all) w, break grate, w, door, out> Return to Chaos if you've finished killing the taco(s): <push door, out>
From Chaos: <enter, 4w, e, n, w, 2n, taco> Return to Chaos: <out, 2s, e, s, 2w, 3e, vortex> Return to Chaos if you're still in the ingredients area: <d, (all) w, break grate, w, door, out> Return to Chaos if you've finished killing the taco(s): <push door, out>
Area/Rating:
Chaos Death Taco [Lime] Monster class:
1.0000000044
44 to
1.0051000000
51M
Hit around:
Yes (Hot Sauce, Works, & DEATH Taco hits around)
Alignment:
Unknown
Rewards:
Reputation:
Reset Type:
Timed, mobs will not respawn until dungeon has fully reset.
Dungeon Timer:
8 hours
Scaling:
Yes
Area Details:
Stat Boosts available with combat against assembled tacos. Death Taco is a small but fairly diverse dungeon when it comes to equipment and items that come from it. You can go into Death Taco and only kill ingredients for xp/gxp if you want or continue on to assemble your different type of taco mob boss. The tacos do hit around, so LEAVE YOUR FOLLOWER outside at the entrance if you don't want them to possibly die. The area has two sections: the counter and the floor. From any place on the counter (other than the taco assembly room) you can choose to go "down" and will fall to the floor. The counter has a room devoted to each of the 8 ingredients, with a final room being the "Taco Assembly" area. In each ingredient room you can <grab> the relevant ingredient, which will cause a living version of the ingredient to attack you. Once killed, you can pick up the item version to use for assembly. Ingredients can often be killed numerous times, allowing you to make several tacos in the assembly room at the end. Specials - Each ingredient has a special ability or attack that is unique to the specific ingredient. Any assembled tacos at the end will have the abilities of every ingredient used to make the taco. There are 5 different tacos that can be made, and each type has different items that it can drop. The more complex the taco, the more powerful it is and the higher the class. Exits - There are two exits to the area. You can <push door> in the assembly room after you have killed at least one taco, or you can go down from any ingredient room, which will take you do the floor. Here you must kill roaches in the west room, <break grate, w, kill chihuahua, door>.
Map of Area
Taco Type, Ingredients, and Drops for the Assembly Room:
Taco Type
Ingredients
Taco Drops
Veggie Taco
: shell, lettuce, tomatoes
A Veggie Taco (<strength>) plain: +3 WIS, 75% overmax HP only, 3 uses crisp: +4 WIS, 100% overmax HP only, 3 uses A side of rice (<strength>) moist: 37.7% HP/SP overmax, 3 uses steaming: 50% overmax HP+SP, 3 uses A <size> pop (SP heal x3-4, <refill pop> will work several times (anywhere) with a chance to fail and lose the cup.) Small: ~100 SP heal, x3 Large: 250 SP heal, x4 Gigantic: Full SP heal, x4 A Cerveza (<strength>) (plain) first time +2 CON, each drink is 50% overmax SP, 4 uses. (refreshing) first time +3 CON, each drink 83% overmax SP. (strong) first time +4 CON, each is 100% overmax SP, 3 uses
Cheesy Taco
: shell, lettuce, tomatoes, cheese
Wrap/Smear, etc, on various armor pieces to increase defenses based on item. tin foil (shiny) boost radiation and mental AC nacho cheese (huge) boosts ice and acid AC meat paste (brick) boost edge and energy AC sour cream (huge) boosts fire and electric AC refried beans (brick) boost blunt and poison AC
Meat Taco
: shell, lettuce, tomatoes, cheese, meat
Side of beans (spicy) room damage, not sure type, duration or amount Sliced jalapenos (hot) HP regen +10 a round Cinnamon twists (sugary) once/round can use for more damage, maybe 6 or 7 uses Wet wipe (gigantic) room peace, one use. To use: "wipe hands". Doesn't work on all mobs.
Cup of salsa (giant) +4 DEX, +4 INT, +2 WIS, +2 CHA (Lvl 114) - random stat boost (unknown) Lime wedge (juicy) Adds acid damage to weapon Packet of hot sauce (fire) Adds fire damage to weapon Leaf of Lettuce Adds WC and converted all wc to blunt
Knocks you out of room, can also knock you down to the floor. Landing will cause damage (if you levitate or fly, you can negate this)
Tomato
Attacks will cause 'acid' to squirt on you.
Cheese
Binds to hands briefly causing you to unwield your weapon. Must wait for effect to wear off to re-wield.
Meat
Poison causing a stat debuff effect (str, dex, con)
Sour Cream
Quickly regenerates health.
Guacamole
Slippery effect causes all gear to be force removed. Must wait for it to wear off to re-wear.
Hot Sauce
Causes blindness, hits around. (Any taco you make with the hot sauce will also hit around.)
Class sizes sorted by Dungeon Scaler for Death Taco
Scaler
Class
Mobs/Extra Info
15
4k - 13k
Moderately Concerning Death Taco: 29k Works Taco: 29k Meat Taco: 13k Cheesy Taco: 15k Veggie Taco: 10k
20
2k - 38k
Moderately Concerning Death Taco: 41k
25
10k - 42k
Moderately Concerning Death Taco: 53k
29
6k - 46k
Veggie Taco: 33k Cheesy Taco: 39k Meat Taco: 46k
30
21k - 61k
Cheesy Taco: 43k Death Taco: 87k
40
42k - 188k
Moderately Concerning Cheesy Taco: 89k Works Taco: 558k Death Taco: 796k Quesadilla Codpiece (tiny): 5 AC in all resistances Spork Lance (bendy): 35 WC
41
58k - 218k
Suspiciously Strong Cheesy Taco: 101k Meat Taco: 200k Works Taco: 676k Death Taco: 1.8M Quesadilla Codpiece (medium): 8 AC in all resistances Spork Lance (straight): 50 WC
Max Item Drop Potency Beyond This Point Lance Weapon: 93 Edged WC, heals HP/SP during combat and has damage specials. Deadly Veggie Taco: 2.3M Deadly Cheesy Taco: 3.3M Deadly Meat Taco: 5.3M Deadly Works Taco: 9.7M Deadly DEATH Taco (tm): 37M
95
12k - 5.7M
Deadly Veggie Taco: 2.5M Deadly Cheesy Taco: Deadly Meat Taco: 5.6M Deadly Works Taco: Deadly DEATH Taco (tm): 40M
101
1.6M - 6.4M
Deadly Veggie Taco: Deadly Cheesy Taco: Deadly Meat Taco: Deadly Works Taco: 9.6M Deadly DEATH Taco (tm): 44M
135
2.3M - 8.9M
Deadly Veggie Taco: 5.7M Deadly Cheesy Taco: 6.8M Deadly Meat Taco: 8.7M Deadly Works Taco: 14M Deadly DEATH Taco (tm):
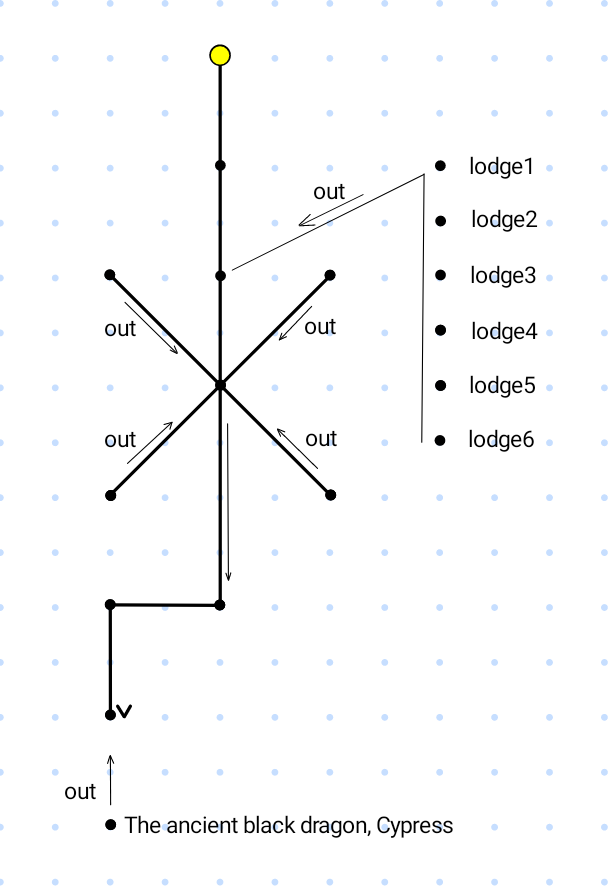
From Fantasy: <portal, 15e, leave, 6e, 4s, 2w, s> Return to Fantasy: <n, 2e, 4n, 6w, enter, 15w, portal>
From Fantasy: <portal, 15e, leave, 6e, 4s, 2w, s> Return to Fantasy: <n, 2e, 4n, 6w, enter, 15w, portal>
Area/Rating:
Fantasy Fachan Village [Trandamere] Monster class:
1.0000006000
6k to
1.0000043000
43k
Hit around:
Alignment:
6 - Evil 1 - Repulsive and loathsome
Rewards:
Coins - None
Reputation:
Wheel of Dragons
Reset Type:
Natural, mobs will respawn approximately every 30-45 minutes.
Dungeon Timer:
2 hours
Scaling:
No
Area Details:
This is a non scaling dungeon with a relatively small number of mobs.
Map of Area
Class sizes sorted by Dungeon Scaler for Fachan Village
Scaler
Mobs/Extra Info
Non-scaling dungeon
The ancient black dragon, Cypress:43k The fachan female:18k The fachan leader:19k The fachan shaman:18k A large fachan guard:9k A stocky fachan guard:6k A tired fachan guard:9k
1.0000006000
6k
1.0000043000
43k
Halo
[Quaker]
From Chaos: <enter, 4w, e, s, w, s, 2e, grab joystick, w, s, play halo> Return to Chaos: <lie down, n, e, out, 2w, n, e, n, 2w, 3e, vortex>
From Chaos: <enter, 4w, e, s, w, s, 2e, grab joystick, w, s, play halo> Return to Chaos: <lie down, n, e, out, 2w, n, e, n, 2w, 3e, vortex>
Natural, mobs will respawn approximately every 30-45 minutes.
Dungeon Timer:
2 hours
Scaling:
Yes
Area Details:
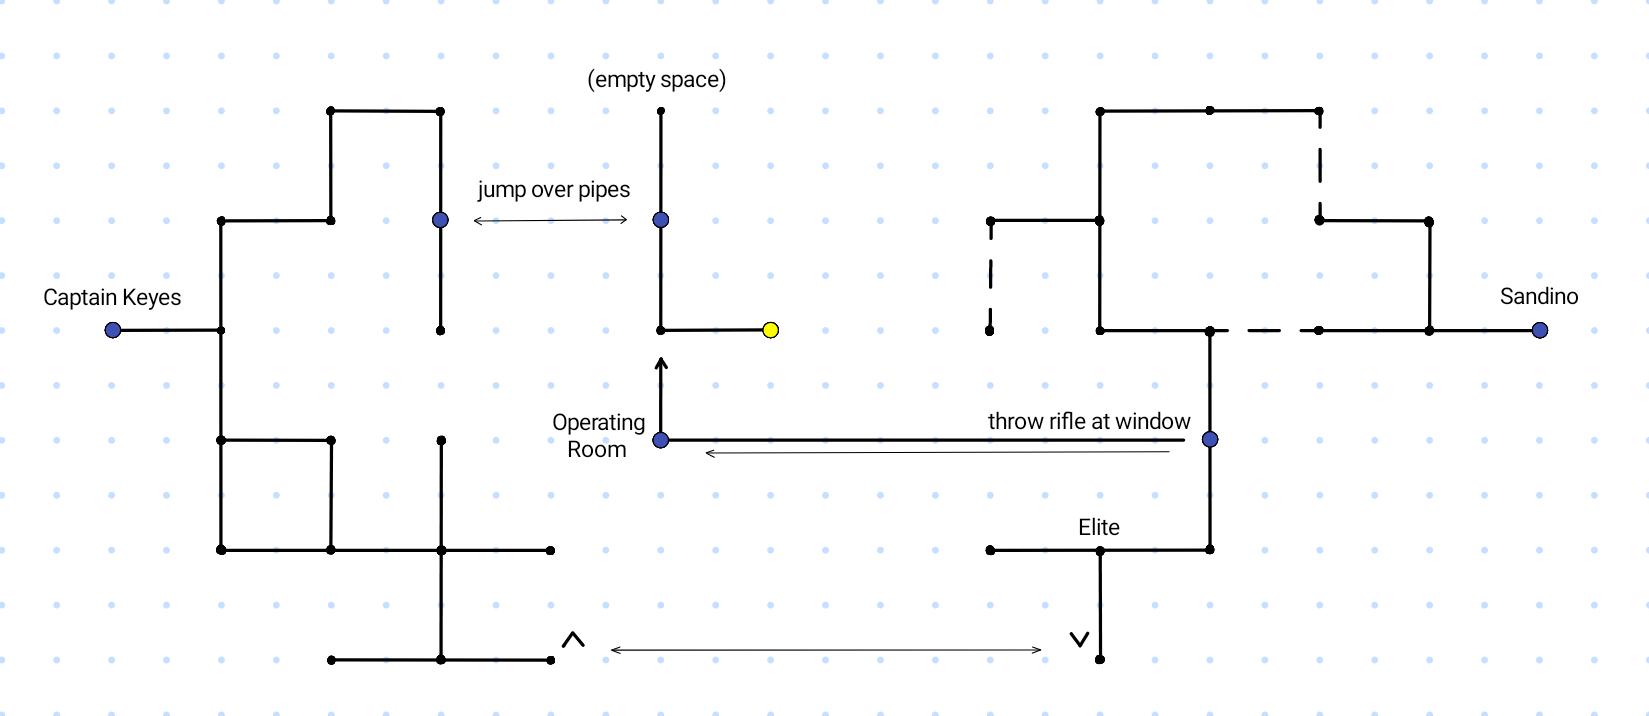
Halo has an armor type "other" belt which will need to be acquired through a sequence of steps for the best possible result. There are two types of the belt which can be obtained here: 'jury rigged' and 'shiny'. The shiny version is the more powerful of the two, and is semi-unique (and often bind on pickup). Important note: If you're wearing an 'other' item already, you'll have to remove it so that Sandino can put the belt on you. The belt can be removed once worn. The datajack is an 'unknown' item and will automatically be worn (unless you're a Bladesinger and already wearing the maximum amount of unknown items allowed). Once worn, the datajack cannot be removed.
To acquire the belt, you must first head to Sandino. Once inside the area, travel <w, n, jump over pipes, n, w, s, w, 3s, 2e, s, e, u>
<n, e, 2n, 3e, say hello>
Sandino says: Master Chief! I am so glad it is you! Sandino says: If anyone can get us out of this alive it's you. Sandino says: When I heard the Covenant had breached the ship, I thought you would be a goner since we hadn't had time to finish your implants. Now the implants are all gone and there is no way we can win. Sandino says: I hope they don't look in here. Sandino says: I wish they would turn off those alarms so I could think.
<say lab>
Sandino says: Well, I call it my lab, but it is more of an operating room. I don't have the key to the door on the first floor but there is an observation deck on the second floor. Maybe you can get in through there somehow.
<say follow>
Sandino says: Lets get out of here.
<3w, s, throw [item] at window> (generally I use a rifle from one of the enemies here for this)
<w, search instruments>
Now find an elite enemy in the area, kill it (do not use the corpse) and <dissect corpse>. This will give you some wires.
You tear open the corpse and look at all its bits. You find a ton of wiring and electronics mixed in with the entrails. You carefully remove them and wipe them off.
Return to the lab where Sandino is waiting, <say install>
Sandino fiddles with the pile of equipment. Sandino pulls out a breathing mask. Sandino says: You'll probaly want this. Without asking he slaps the mask on your face and the world goes black. The world blurs back into focus slowly. Sandino says: Just one final adjustment... Sandino grabs something off the instrument tray and buckles on a heavy belt. There is a flash of light as a shimmering energy field envelops your body. Sandino says: It works! Now we can take the fight to the Covenant!
A jury rigged shield assembly belt The belt is made of some kind of synthetic blue leather that has circuits and wires sticking out of it, often attached with duct tape. It has has some kind of bulky material in various pockets. Probably some sort of battery to power the shield projectors the cybernetics tech implanted. The other is in perfect condition. It has a magical glow about it. This armor provides special defense against melee attacks. 2 edged 2 blunt 2 ice It doesn't look too heavy.
A gleaming silver datajack The implant feels cold and smooth as you run your hand over the shaved section of your scalp that immediately surrounds it. It gives no hint as to what it connects to, but it would be safe to assume it's related to that shield assembly implant the cyber tech was talking about. The unknown is in perfect condition. It looks unbreakable.
If he has the shiny belt, you will get that version, otherwise you will get the 'jury rigged' version. From here you can now head to Captain Keyes.
<2n, jump over pipes, n, w, s, w, s, w>
<say cortana> and he will download the AI to your belt. If you have the shiny version this will add information about damage being done to you while it is worn.
Captain Keyes says: Cortana is the ship's AI. She is my friend, too, but she knows too much to fall into enemy hands. The Covenant would be all over us like a wet t-shirt then. Captain Keyes says: I am going to give her to you. Captain Keyes inserts something in your datajack. Captain Keyes says: Now get off the ship before we are overrun. Captain Keyes says: Thats an order old friend.
Map of Area
Class sizes sorted by Dungeon Scaler for Halo
Scaler
Class
Mobs/Extra Info
15
4k
20
9k
25
14k - 17k
30
26k - 29k
35
40k - 44k
40
49k - 55k
44
57k - 61k
45
58k - 65k
55
122k - 183k
65
215k - 346k
70
310k - 446k
75
403k - 568k
86
1.1M - 1.5M
90
1.3M - 1.8M
100
386 - 5M
106
4.8M - 5.5M
110
4.4M - 5.2M
115
5M - 6M
120
5.1M - 6.6M
125
7.6M - 9.1M
130
12.1 - 14.3M
135
11M - 13M
140
12M - 15M
145
14.4M - 17.6M
150
384 - 17.8M
1.0000000373
373
1.0018382852
18M
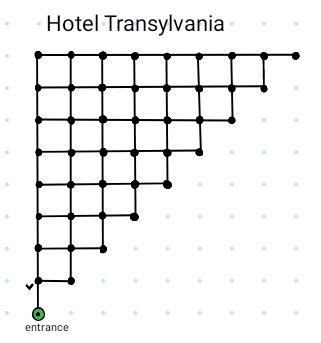
Hotel Transylvania
[Zan]
From Chaos: <enter, 3e, 2s, 2e, s, 2w, buy 5, theatre, e, enter, pull rug, n> Return to Chaos: <s, out, out, w, s, 2e, n, 2w, 2n, 3w, vortex>
From Chaos: <enter, 3e, 2s, 2e, s, 2w, buy 5, theatre, e, enter, pull rug, n> Return to Chaos: <s, out, out, w, s, 2e, n, 2w, 2n, 3w, vortex>
Area/Rating:
Chaos Hotel Transylvania [Zan] Monster class:
1.0000000034
34 to
1.0616000000
616M unknown
Hit around:
No
Alignment:
Neutral
Rewards:
Coins - 11,929
Reputation:
Reset Type:
Timed, mobs will not respawn until dungeon has fully reset.
Dungeon Timer:
3 hours
Scaling:
Yes
Area Details:
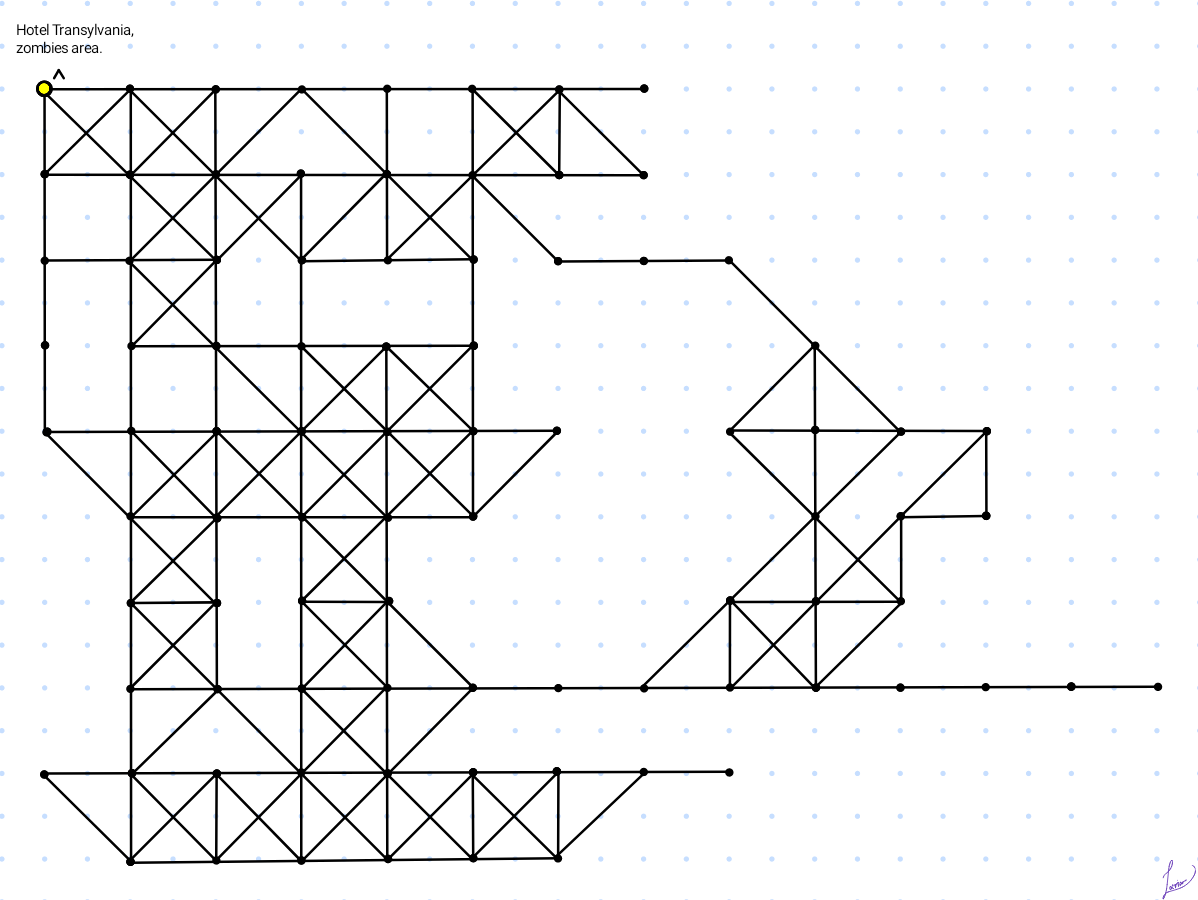
Zombies: All zombies in this area are effectively the same, despite some differing names. There is a large class jump when moving from scaler 117 to 118. Vampires: At the entrance to the area, there is a down exit which takes you to vampires. These mobs are higher class, and much more difficult, though they still change based on scaler. They are meant to be 'party' mobs, that have some unfriendly/difficult combat mechanics for having less players in the party.
Vampires Section - [Each vampire will have one random damage type - except for edged and blunt] 3 party members (minimum): Penalty to players' outgoing damage 4 party members: Normal damage dealt (no penalty incurred to players) 5 party members: Damage bonus (vampires may die in 1/2 the amount of time it takes with less than 5 players)
Map of Zombie Area Map of Vampire Area
Class sizes sorted by Dungeon Scaler for Hotel Transylvania
Scaler
Class
Vampires/Extra Info
15
3k - 4k
35k - 39k
17
5k
20
7k - 8k
46k - 48k
25
12k - 14k
27
13k - 16k
30
29k - 35k
72k - 76k
31
31k - 36k
35
43k - 46k
144k - 162k
36
45k - 49k
40
49k - 56k
41
49k - 57k
42
51k - 57k
43
52k - 57k
44
56k - 60k
45
166k - 178k
639k - 684k
46
186k - 216k
47
236k - 286k
48
225k - 282k
49
340k - 365k
50
350k - 375k
51
393k - 432k
52
395k - 439k
53
479k - 532k
54
479k - 527k
55
568k - 623k
56
577k - 622k
57
572k - 627k
58
681k - 741k
5.3M - 5.4M
59
685k - 744k
60
690k - 755k
6.1M - 6.3M
61
785k - 888k
62
786k - 888k
63
798k - 888k
64
1.1M
65
1.2M
8M
66
1.2M
67
2.3M
68
2.3M - 2.5M
69
2.4M
70
2.8M
8.9M
71
2.6M - 2.8M
75
3.3M
10M
76
3.8M
78
3.6M - 3.75M
79
4.3M
80
4.2M
82
5.1M
85
5.5M
90
6M
Vampires: 21M
95
6.9M
96
7.3M
99
7.4M
100
9.2M
44M
105
9.4M
106
9.8M
110
10M
61.5M
115
11M
Vampires: 75M
117
11M
118
26M
SCALER JUMP
120
25.3M - 25.6M
Vampires: 181M
125
28M
Vampires: 217M
130
29.4M - 30.1M
Vampires: 329M
135
30M
140
34.6M - 34.9M
Vampires: 403M
143
35M
Vampires: 400M
144
36M
145
35.5M - 35.8M
Vampires: 440M
147
Vampires: 470M
149
Vampires: 535M
150
35.5M - 35.7M
Vampires: 570M
1.0000000034
34
1.0616000000
616M
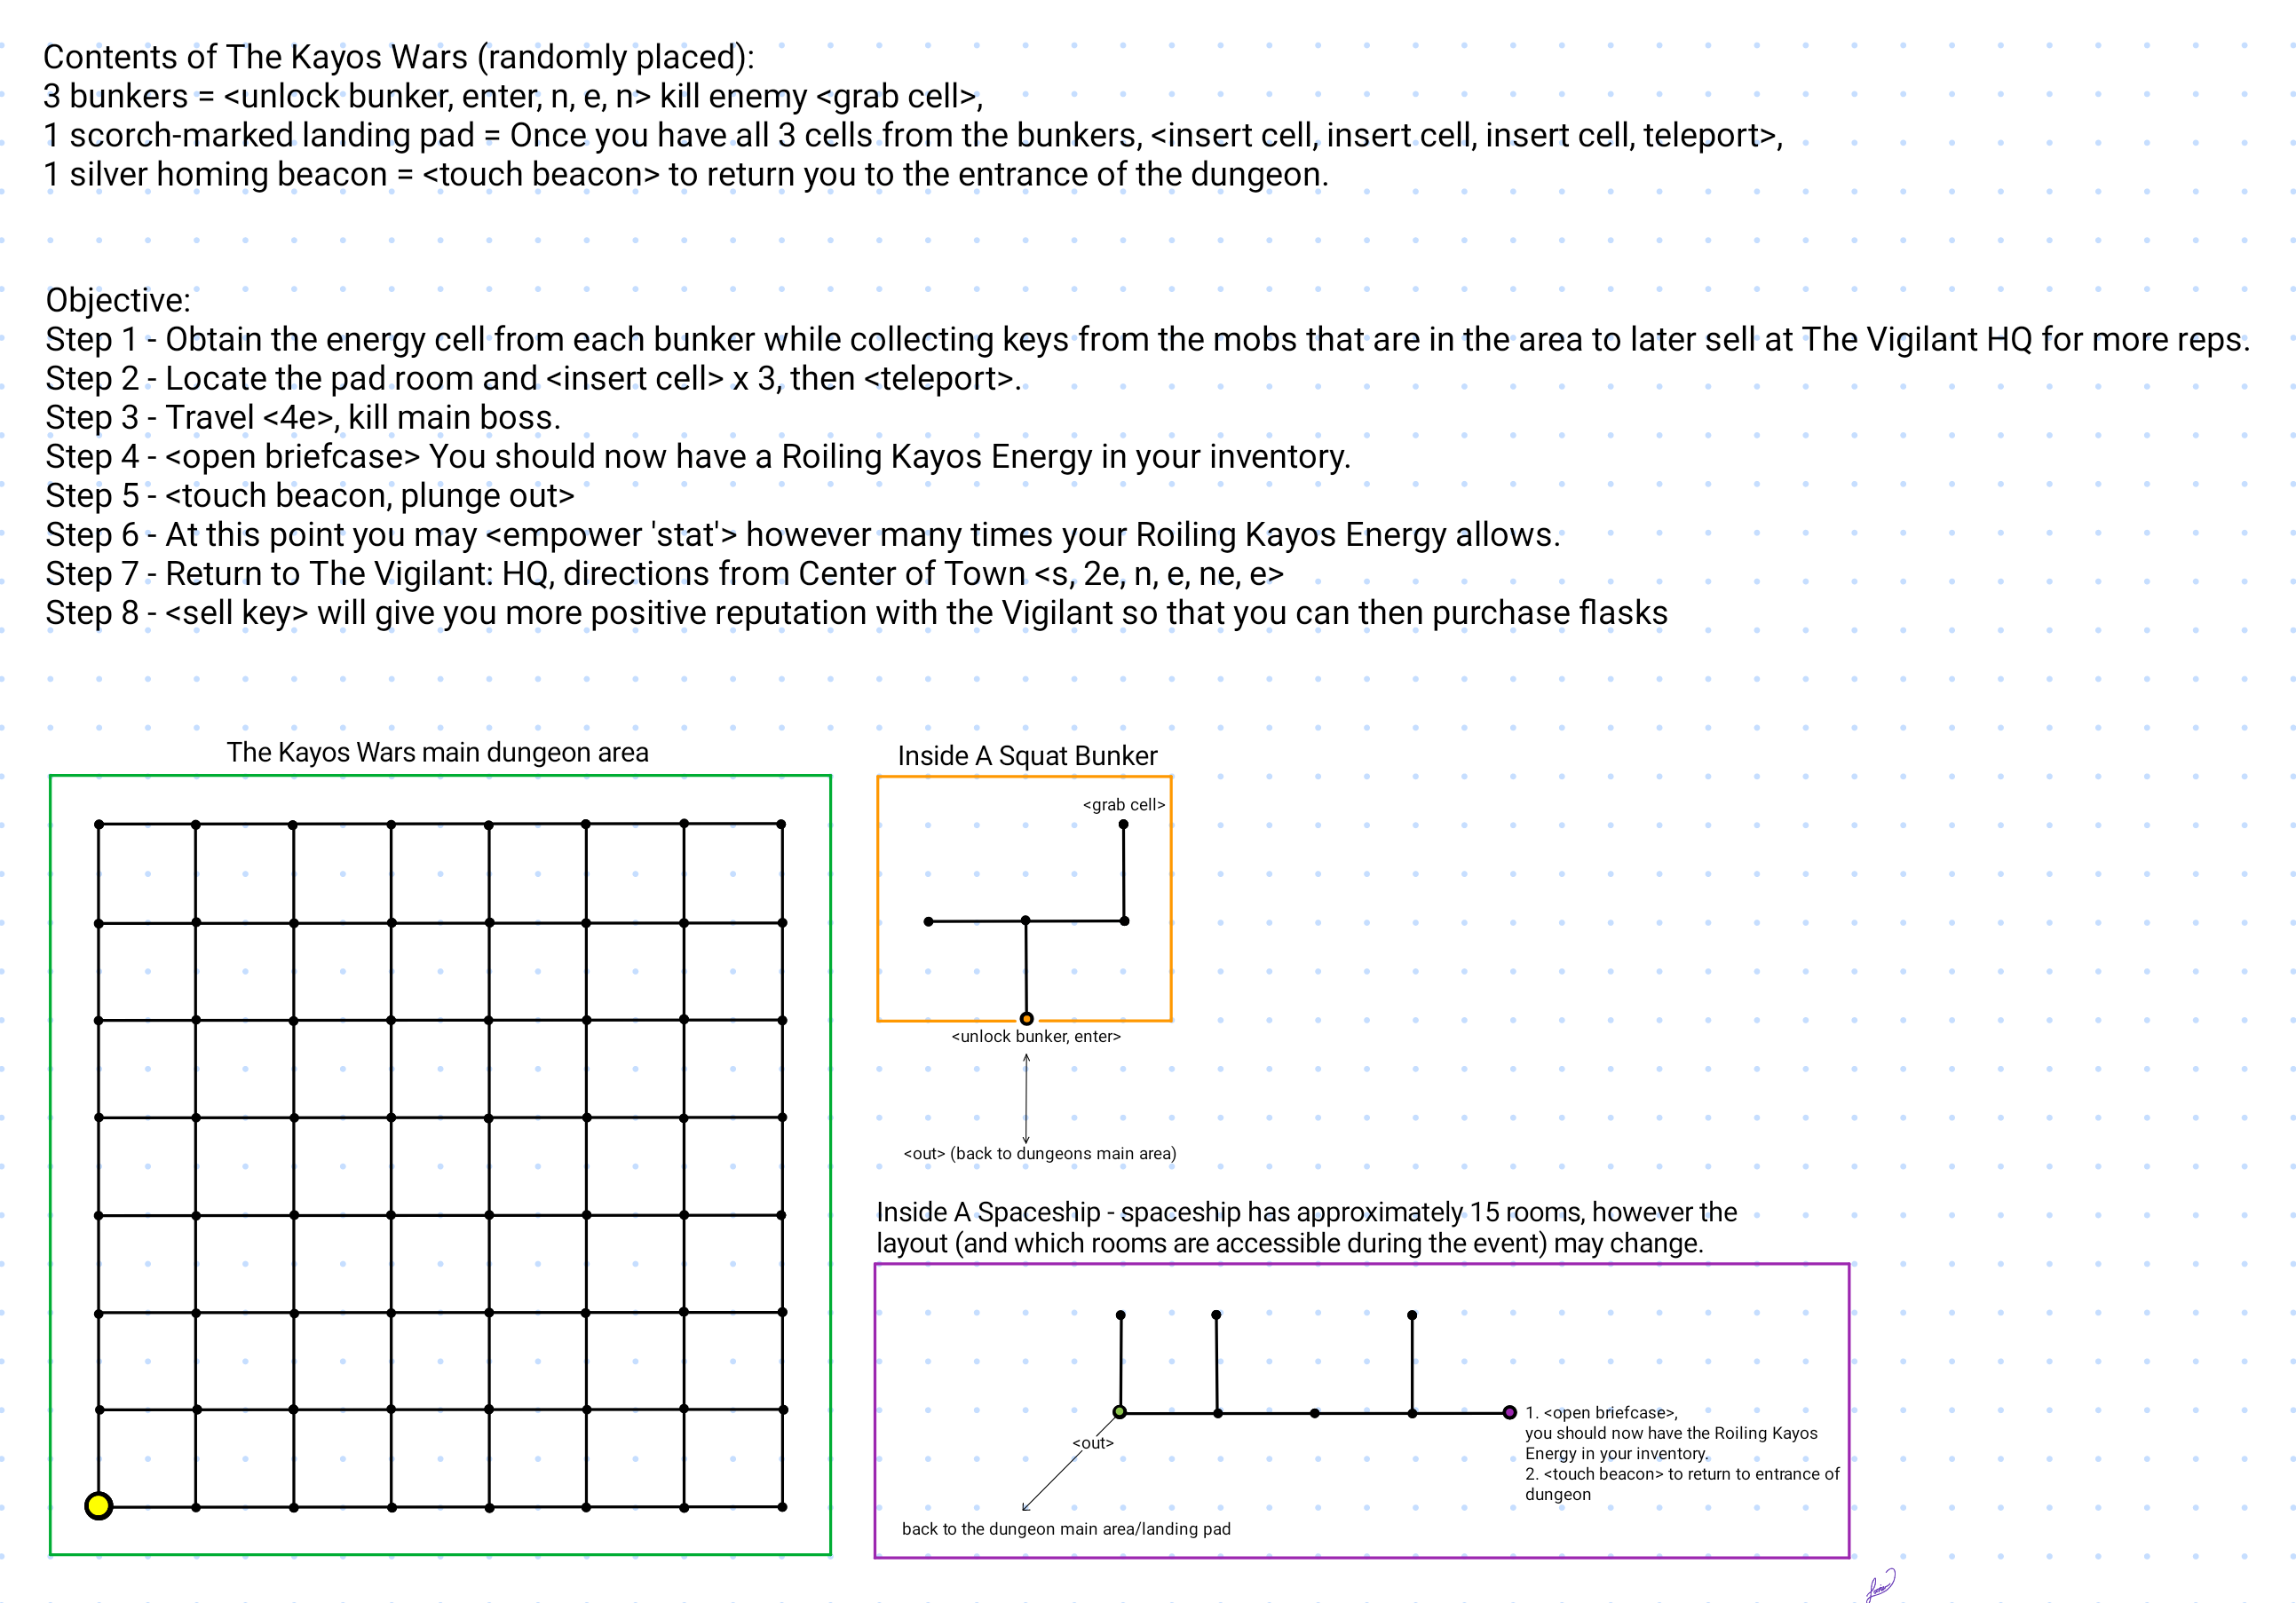
Kayos Wars, The
[Flaxen]
Type <events> to see if the dungeon is currently available to locate. Directions to the events change each time a new one is opened. Look for 'An Interdimensional Portal' and <plunge in>
An Interdimensional Portal Sparks fly all around the purple-black maw of this portal through space-time. It may take you somewhere exciting! Or kill you. Or somewhere exciting! You want to 'plunge' in. If you're able to move this thing, tell a wizard, or else.
Return to Fantasy: Locate the homing beacon - <touch beacon, plunge out>
Area/Rating:
Fantasy The Kayos Wars [Flaxen] Monster class:
1.0000000038
38 to
1.0041600000
41.6M
Hit around:
Alignment:
Neutral (with the boss being evil)
Rewards:
Stat boosting items
Reputation:
The Vigilant
Reset Type:
Timed, mobs will not respawn during the same event.
Dungeon Timer:
7 hours
Scaling:
Yes
Area Details:
EXPLORER NOTE: the ship may changes from reboot to reboot. It has approximately 15 rooms, therefore, it would be beneficial to continue participating in the events until you have visited all rooms in the spaceship.
Stat boosting area when you purchase flasks.
Information provided by 3K Wiki: See below for WMT step-by-step guide. About: Kayos Wars is a dungeon which appears for a limited time. The current status of the Kayos Wars area can be found with the "events" command and will provide a general idea of where to look for it. The battlefield is square-shaped and to exit you need to find the "homing beacon" somewhere on the field if you want to exit before beating the boss. Mobs in Kayos Wars will have randomly generated traits (affixes) which appear after their name which alter how they fight (or how to fight them). Progression: Fighting trash mobs in the battlefield will drop keys which can be used to gain entry to the bunkers scattered throughout. Inside the bunkers, you'll find a named miniboss and after you defeat them you can <grab cell>. Once you acquire three cells, you can find the transport/landing pad, insert the cells, and you'll be taken to the spaceship. On the spaceship is the boss and after defeating them you can open the briefcase in the room for a ball of Kayos energy which can be used to "empower" your stats. Each empower gives +1 to a stat for 6 hours. Higher scalers grant more empowers. Reputation: Killing things in Kayos Wars will increase reputation with The Vigilant which can be redeemed for various boosts at their headquarters near Science. Higher level scalers rewards more reputation per kill. Extra digital keys and other objects from the dungeon can be sold at The Vigilant shop for some Reputation as well. Equipment boosts can raise gear above it's maximum-normally-allowed armor and weapon class.
Map of Area
WMT's steps for this area:
Kill at least 3 mobs in the area to obtain keys to unlock the bunkers. Once you have 3 keys, locate a bunker. <unlock bunker, enter>.
When inside the bunker, travel <n, e, n> (killing anything in your path) in order to obtain the energy cell from each bunker.
<grab cell>
Vacate the bunker and repeat until you have 3 cells, now locate the landing pad room and <insert cell> x 3, then <teleport>.
You should now be inside the ship. Directions to the main boss may vary as the ships layout may change. In general, make your way to the boss. According to the first layout on the map, travel <4e>, kill main boss.
<open briefcase> You should now have a Roiling Kayos Energy in your inventory.
<touch beacon, plunge out>
At this point you may <empower 'stat'> however many times your Roiling Kayos Energy allows.
You can <enter> back into The Kayos Wars to kill more mobs and collect keys (you can sell the keys for more positive reputation points, which in turn can be traded for boosts as indicated in step 10.)
Return to The Vigilant: HQ, From Center of Town <s, 2e, n, e, ne, e>.
<sell key> will give you more positive reputation (25 points per key) with the Vigilant so that you can then purchase flasks for Stat boosts, Armor boosts, and/or Weaponry boosts.
'Resistance' Damage Affixes:
Name:
Enemy Special:
arcane
- energy melee damage
corroding
- acid melee damage
electrifying
- electric melee damage
flaming
- fire melee damage
freezing
- ice melee damage
poisonous
- poison melee damage
pounding
- blunt melee damage
psiwielding
- mind melee damage
radioactive
- radiation melee damage
slashing
- edged melee damage
'Special' Damage Affixes:
Name:
Enemy Special:
antimagic
- immune to certain powers such as scans, stuns, slows
berserking
- harder hits
blinding
- blinds you
burning
champion
- stronger in general (possibly has more stats)
draining
- gives an illness which continues to drain SP's
engaging
- aggressive
ethereal
- possesses a dodge special
exploding
- time delayed explosion
fleeing
- will attempt to wimpy when losing a fight
furious
- chance of penetration attack
healthy
- mob has more hit points
hunting
- will pursue enemies who withdraw from combat
rampaging
- hits around
reflecting
- reflects some of your own damage types
regenerating
- regens health
shielding
- creates a shield block
slippery
- possesses a dodge special
speedy
- higher attack speed/attacks per round
summoning
- summons another mob
tough
walling
- creates a wall which prevents you from leaving
wandering
wounding
- temporary damage to hit points over time
Class sizes sorted by Dungeon Scaler for The Kayos Wars
Scaler
Class
Mobs/Extra Info
15
6k - 11k
Trash: 50 reps Minis: 200 Boss: 500 Stat Boosts: 4
This training arena will help YOU prepare for the trials of combat that you shall face if you pursue the path of KNIGHTHOOD. Be warned, the training within will challenge your physical and mental strength. While the trials within are intended for training, the combat is very real and should be approached with caution.
Reputation: It appears as though you need around 5,000+ reputation points to visit the Grand Master. At each Challenge Board, you must <challenge> a knight in order to proceed. Once you've bested said knight, you may continue to <challenge> more knights. This dungeon is reputation based. Your reputation increases each time you best a knight. If you <abandon> your journey, you will lose some reputation, however, if you simply 'clear the challenge board', you may leave the way you came in. All knights identify to 'elf'.
To learn how to use the equipment dropped from the arena (in order to gain the specials), visit the Grand Master once per boot and: <say hi> <say reputation> <say service> <say training> <say train> <say learn> <say teach> Type <learn> to see the list of what the Grand Master trains. Type <learn [skill]> - Skill being sword, punch, shield, or evasion. Additionally, the more reputation points you have, the higher the skill bonus you will receive.
Note: You are still able to wield/wear the equipment even if you do not have the reputation (provided you meet the level requirement); you simply do not gain the specials given for that gear unless you learn the appropriate skill from the Grand Master.
Map of Area
Class sizes sorted by Challenge Level for the Knights Training Arena
Challenge Arena
Class
Knight/Reputation
Stage 1 Beginner
137k - 1M
An Aspiring Knight {Page-in-Training} - 5 reps
Stage 1 Intermediate
160k - 1M
An Aspiring Knight {Page-in-Training} - 10 reps
Stage 2 Beginner
724k - 2.9M
An Aspiring Knight {Squire-in-Training} - 10 reps
Stage 2 Intermediate
2.8M - 3.8M
An Aspiring Knight {Squire-in-Training} - 20 reps
Stage 2 Advanced
2.6M - 5.4M
An Aspiring Knight {Squire-in-Training} - 30 reps
Stage 3 Beginner
4.1M - 13M
A 2nd Class Knight {Officer-in-Training} - 15 reps
Stage 3 Intermediate
11.8M - 19.5M
A 2nd Class Knight {Officer-in-Training} - 30 reps
Stage 3 Advanced
10.3M - 24.6M
A 2nd Class Knight {Officer-in-Training} - 45 reps
Stage 4 Beginner
12.5M - 42.5M
A Knighted Officer - 20 reps
Stage 4 Intermediate
20.4M - 52M
A Knighted Officer - 40 reps
Stage 4 Advanced
29.1M - 58.6M
A Knighted Officer - 60 reps
Stage 5 Beginner
15.8M - 52.1M
A Knighted Commander - 25 reps
Stage 5 Intermediate
59.3M - 60.4M
A Knighted Commander - 50 reps
Stage 5 Advanced
39.2M
A Knighted Commander - 75 reps
Stage 6 Beginner
25M - 76.5M
A Knight Grand Commander {In-Training} - 48 reps
Stage 6 Intermediate
44.1M - 94.2M
A Knight Grand Commander {In-Training} - 96 reps
Stage 6 Advanced
74.4M - 112.8M
A Knight Grand Commander {In-Training} - 144 reps
Stage 7 Ultimate
102.6M
A Knight's Grand Champion - 250 reps
1.0000069027
69k
1.0167037745
167M
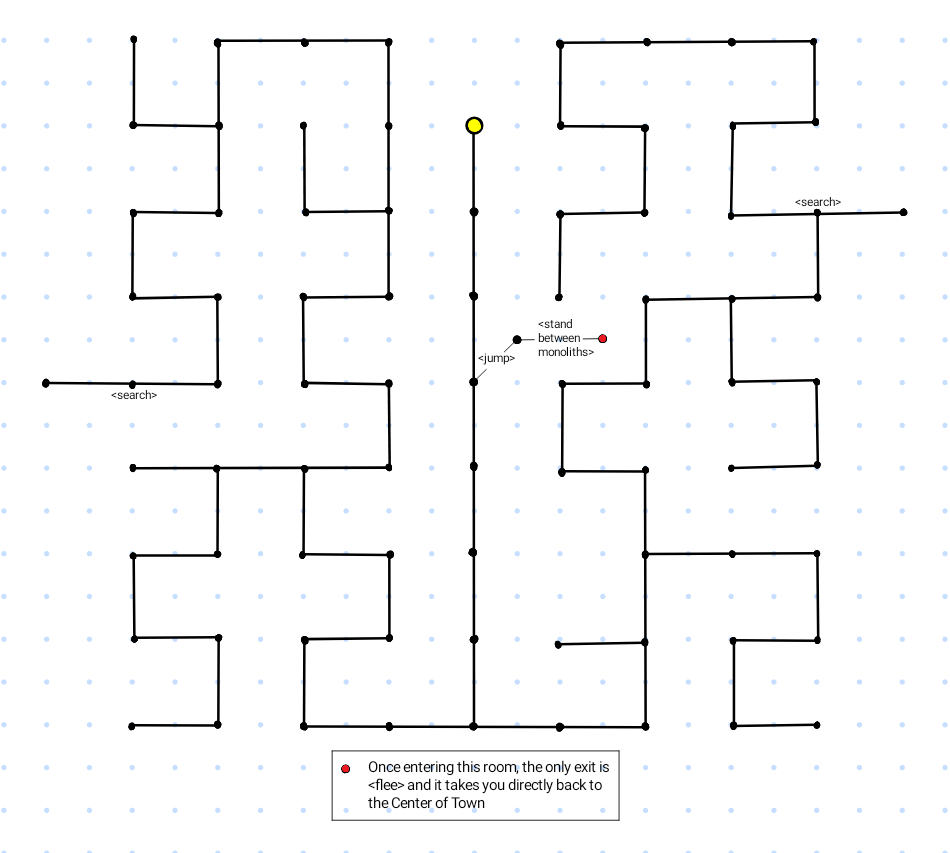
Land of the Ice People
[Rastafan]
From Fantasy: <portal, 12n, leave, 11n, 3e, 9n, portal> Return to Fantasy: <portal, 4n, portal>
From Fantasy: <portal, 12n, leave, 11n, 3e, 9n, portal> Return to Fantasy: <portal, 4n, portal>
Area/Rating:
Fantasy Land of the Ice People [Rastafan] (aka Icy Blue Portal) Monster class:
Natural, mobs will respawn approximately every 30-45 minutes.
Dungeon Timer:
2 hours
Scaling:
No
Area Details:
Keep an eye out for the Peridot Ring of Adornment (this is a quest marble).
This is a non scaling dungeon with a wide range of low scale magical items good for donations and selling. It is also a good place to often find a Ring of Pickling.
Non-dungeon part of area: The Frolag Guards can be found <3s, jump, stand between monoliths> from the entrance of the dungeon.
1.0000000071
71
1.0000110000
110k
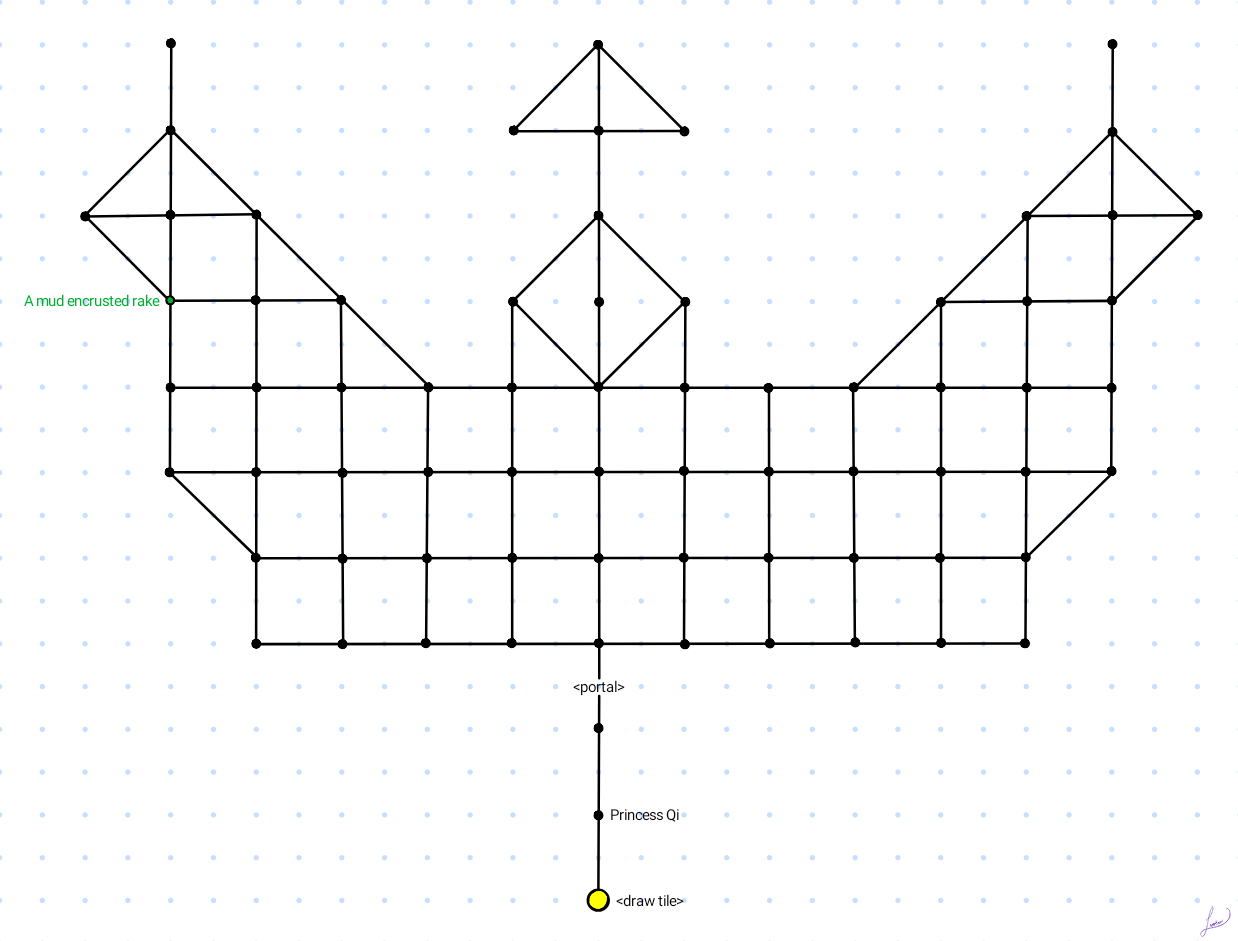
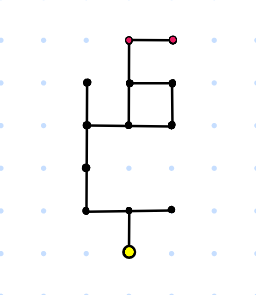
Mahjongg
[Revelation]
From Chaos: <enter, 2w, 2s, draw tile> Return to Chaos: <exit, 2n, 2e, vortex>
From Chaos: <enter, 2w, 2s, draw tile> Return to Chaos: <exit, 2n, 2e, vortex>
Area/Rating:
Chaos Mahjongg [Revelation] Monster class:
1.0000030000
30k to
1.0208000000
208M
Hit around:
No
Alignment:
Slightly Good
Rewards:
Coins - None
Reputation:
Reset Type:
Timed, mobs will not respawn until dungeon has fully reset.
Dungeon Timer:
6 hours
Scaling:
Yes
Area Details:
Reputation Goal: Increase your Mahjongg reputation to gain favor with Princess Qi. Once you have approximately 25,000 in positive reputation, <bow> to Princess Qi to receive her gift (the Bihu Symbol) which will make a piece of armour unbreakable. The higher your scaler, the more reputation points you receive during your battles within the dungeon (currently, scaler 120 gives approximately 70 reputation points per kill whereas scaler 150 gives you approximately 100 reputation points per kill).
Map of Area
Mobs and Damage Types
Name
Damage
Butterfly
Edged/Blunt
Dolphin
Mental
Dragon
Fire
Phoenix
Fire
Rabbit
Edged/Blunt
Ram
Edged/Blunt
Serpent
Poison
Tigers
Edged/Blunt
Class sizes sorted by Dungeon Scaler for Mahjongg
Scaler
Class
15
29k - 41k
17
29k - 41k
20
29k - 41k
25
29k - 41k
30
29k - 41k
35
29k - 41k
40
29k - 41k
45
29k - 41k
50
29k - 41k
55
42k - 52k
60
43k - 51k
65
43k - 51k
68
45k - 50k
69
42k - 52k
70
474k - 692k
71
510k - 683k
72
516k - 677k
75
745k - 768k
80
581k - 810k
84
85
5.1M
86
4.6M - 6.8M
87
4.6M - 6.8M
88
4.7M - 6.9M
90
5M - 6M
95
5.2M - 7.2M
97
5.2M - 7.5M
98
5.5M
99
5.5M - 7.5M
100
16M - 25M
101
20M
105
18M - 25M
110
32M - 44M
111
30M - 45M
115
32.8M - 45.5M
117
31M - 47M
120
83M - 96M
125
84M - 96M
130
119M - 135M
135
134M
138
123M - 141M
139
124M - 141M
140
219M - 253M
143
222M - 256M
144
222M - 257M
145
223.5M - 258.3M
147
226M - 261M
148
226M - 263M
150
229M - 264M
1.0000030000
30k
1.0208000000
208M
Puppy Mill
[Rastafan]
From Chaos: <enter, 2w, n, follow tracks, n, climb gate> Return to Chaos: <climb gate, s, return, s, 2e, vortex>
From Chaos: <enter, 2w, n, follow tracks, n, climb gate> Return to Chaos: <climb gate, s, return, s, 2e, vortex>
Area/Rating:
Chaos Puppy Mill [Rastafan] Monster class:
1.0000000096
96 to
1.0004500000
4.5M This area has discovered rooms. WMT has discovered
1.0000000013
13 rooms.
Hit around:
No
Alignment:
Evil
Rewards:
Medal - Puppy Pendant Medal - Puppy Philanthropist Medal - Puppy Particulars
Coins - 326
Reputation:
Pinnacle Pound
Reset Type:
Natural, mobs will respawn approximately every 30-45 minutes.
Dungeon Timer:
Boot - Dungeon will not reset once visited until the next mud reboot
Scaling:
Yes
Area Details:
See more information on puppies, the pound, and the Veternarian profession here.
Note: The Puppy Mill does not reset during boot (but mobs will respawn), so whichever level you first enter at, you will be stuck at for the reboot unless you're able to have it reset with the eternal Reset Dungeon power.
There are 2 rooms in this dungeon which are occupied by aggressive enemies (Morons with pipes, and Rocko) marked in red on the map. You must kill them to pick up and 'rescue' puppies. Each rescue increases your reputation with the Pinnacle Pound. This can be used to begin raising a dog companion. There are many puppy breeds that can be found here (165 so far) which can be seen by looking at 'medals puppy3'.
Map of Area
Class sizes sorted by Dungeon Scaler for Puppy Mill
Scaler
Class
Mobs/Extra Info
5
97
Rocko: 97
15
1k
Rocko: 1k
20
7k - 8k
Rocko: 8k
25
14k - 16k
Rocko: 15k
30
26k - 28k
Rocko: 25k
35
34k - 36k
Rocko: 38k
40
47k - 49k
Rocko: 58k
45
52k - 57k
Rocko: 65k
50
62k - 70k
Rocko: 74k
55
87k - 96k
Rocko: 160k
60
105k - 110k
Rocko: 176k
65
130k - 140k
Rocko: 278k
70
167k - 180k
Rocko: 393k
74
190k - 210k
Rocko: 460k
75
196k - 473k
78
220k - 241k
Rocko: 493k
80
267k - 605k
81
270k - 285k
Rocko: 580k
85
335k - 355k
Rocko: 718k
90
432k - 463k
Rocko: 1M
95
574k - 610k
Rocko: 1.4M
100
739k - 779k
Rocko: 1.8M
105
738k - 783k
Rocko: 1.9M
110
831k - 871k
Rocko: 2.1M
115
955k - 991k
Rocko: 2.4M
120
991k - 1M
Rocko: 2.9M
125
1.1M
Rocko: 3.3M
130
1.2M - 1.3M
Rocko: 3.5M
135
1.3M
Rocko: 3.6M
140
1.4M - 4M
143
1.3M - 1.5M
Rocko: 4.4M
145
1.3M - 1.5M
Rocko: 4.4M
150
1.5M
Rocko: 4.4M
1.0000000096
96
1.0004500000
4.5M
Rimalkins Cave 2.0
[Turnhold]
From Fantasy: <portal, 12n, leave, 11n, 3e, 3n, 6w, s, slide> Return to Fantasy: <leave, n, 2w, portal>
From Fantasy: <portal, 12n, leave, 11n, 3e, 3n, 6w, s, slide> Return to Fantasy: <leave, n, 2w, portal>
Area/Rating:
Fantasy Rimalkins Cave 2.0 [Turnhold] Monster class:
1.0013000000
13m to
1.0095000000
95M
Hit around:
Alignment:
Neutral
Rewards:
Reputation:
Reset Type:
Timed, mobs will not respawn until dungeon has fully reset.
Dungeon Timer:
2 hours
Scaling:
No
Area Details:
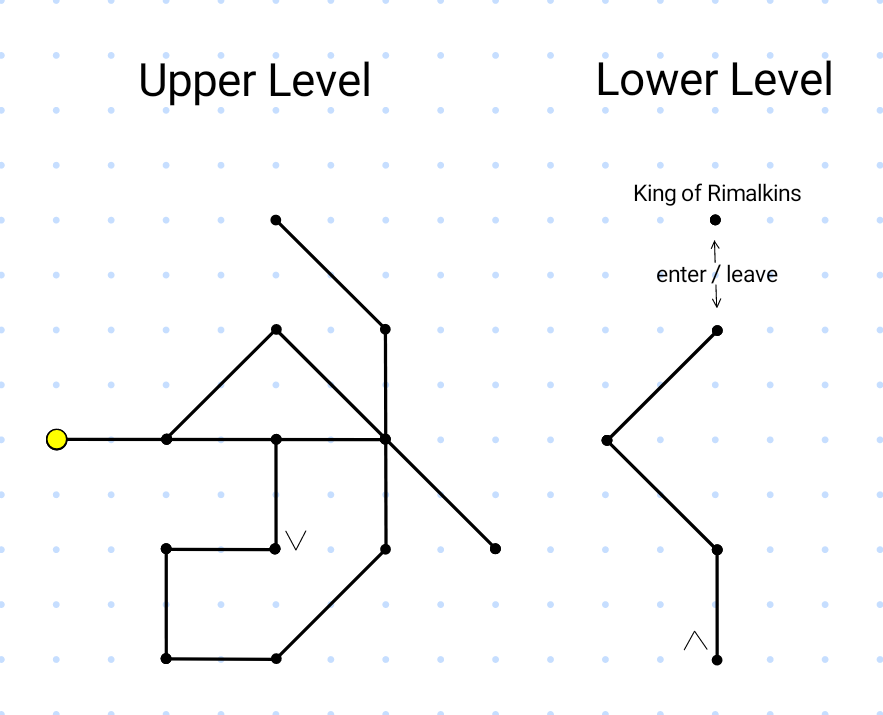
Originally created by Tharog and remade into a dungeon by Turnhold, Rimalkins 2.0 are a non scaling dungeon cave area consisting of one upper and one lower level. While rating shows a low end mob class of 809k, the range is really around 13m for "Small" rimalkins, around 19m for "Large", and 26m for "Very Large". The lower level of the cave has a room with the King, but you will not be able to enter the room until an unspecified number of rimalkins have been killed. The number needed to gain entry might require killing them in a quantity greater than all available in a single dungeon reset. Once entry has been earned, you can retain access through reboots. The king is around class 95m and has a legendary bind on pickup ring 'Ring of Magical Deflection'. While the ring has no AC, it does have some SMD as well as a special that will sometimes prevent damage from specials.
See also:Rimalkin Cave (non-dungeon area ranging in class size of to ).
Map of Area
Class sizes sorted by Dungeon Scaler for Rimalkins 2.0
Scaler
Mobs/Extra Info
Non-scaling dungeon
13M - 95M
1.0013000000
13m
1.0095000000
95M
Section Z
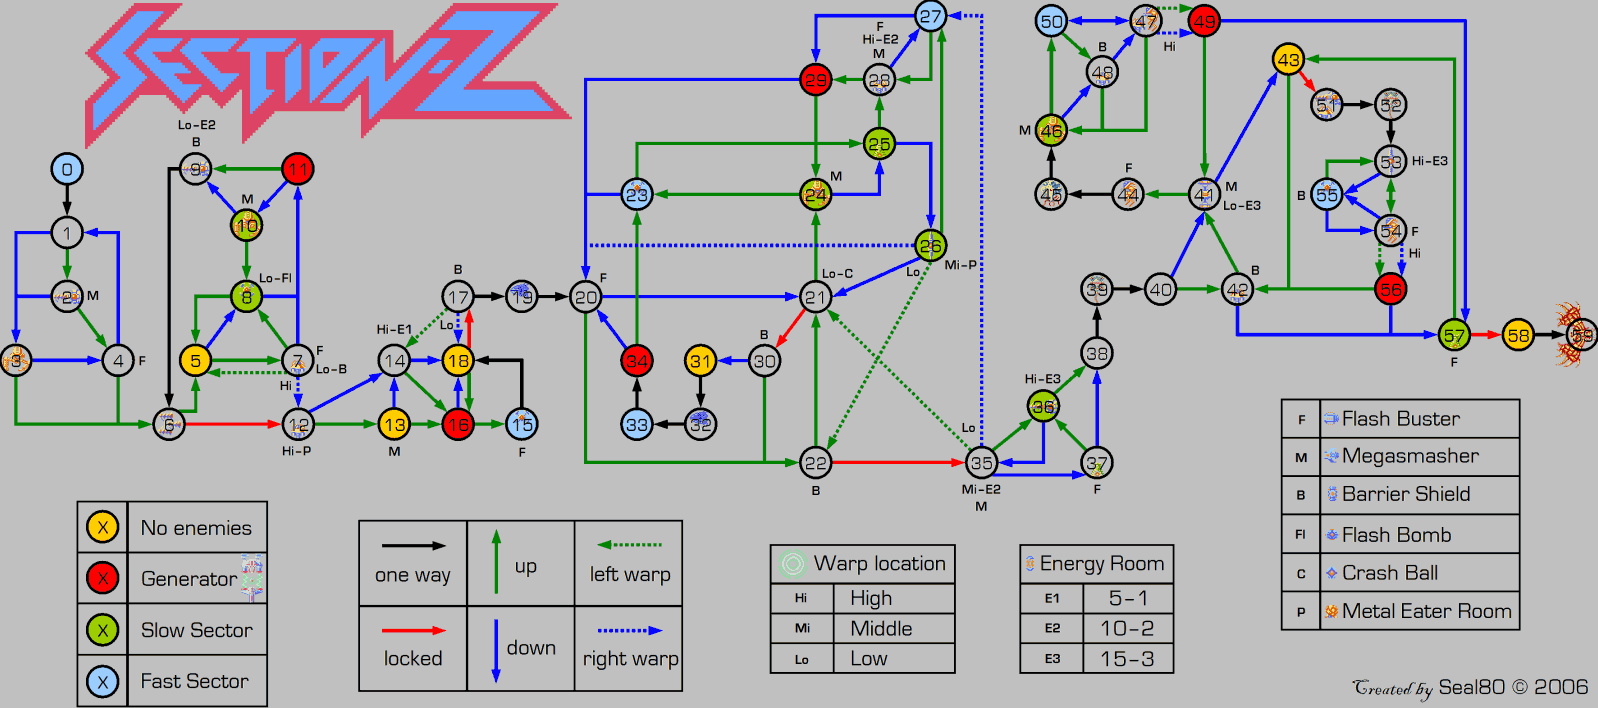
[Kikipopo]
From Science: <enter, u, 3n, w, n, play, press start> Return to Science: (from anywhere inside, but not during combat) <pause game, s, e, 3s, d, out>
From Science: <enter, u, 3n, w, n, play, press start> Return to Science: (from anywhere inside, but not during combat) <pause game, s, e, 3s, d, out>
Area/Rating:
Science Section Z [Kikipopo] Monster class:
1.0000013000
13k to
1.0138000000
138M
Hit around:
No
Alignment:
Slightly Evil
Rewards:
None
Reputation:
None
Reset Type:
Timed, mobs will not respawn until dungeon has fully reset.
Dungeon Timer:
8 hours
Scaling:
Yes
Area Details:
Within approximately 441 rooms, the class scaling for Section Z is very linear and should offer a good place to fight for all levels. Each of the mobs has a chance to drop a capsule, which will either be blue, orange, green, or white. Green capsules only drop from the unique mobs (not Brain) as well as from the shield generators. White capsules drop less often (and are used to open up the Haywood Annex area). Blue and Orange capsules will deteriorate and vanish after being held for a time (though you can <compress> the capsule to keep it from vanishing, while green will never vanish.
You can <swallow capsule> for effects that are specific to the color of the capsule. The bonuses from these capsules, as well as the duration of the bonus, will improve based on the level of the scaler. 30 minutes is the maximum time bonus at scaler 150.
Section Z capsule information
Blue capsule will expire and if consumed will provide +critical hit / +penetration. Inserting this color capsule into the figurine will provide SMD.
Orange capsule will expire and if consumed will provide +focus / +regeneration. Inserting this color capsule into the figurine will provide HP/SPRegeneration.
Green capsule will not expire and if consumed will provide +wisdom / +dexterity stats. Inserting this color capsule into the figurine will provide +WIS/+DEX.
Blue capsule + Blue capsule = Blue Aura gear Blue capsule + Orange capsule = Violet Aura gear Blue capsule + Green capsule = Aquamarine Aura gear Orange capsule + Orange capsule = Orange Aura gear Green capsule + Green capsule = Green Aura gear Green capsule + Orange capsule = Yellow Aura gear
White capsules can only be consumed when you're standing in the room of The Rejected Game which will then transport you to the Haywood Annex. See notes in 'The Final Boss' section below.
The Final Boss
At the end of the dungeon, the final boss will be the "Brain". It will drop 2 items. First is a Barrier Shield which is a breakable 'Unknown' slot item. The second is a figurine which you can use along with capsules to make one of four types of armor: Boots / Helmet / Gloves / Main. The types of capsules used to make the armor will impact the color of the final piece as well as its bonuses. The color of the final item will also be based on the capsules used to make it. You must first <open figurine> which will reveal a slot in each of the item type areas, labeled as feet/head/chest/hands. As an example, to make orange boots, you would enter the following commands:
<open figurine> <insert orange near feet> <close figurine> <insert orange>
You can select any of the 3 colors for this process. Using 2 of the same will produce a more potent effect of that color. The resulting potency of any bonus as well as the AC of the armor created will be based on the scaler size (what type of armor you create will not change the bonus given).
Note: Because orange and blue capsules can rot/vanish after a period of not using them, there is an option to <compress> them, which will turn them into stones. These stones will not vanish, and can be saved for later use in a figurine. Once a stone however, they can no longer be consumed for any beneficial effects.
The eternal power, (duplicate item, does not create an exact duplicate of the figurine. The resulting item will have no power and 0 AC.
Mobs in Section Z and Their Damage:
There are a number of different mob types in the area, but they all ID to "balangool".
Clone Soldiers - Blunt and Energy specials Spiral Gun - Blunt and Energy specials Cloud Eyes - Energy specials Gromas - Edged and Blunt specials Leagos - Edged and Blunt specials Leava - Blunt specials Rippers - Blunt specials Generators - Energy and Electric specials
Unique mobs: Section 19: Zamuza radiation & blunt specials Section 39: Balba electric & radiation specials (slightly larger class than average) Section 45: Galga fire & radiation specials (slightly larger class than average) Section 49: Brain edged & acid specials (noticably larger class than average)
Map of Three Kingdoms Section Z
Map of Section Z from original gameplay
Class sizes sorted by Dungeon Scaler for Section Z
Natural, mobs will respawn approximately every 30-45 minutes.
Dungeon Timer:
12 hours
Scaling:
Yes
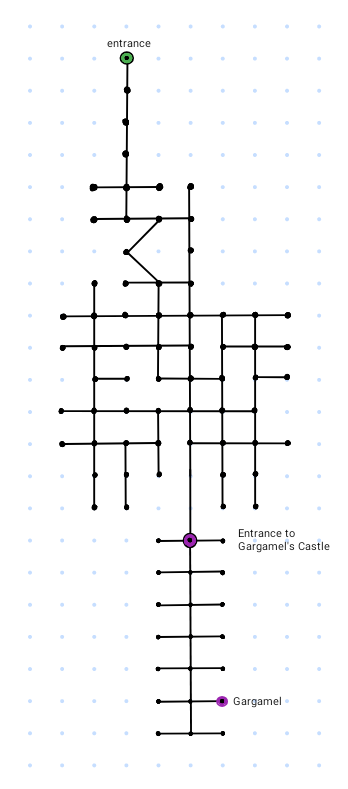
Area Details:
While this dungeon scales, mobs remain the same from scaler levels 1 to 99 (< 50k). Beyond this, they scale up quickly, and become considerably more difficult above 111. At 111 and beyond they can summon mobs to assist, cast fear spells, use room damage as well as gain some immunities and regeneration.
Map of Area
Class sizes sorted by Dungeon Scaler for Smurfland
Scaler
Class
Mobs/Extra Info
1 - 99
< 50k
20
6k - 19k
100
650k - 760k
Tracker, Smurf-eater, Azrael, Gargamel: 1.4M
105
662k - 1.3M
110
772k - 841k
Tracker, Smurf-eater, Azrael, Gargamel: 1.6M
111
Mobs begin to summon rats to assist in fighting, cast fear spells, use room damage as well as gain some immunities and regeneration.
115
1.5M +
Rats have random immunities.
120
5M - 6M
125
11M - 13M
130
16M - 18M
135
15.8M - 18.4M
138
33M
140
34.6M - 35.7M
142
36M
143
35M
Brainy Smurf: 34.7M A very large rat: 38.2M
145
24.1M - 39.5M
146
35M - 40M
150
25M - 40M
1.0000003311
3k
1.0039833520
40M
Summerset Warrens 2.0
[Turnhold]
From Chaos: <enter, 4w, e, n, w, pull fence> Return to Chaos: <pull fence, e, s, 2w, 3e, vortex>
From Chaos: <enter, 4w, e, n, w, pull fence> Return to Chaos: <pull fence, e, s, 2w, 3e, vortex>
Timed, mobs will not respawn until dungeon has fully reset.
Dungeon Timer:
2 hours
Scaling:
Yes
Area Details:
Warning: If you're going after the ring, obtain an axe prior to entering this area. Axe can be found in:
Smithy (in town) for 240 coins. From Center of Town, travel <s, e, s, buy axe, n, w, n>
Guild specific -
Juggernaut guild store
Knight guild store
Mages (can <cast fabricate as dagger#Axe#Axe>)
Priests (can <create axe>)
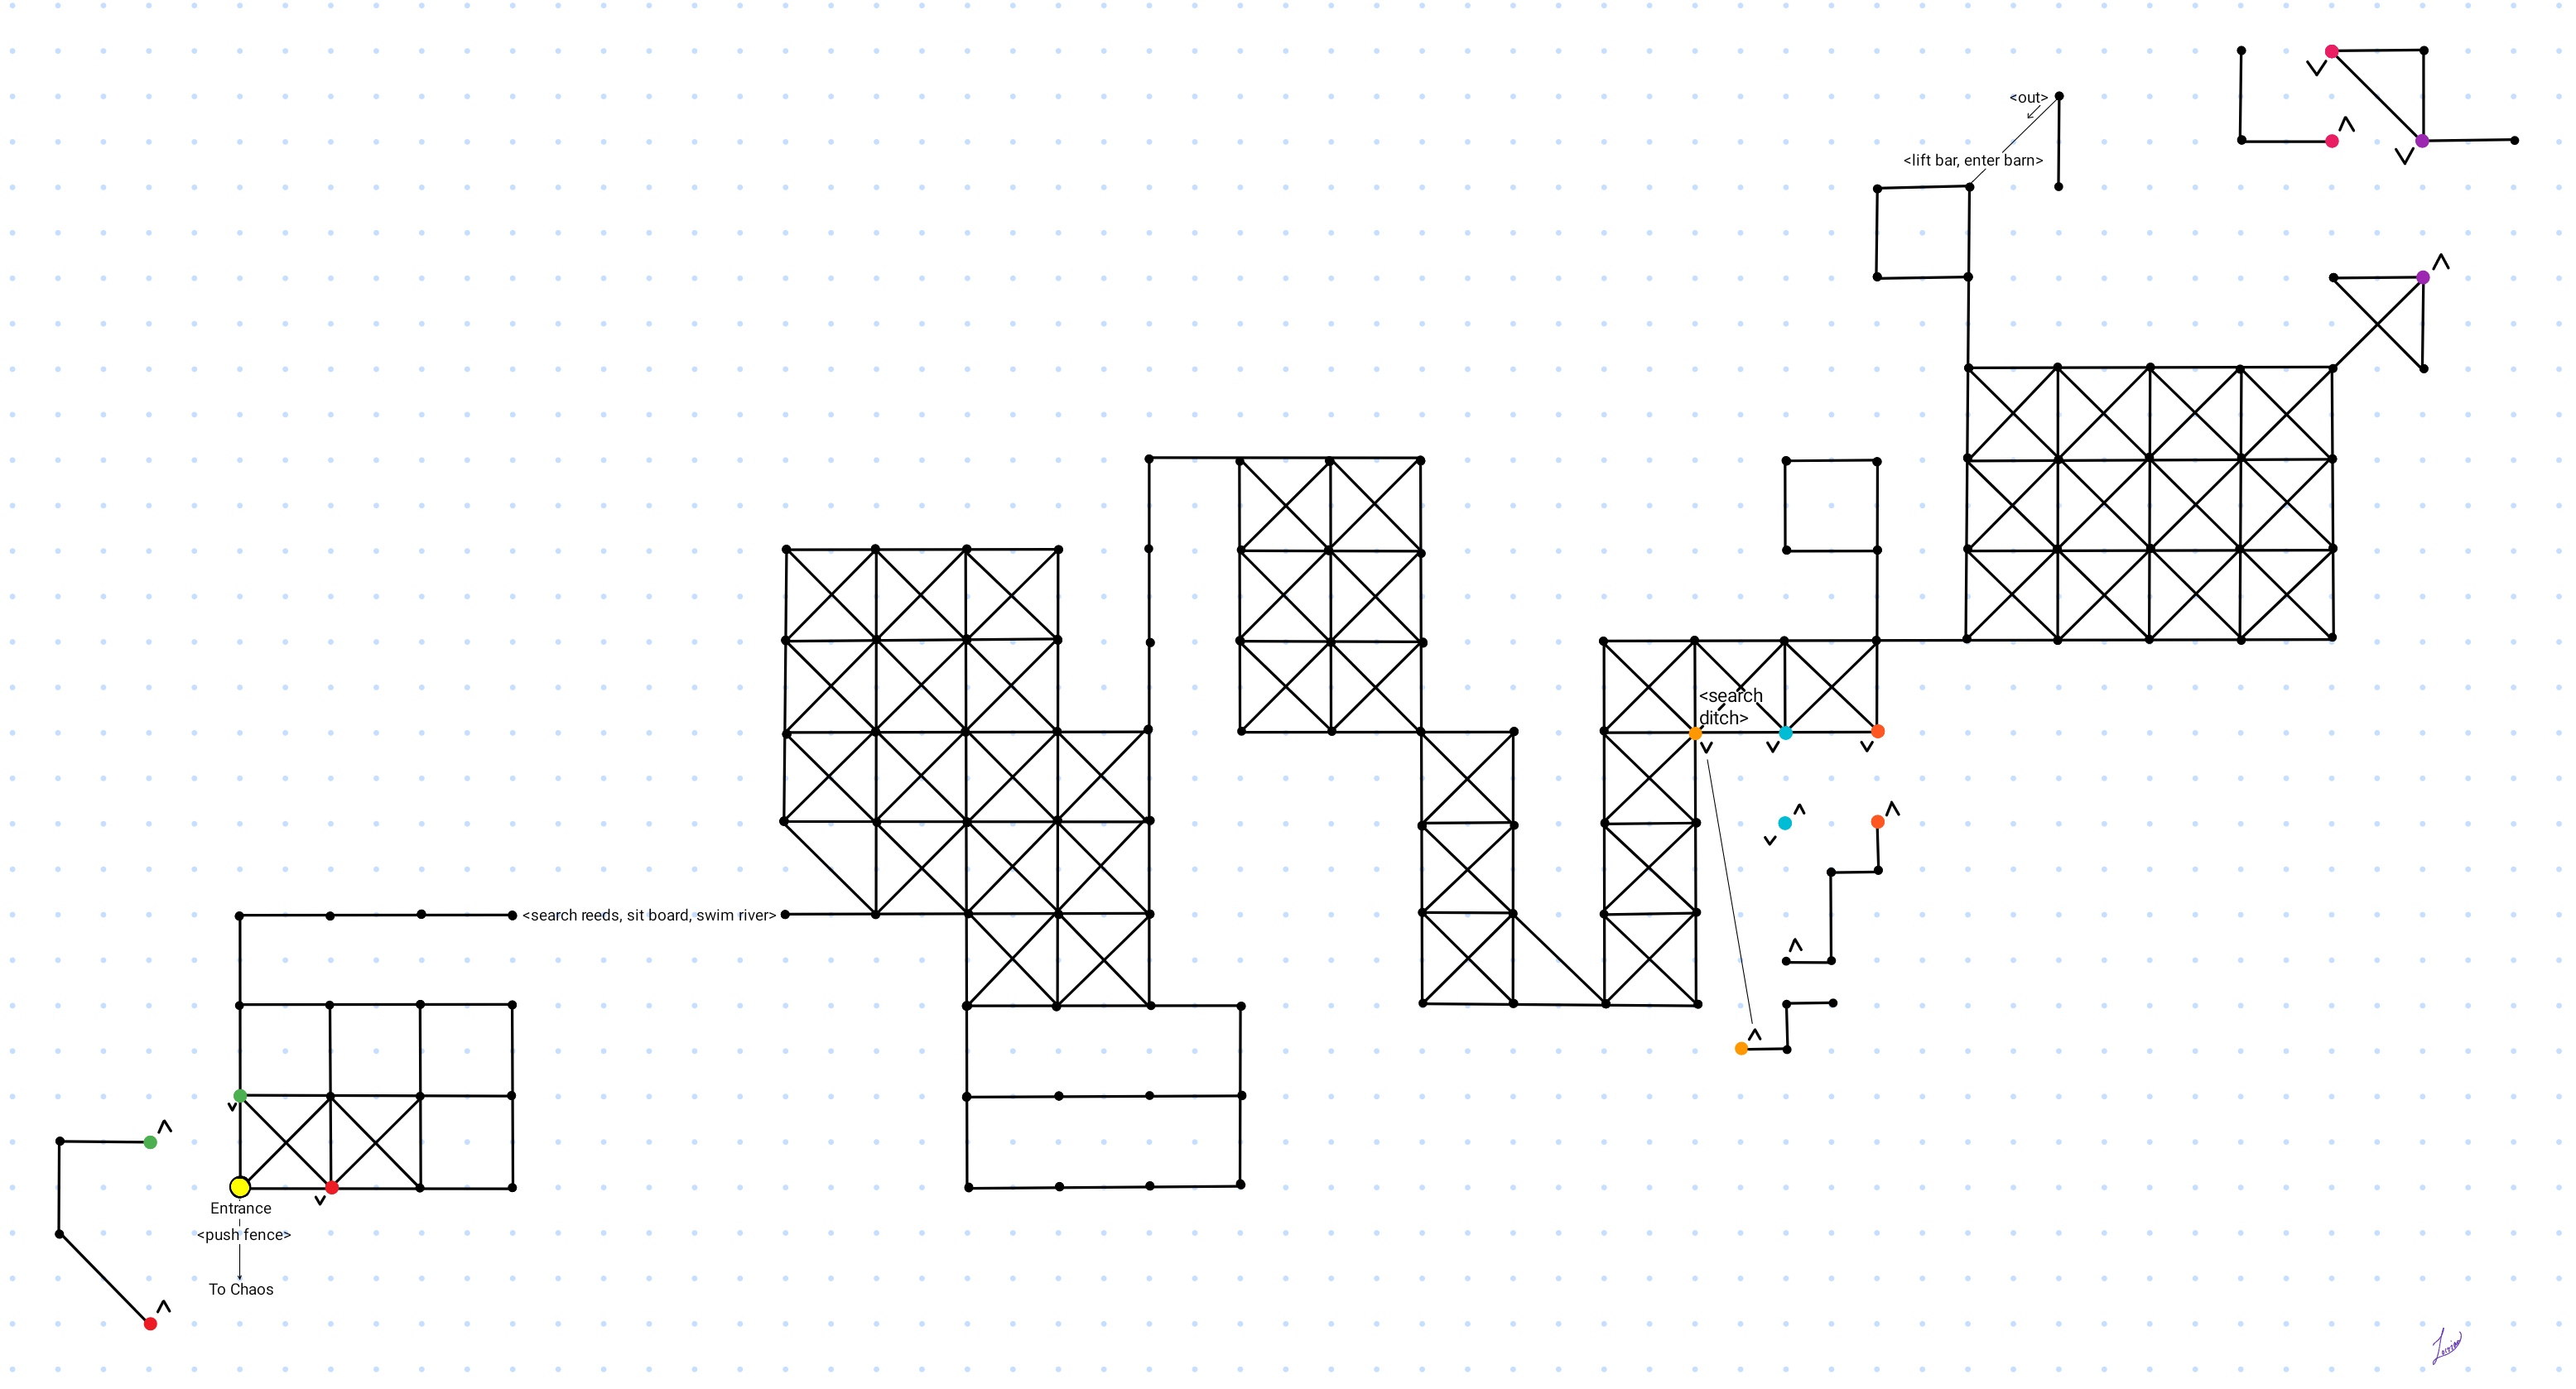
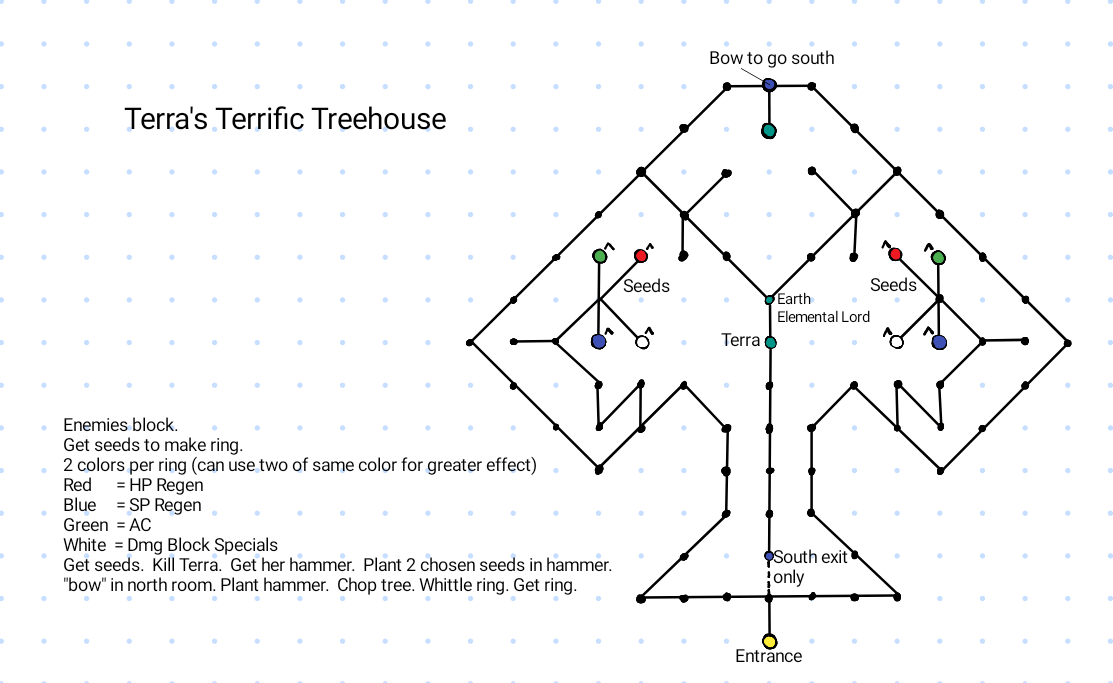
Forest Cottage, Fantasy area. From Fantasy, travel <portal, 15e, leave, 15e, 6n, enter, kill barrett 15k : Barrett, Woodsman of the Forest <get axe, leave, s, 4w, portal>
Dragonlance Solace, Chaos area. From Chaos, travel <enter, 4w, e, s, w, s, 3e, enter, nw, n, wear ring, sw, kill dwarf> 5k : An old and strong dwarf <get axe, ne, ride dragon, s, se, 4w, n, e, n, 2e, 2w, 3e, vortex>
Now you may continue on your journey with Terra's Terrific Treehouse.
This dungeon is all about making a ring. In two locations here there are branches with 4 different seeds: Red / Blue / Green / White. In total there are 8 seeds to be found, 2 of each color. At the center of the area, once you have cleared the necessary blockers, is Terra. She is a much higher class in general than the rest of the dungeon and carries a hammer. When killed, you plant two seeds in the hammer, then on the northern end of the map 'bow' to enter a hidden room. Plant the hammer which grows a tree, then use an axe (any axe will work, but there are none in this dungeon), chop tree, whittle ring, and you have your ring. The colors offer different bonuses, and can either be mixed or doubled up for greater effect. Having two of the same color will create a "very [insert color name here]" ring while combining the white seed with another color creates a "pale [insert color name here]" ring. Red = HP Regen, Blue = SP Regen, White = Damage Mitigation (fairly infrequently, this is a firing special that can reduce damage), Green = AC.
As mentioned above, you can combine the colors for a varied/yet weaker effect. Blue and Green = Turqoise ring Blue and Red = Purple ring Red and Green = Yellow ring
Please refer to the map for details on the relevant rooms.
Map of Area
Class sizes sorted by Dungeon Scaler for Terra's
Scaler
Class
Mobs/Extra Info
15
7k - 44k
Terra, Knight of Earth: 303k A strangely dense, very blue wooden ring {radiant} [.....*.....]]
17
7k - 45k
Terra, Knight of Earth: 305k A strangely dense, wooden ring {radiant} [.....*.....]
20
8k - 44k
Terra, Knight of Earth: 303k A strangely dense, very red wooden ring {radiant} [.....*.....]
25
7k - 45k
Terra, Knight of Earth:
30
7k - 44k
Terra, Knight of Earth:
35
7k - 43k
Terra, Knight of Earth:
38
8k - 46k
Terra, Knight of Earth: 305k Ring made from 2 green seeds provides 10 edged, 10 blunt, 10 mind, 10 energy, -10 fire.
39
82k - 1.2M
40
17k - 48k
Terra, Knight of Earth: 531k
45
18k - 50k
Terra, Knight of Earth: 488k
50
83k - 2.2M
Terra, Knight of Earth: 8.2M
55
94k - 2.1M
Terra, Knight of Earth: 8.2M A strangely dense wooden ring {radiant} [....-*-....]
60
81k - 2.1M
Terra, Knight of Earth: 8.1M - 8.2M A strangely dense wooden ring {radiant} [....-*-....]
65
103k - 3.5M
Terra, Knight of Earth: 12M - 23M A strangely dense wooden ring {radiant} [....-*-....]
70
103k - 3.9M
Terra, Knight of Earth: 15M
75
87k - 2.2M
Terra, Knight of Earth: 8.1M
80
454k - 6.6M
Terra, Knight of Earth:
85
527k - 6.9M
Terra, Knight of Earth: 30.5M A strangely dense wooden ring {radiant} [....-*-....]
88
834k - 9.6M
Terra, Knight of Earth: 18M A strangely dense wooden ring {radiant} [....-*-....]
90
871k - 11.5M
Terra, Knight of Earth: 17.2M - 35.5M A strangely dense wooden ring {radiant} [....-*-....]
95
1.3M - 11.2M
Terra, Knight of Earth: 22.8M
100
2.8M - 15.5M
Terra, Knight of Earth: 62M A strangely dense wooden ring {radiant} [...*-*-*...]
105
3.9M - 20.2M
Terra, Knight of Earth: 39.6M
110
4.8M - 17.7M
Terra, Knight of Earth: 51.2M
115
5.7M - 23.4M
Terra, Knight of Earth: 44.7M
120
7.3M - 22M
Terra, Knight of Earth: 85M A strangely dense wooden ring {radiant} [...*-*-*...]
123
8M - 20M
Terra, Knight of Earth: 102M A strangely dense wooden ring {radiant} [...*-*-*...]
124
11M - 30M
Terra, Knight of Earth: 78M A strangely dense wooden ring {radiant} [.*-*-*-*-*.]
125
12M - 45M
Terra, Knight of Earth: 94M
129
13M - 39M
Terra, Knight of Earth: 71M A strangely dense wooden ring {radiant} [.*-*-*-*-*.]
130
28M - 88M
Terra, Knight of Earth: 192M - 240M A strangely dense wooden ring {radiant} [.*-*<*>*-*.]
131
31M - 86M
Terra, Knight of Earth: 254M A strangely dense wooden ring {radiant} [.*-*<*>*-*.]
132
41M - 100M
Terra, Knight of Earth: 275M A strangely dense wooden ring {radiant} [.*-*<*>*-*.]
133
46M - 105M
Terra, Knight of Earth: 323M
134
50M - 91M
Terra, Knight of Earth: 366M
135
55M - 146M
Terra, Knight of Earth: 321M - 385M A strangely dense wooden ring {radiant} [.*-*<*>*-*.]
136
59M - 121M
Terra, Knight of Earth: 356M A strangely dense wooden ring {radiant} [<*/*(*)*\*>]
137
65M - 173M
Terra, Knight of Earth: 463M
138
71M - 181M
Terra, Knight of Earth: 478M
139
79M - 268M
Terra, Knight of Earth: 565M
140
83M - 295M
Terra, Knight of Earth: 525M A strangely dense wooden ring {radiant} [<*/*(*)*\*>]
141
92M - 277M
Terra, Knight of Earth: 600M
142
105M - 345M
Terra, Knight of Earth: 627M
143
119M - 380M
Terra, Knight of Earth: 613M - 693M A strangely dense wooden ring {radiant} [<*/*(O)*\*>]
145
171M - 412M
Terra, Knight of Earth: 651M
146
190M - 447M
Terra, Knight of Earth: 688M
147
225M - 498M
Terra, Knight of Earth: 692M
150
300.9M - 602.6M
Terra, Knight of Earth: 638.6M
1.0000008000
8k
1.0720000000
720M
Tree of Life 2.0
[Turnhold]
From Chaos: <enter, 4w, embrace void> Return to Chaos: <leave, w, 3e, vortex>
From Chaos: <enter, 4w, embrace void> Return to Chaos: <leave, w, 3e, vortex>
Timed, mobs will not respawn until dungeon has fully reset.
Dungeon Timer:
3 hours
Scaling:
No
Area Details:
Stat boost available when you obtain boots, gloves, breastplate, and/or the scroll. While this dungeon does NOT scale, the mobs HIT AROUND so dog owners beware! The gear drops are random, so if you don't find what you are looking for check back in 3 hours [or get an
Eternal
to (reset dungeon]. All spirit gear is unbreakable with several nice stat boosts. Details provided below.
See also:Tree of Life 1.0 (non-dungeon area ranging in class size of to ).
Map of Area
Class Sizes and Gear for Tree of Life 2.0
Scaler
Mobs/Extra Info
Non-scaling dungeon
Sandalphon:7M Bracers: dodge special Gabriel:7M Greaves: no added benefit Michael:7.8M Amulet: HP/SP regen Haniel:7.7M Boots: +10 DEX Raphael:7M Cloak: HP healing up to 200% overmax Khamael:7M Gloves: +10 STR Tzadkiel:7M Helmet: no added bonus Tzaphkiel:9.3M Shield: ~5% block chance Ratziel:8M Breastplate: +10 CON Metatron:15.2M Sword of the Spirit: 50 WIS required to wield this weapon +1 light source
Last room:no enemy Scroll of the Universe: +10 INT and +15 WIS when you <recite scroll>
1.0007000000
7m
1.0016000000
16M
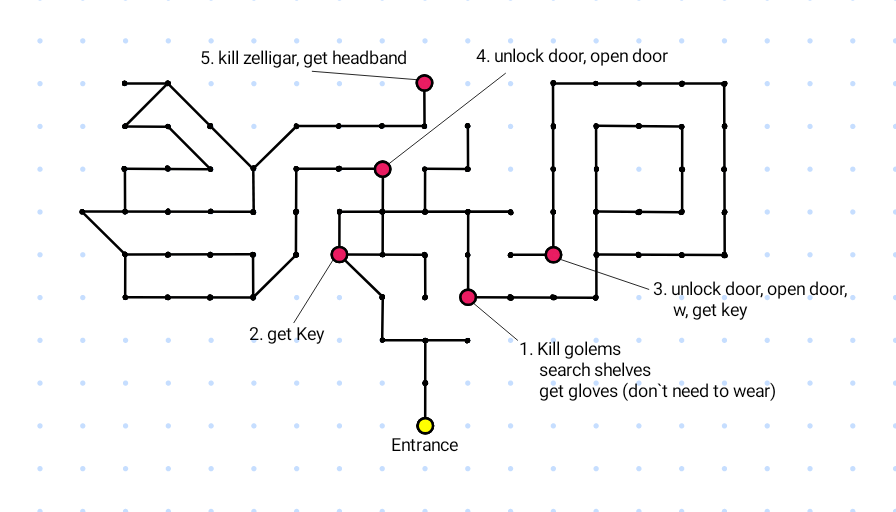
Zelligar's Castle
[Pfunk]
From Fantasy: <portal, 12w, leave, 3w, 4n, enter> Return to Fantasy: <leave, 4s, 3e, enter, 12e, portal>
From Fantasy: <portal, 12w, leave, 3w, 4n, enter> Return to Fantasy: <leave, 4s, 3e, enter, 12e, portal>
Area/Rating:
Fantasy Zelligar's Castle [Pfunk] Monster class:
1.0000000038
38 to
1.0050000000
50M
Hit around:
2nd golem will hit the last player that entered the room
Timed, mobs will not respawn until dungeon has fully reset.
Dungeon Timer:
2 hours
Scaling:
Yes
Area Details:
Stat Boost available when you wear the Headband dropped by Zelligar. Most rooms of this dungon, upon entering, will contain a single aggro golem. During the fight, a second aggro golem will often appear. This second golem will attack the last person that entered the room, so be aware of this when considering tanking. Access to all parts of the castle are controlled by keys, which can be accessed following the ordered sequence in the dungeon map. Zelligar will summon several golems to assist in combat, and these, too, will attack the last in. It is possible to move to the room south of him to rest if needed. It can help to make sure this south room is clear of enemies if you need to bounce him. Zelligar's headband bonuses will change based on scaler. You can also go into Zelligar's Castle and only kill golems for xp/gxp if you want; the map shows you the layout of the area so that you can easily avoid Zelligar's room.
Map of Area
Class sizes sorted by Dungeon Scaler for Zelligar's Castle