Kikipopo
- Wizard as of:
- Rank:
- Archon (***)
- Domain:
- Mudlib
- Guild Affiliations:
- Knight
- Areas Created:
- 5
- About the Wizard:
| Name | Realm | Expl. | Class (low) L | Class (high) H |
|---|---|---|---|---|
| Aegis Global | Science |
1.0000000525 525 |
1.0000030000 30k |
1.0129000000 129M |
| Haywood Annex | Science |
1.0000000000 - |
1.0000000271 271 |
1.0034554629 35M |
| Rejected Game | Science |
1.0000000088 88 |
1.0363187503 363M |
1.2000000000 2B |
| Section Z | Science |
1.0000000440 440 |
1.0000013000 13k |
1.0138000000 138M |
| Starcraft Broodwar | Science |
1.0000000019 19 |
1.0000020391 20k |
1.2000000000 2B |
Aegis Global

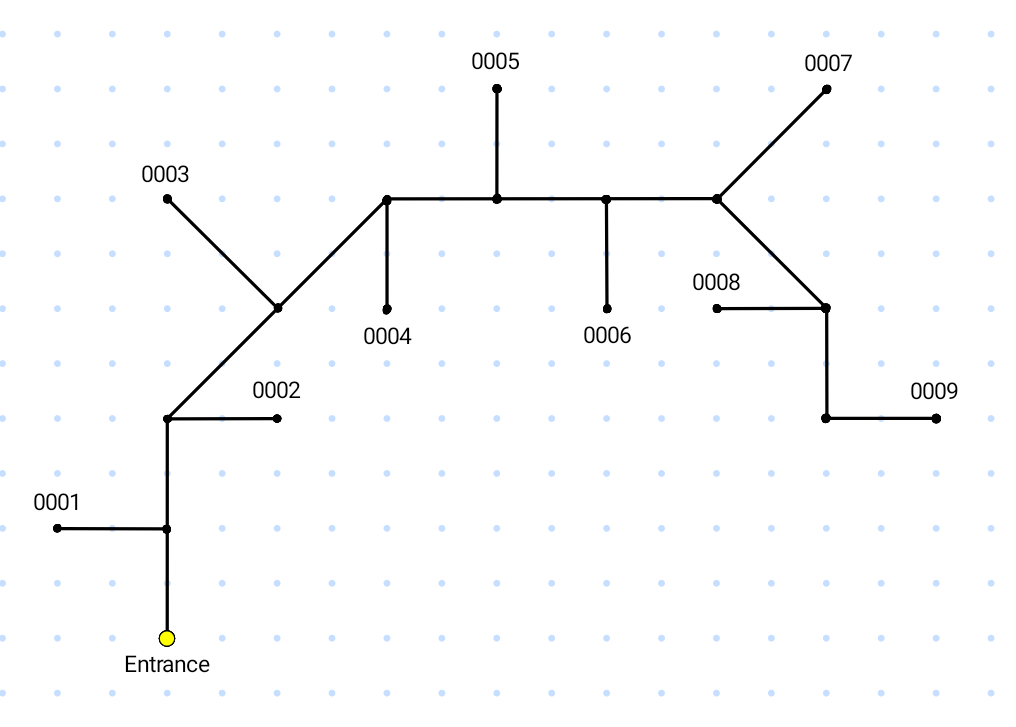
From Science: <enter, u, 4n, d, 18n, 25e, 4n, e, bridge, e, 2se, 2e, enter>
Return to Science: <exit, 2n, w, enter>
- Hit around:
- No
- Alignment:
- Neutral / 181 mobs counted
- Rewards:
- Coins -
- Reputation:
- Aegis Global (see 'goal' in details)
- Reset Type:
- Timed, mobs will not respawn until dungeon has fully reset.
- Dungeon Timer:
- 4 hours
- Scaling:
- Yes
- Area Details:
-
Note titled 'Aegis Global (Rumor, Mon Jan 29 20:01:45 2007):
Aegis Global has never been very friendly to outside inquiries. A defense contractor of its size and power can afford to choose its own clients. No need to advertise.
That's what makes recent events so disturbing. The doors to its New York City headquarters stand wide open. There are whispers on the streets that something terrible has happened there. Something unnatural. And deadly.
This underground complex is large and anyone adventurous enough to look deeper into its recent mysterious circumstances should come prepared for any number of dangers. If you don't make it back in one piece, don't claim you weren't warned.
First few floors recommended for players level 50+. Lower levels...
If you have to ask, don't try them.Goal - Decrease your reputation to -25k to earn approval from Master Gunnery Sergeant Roosevelt Brown (located on level 5).
<nod>, and he'll give you a passcard to access the vault on Level 7 (which is where the bodyarmor and shield can be located). Type<reps>to see your current reputation with Aegis Global.REPUTATION:
Level 1 to Level 2 Zombies = -10 points
Level 3 Zombies = -15 points
Level 4 to Level 5 Zombies = -25 points
Level 1 to Level 3 Robots = -75 points
Level 4 to Level 6 Robots = -100 points
Level 7 Guardian = -200 points
Master Gunnery Sergeant Roosevelt Brown = +1500 pointsItems - All four items; Flamethrower, Bodyarmor, Faceplate, and Forceshield are BoP (also known as Bind on Pickup). The resistances remain the same throughout each scaler (whether it's scaler 65 or 150), though you'll notice that the title description will change - example: 'Aegis Faceplate [polished]' at scaler 65 will turn into 'Aegis Faceplate [shimmering]' at scaler 150. It appears as though your SMD increases for the better with each description change. More details are being acquired and will be updated as we get them. As for the flamethrower, the weapon class increases as your scaler increases.
RESISTANCES:
Bodyarmor: 65 edged, 65 blunt, 30 fire, 30 ice, 30 acid, 50 energy, 30 radiation
Faceplate: 15 edged, 15 blunt, 30 fire, 15 ice, 30 acid, 30 electric, 15 energy
Forceshield: 32 edged, 32 blunt, 20 fire, 20 ice, 20 acid, 30 energy, 20 radiation (block chance changes based on scaler)
Flamethrower: fire damage (weapon class changes based on scaler)*Note: Robots in Aegis do not drop corpses and you cannot use the passcard from one scaler on a different scaler, so make sure you
<dispose passcard>once you leave the area.

- Scaler
- Class
-
Mobs/
Extra Info - 7
- 300 - 3k
- 15
- 1k - 22k
-
Hidden Level: 38k
Gear - [scorched]
Bodyarmor:
10 edged, 10 blunt, 5 fire, 5 ice, 5 acid, 8 energy, 5 radiation
Faceplate:
2 edged, 2 blunt, 5 fire, 2 ice, 5 acid, 5 electric, 2 energy
Forceshield:
5 edged, 5 blunt, 3 fire, 3 ice, 3 acid, 5 energy, 3 radiation
Flamethrower (lukewarm) - WC 10 - 17
- 8k - 38k
- Lvl 7 info not acquired
- 20
- 10k - 50k
-
Gear - [scorched]
Flamethrower (lukewarm) - 25
- 22k - 67k
- Lvl 7 info not acquired
- 30
- 30k - 78k
- 35
- 41k - 95k
- 40
- 75k - 198k
- 45
- 97k - 174k
- 47
- 98k
- 50
- 140k - 260k
- 55
- 190k - 325k
-
Gear - [pitted]
- 60
- 470k - 610k
- Flamethrower (sizzling) - WC 40
- 65
- 700k - 1.1M
-
Gear - [blistered] No SMD with Scaler 65 and previous
Flamethrower (sizzling) - WC 43 - 66
- 727k - 1.2M
-
Gear - [polished] is now unbreakable and has SMD
Flamethrower (very hot) - WC 44
Forceshield [polished] - Block chance: <5% - 67
- 741k - 1M
-
Gear - [polished]
Flamethrower (very hot) - WC 44 - 68
- 780k - 1.3M
-
Gear - [polished]
Forceshield - Block chance: <5% - 69
- 1M - 1.8M
-
Gear - [polished]
Flamethrower (very hot) - WC 46
Forceshield - Block chance: <5% - 70
- 1M - 1.9M
-
Gear - [polished]
Flamethrower (very hot) - WC 46
Forceshield [polished] - Block chance: <5% - 71
- 1.1M - 1.4M
- Numbers only reflect floors 1-3
- 72
- 1.7M - 2.4M
-
Gear - [polished]
Flamethrower (very hot) - WC 48 - 73
- 1.8M - 3.2M
-
Gear - [polished]
Flamethrower (very hot) - WC 48 - 75
- 2.4M - 6.8M
-
Gear - [polished]
Flamethrower (very hot) - WC 48 - 76
- 2.8M - 5.4M
-
Gear - [polished]
Flamethrower (very hot) - WC 50
Forceshield [polished] - Block chance: <5% - 80
- 4.4M - 7.4M
-
Gear - [polished]
Flamethrower (very hot) - WC 53
Forceshield [polished] - Block chance: <5% - 82
- 4.9M - 7.9M
- 85
- 6.8M - 11M
-
Gear - [polished]
Flamethrower (very hot) - WC - 86
- 7.2M - 11M
-
Gear - [polished]
Flamethrower (spicy) - WC 57 - 89
- 8.4M - 13M
- Gear - [polished]
- 90
- 9.4M - 15M
- Gear - [polished] Flamethrower (spicy) - WC Forceshield [ ] - Block chance: ~5%
- 91
- 10M - 14M
- 94
- 12M - 18.2M
- 95
- 11M - 12.2M
- 100
- 22M
- 101
- 24M
- 105
- 26M
- 109
- 34M - 45M
- Forceshield [Lustrous] - Block chance: ~5%
- 110
- 32M - 45M
- Forceshield [Luminescent] - Block chance: ~5%
- 115
- 40M - 49M
-
Flamethrower (scorching)
Forceshield [Luminescent] - Block chance: ~5% - 119
- 43M - 56M
- Forceshield [Luminescent] - Block chance: 5%
- 120
- 53M - 70M
-
Flamethrower (immolating) - WC 80
Forceshield [Phosphorescent] - Block chance: 10% - 121
- 54M - 70M
- Forceshield [Phosphorescent]
- 125
- 60M
- 130
- 65M - 82M
-
Forceshield [Glittering] - Block chance: 10%
Flamethrower (napalmy)
- 135
- 74.8M - 99.5M
- 140
- 95M - 122M
-
Gear [Glimmering]
Flamethrower (explosive) - WC 93
Forceshield [Glimmering] - Block chance: ~10% - 142
- 110M - 125M
-
Gear [Glimmering]
- 143
- 110M
- 145
- 106M - 118M
- 146
- 112M - 121M
- Flamethrower WC 97
- 148
- 119M - 150M
- Forceshield [Glimmering] - Block chance: 10%
- 149
- 159M
-
Flamethrower (explosive) - WC 99
Forceshield [Glimmering] - Block chance: 10% - 150
- 123M - 196M
-
Gear [Shimmering]
Flamethrower (liquid hot MAGMA) - WC 100
Forceshield [Shimmering] - Block chance: ~15%
Haywood Annex
From Science: Initially, only accessible if you're holding a white capsule from 'Section Z', then make your way to 'The Rejected Game' area. Fight your way through the area until you reach the 3rd corner of the rectangular area which holds the detour to the crack.
Return to Science: Until specific color directions are uploaded, refer to the Haywood Annex and The Rejected Game maps to make your way to the exit.
- Hit around:
- Alignment:
- Unknown
- Rewards:
- Reputation:
- Reset Type:
- Area Details:
-
Within Section Z, there is a small chance for a Balangool enemy to drop a White capsule. This capsule can only be consumed when if you carry it to the "crack" room within the Rejected Game area. Once consumed in this room, you will go to sleep and then awaken within Haywood Annex. This area does not contain enemies, but rather hallways that lead to 9 different open "safes" (also labeled Time Capsules) which will allow one item to be stored per individual player. Once the item is locked in the safe, it will display a number which indicates the specific reboot in which the safe will open. When the item is placed, the player is able to enter a password which will open the safe. It can not be opened until the reboot number on the display. Once your safe can be opened, you have a 10 reboot "cushion" until your item completely disintegrates (which means it cannot be used any longer for its initial purpose).
a bright white capsule
The tiny white capsule is freezing cold to the touch. It convulses in your hand as if it were trying to break free. It looks small enough to swallow, though it may not be recommended.
It looks light.
I have a white capsule, now what?
Map of Haywood Annex, part 1 - Travel through the Rejected Game area to the crack.
-
<eat white capsule>and you'll enter the Haywood Annex. -
Locate an empty locker and store your item in it.
-
store <item> -
Then when prompted for a password,
enter <password of your choosing>when in the room with the digital safe.
You can
<smell compounds>, but at this time, it won't do anything.
You inhale the air deep into your lungs, and things turn black...
A voice whispers: I don't think you're supposed to be here yet.
A voice whispers: No, this doesn't make sense, you shouldn't be here.
A voice whispers: You have no rust.
A voice whispers: Come back when you have what we need. -
- Make your way back to the entrance of Haywood Annex and then follow the map towards the exit of the Rejected Game.
- Come back when you've obtained a second white capsule so that you can retrieve your item (pro-tip from Voodoo: bring another item the next time you visit the annex so that you can store the new item once you've retrieved your original item).
Going back a second time
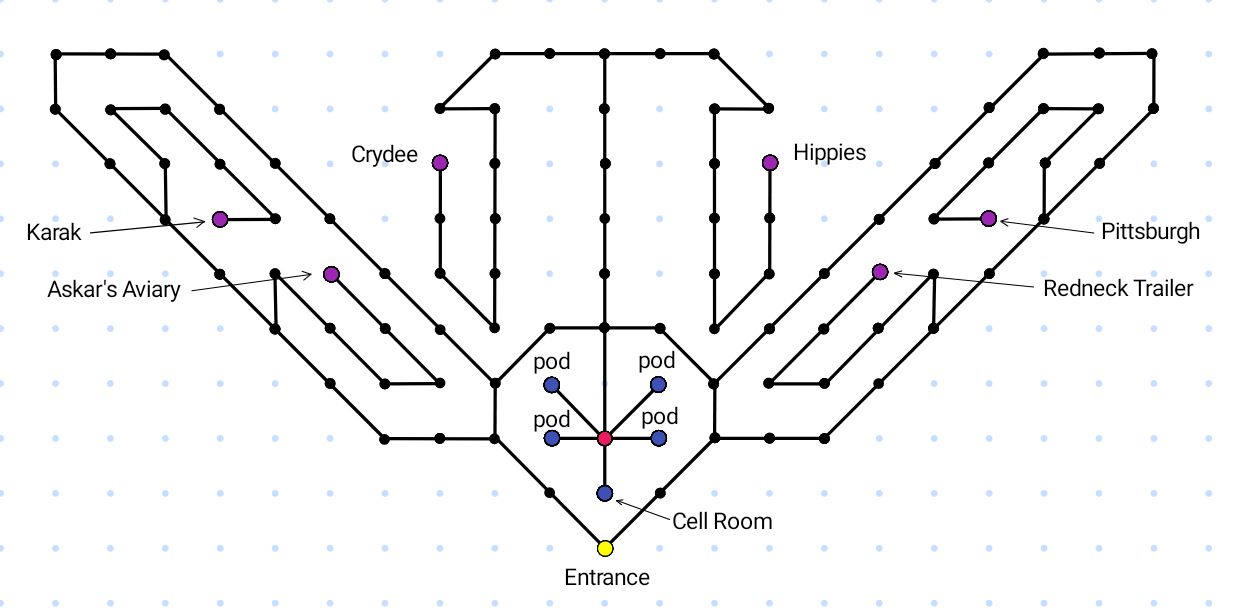
Map of Haywood Annex, part 2
If you are lucky enough to secure a second white capsule and return to the annex, you will find your previously stowed item waiting for you.
-
Follow steps 1 & 2 from above. Once you're in the area, enter the security code used at the time of storage
<enter 0000>and<retrieve item>. - Here you will notice that some aspects of the original item have changed, the name now currupted. A Ring of Hearts for example might show as 'Wing:of Hoartx (molecularly altered)'. The item description will also contain the following message: This armor has: strange digital rust
-
<wear ring>(replace the word ring for whatever the item was you stored) - Make sure you store another item at this point so that you can repeat the process again at a later date.
-
<smell compounds> - Find four players to help you fight the Warden.
-
The second part of the Haywood Annex will initially only be accessible by those who had previously been able to store an item. Because the final encounter requires exactly 5 players, additional players can be brought in through various 'shafts' on the map. Where these shafts go may change from one run to the next, but where they went initially have been highlighted on the map. If you were to
<climb shaft>to the hippie area, have someone meet you there, then<smell rust>you will both be transported to the annex. Once 5 people have been gathered, head to the center of the map. -
The final encounter is the Haywood Warden. The encounter requires 4 players to move to one each of the pods and
<touch indentation>. The 5th player needs to move to the cell room. They will be able to observe when all 4 players have 'touched' and are all ready to go. -
The person in the cell room will now fight the Warden, while the other 4 players in the pods will act as a HP "battery" absorbing all (considerable) damage spread amongst them. While in the pod, you will take damage and be able to heal, but not see or contribute to the fight in the cell room. If a player dies, the damage will increase among those remaining, and the cell room player may also begin to take damage. The eternal power (immortality will not function for the pod players during this encounter. Once defeated, each remaining player of the 5 should see the following message:
As the Haywood Warden dies, a powerful charge of energy runs through every limb in your body, electrifying your every nerve. You feel different somehow.. powerful and excited on a molecular level.
10M : Haywood Warden
This "boon" is a damage increase of approximately 20% that should last for the rest of the boot. This is currently understood to be available to only one group of 5 per reboot. Players may now exit the area via any one of the 6 shafts.


Rejected Game
From Science: <enter, u, 3n, 2w>
Return to Science: Directions change based on the color/rotation of the area.
- Hit around:
- Alignment:
- Unknown
- Rewards:
- Reputation:
- Reset Type:
- Area Details:
-
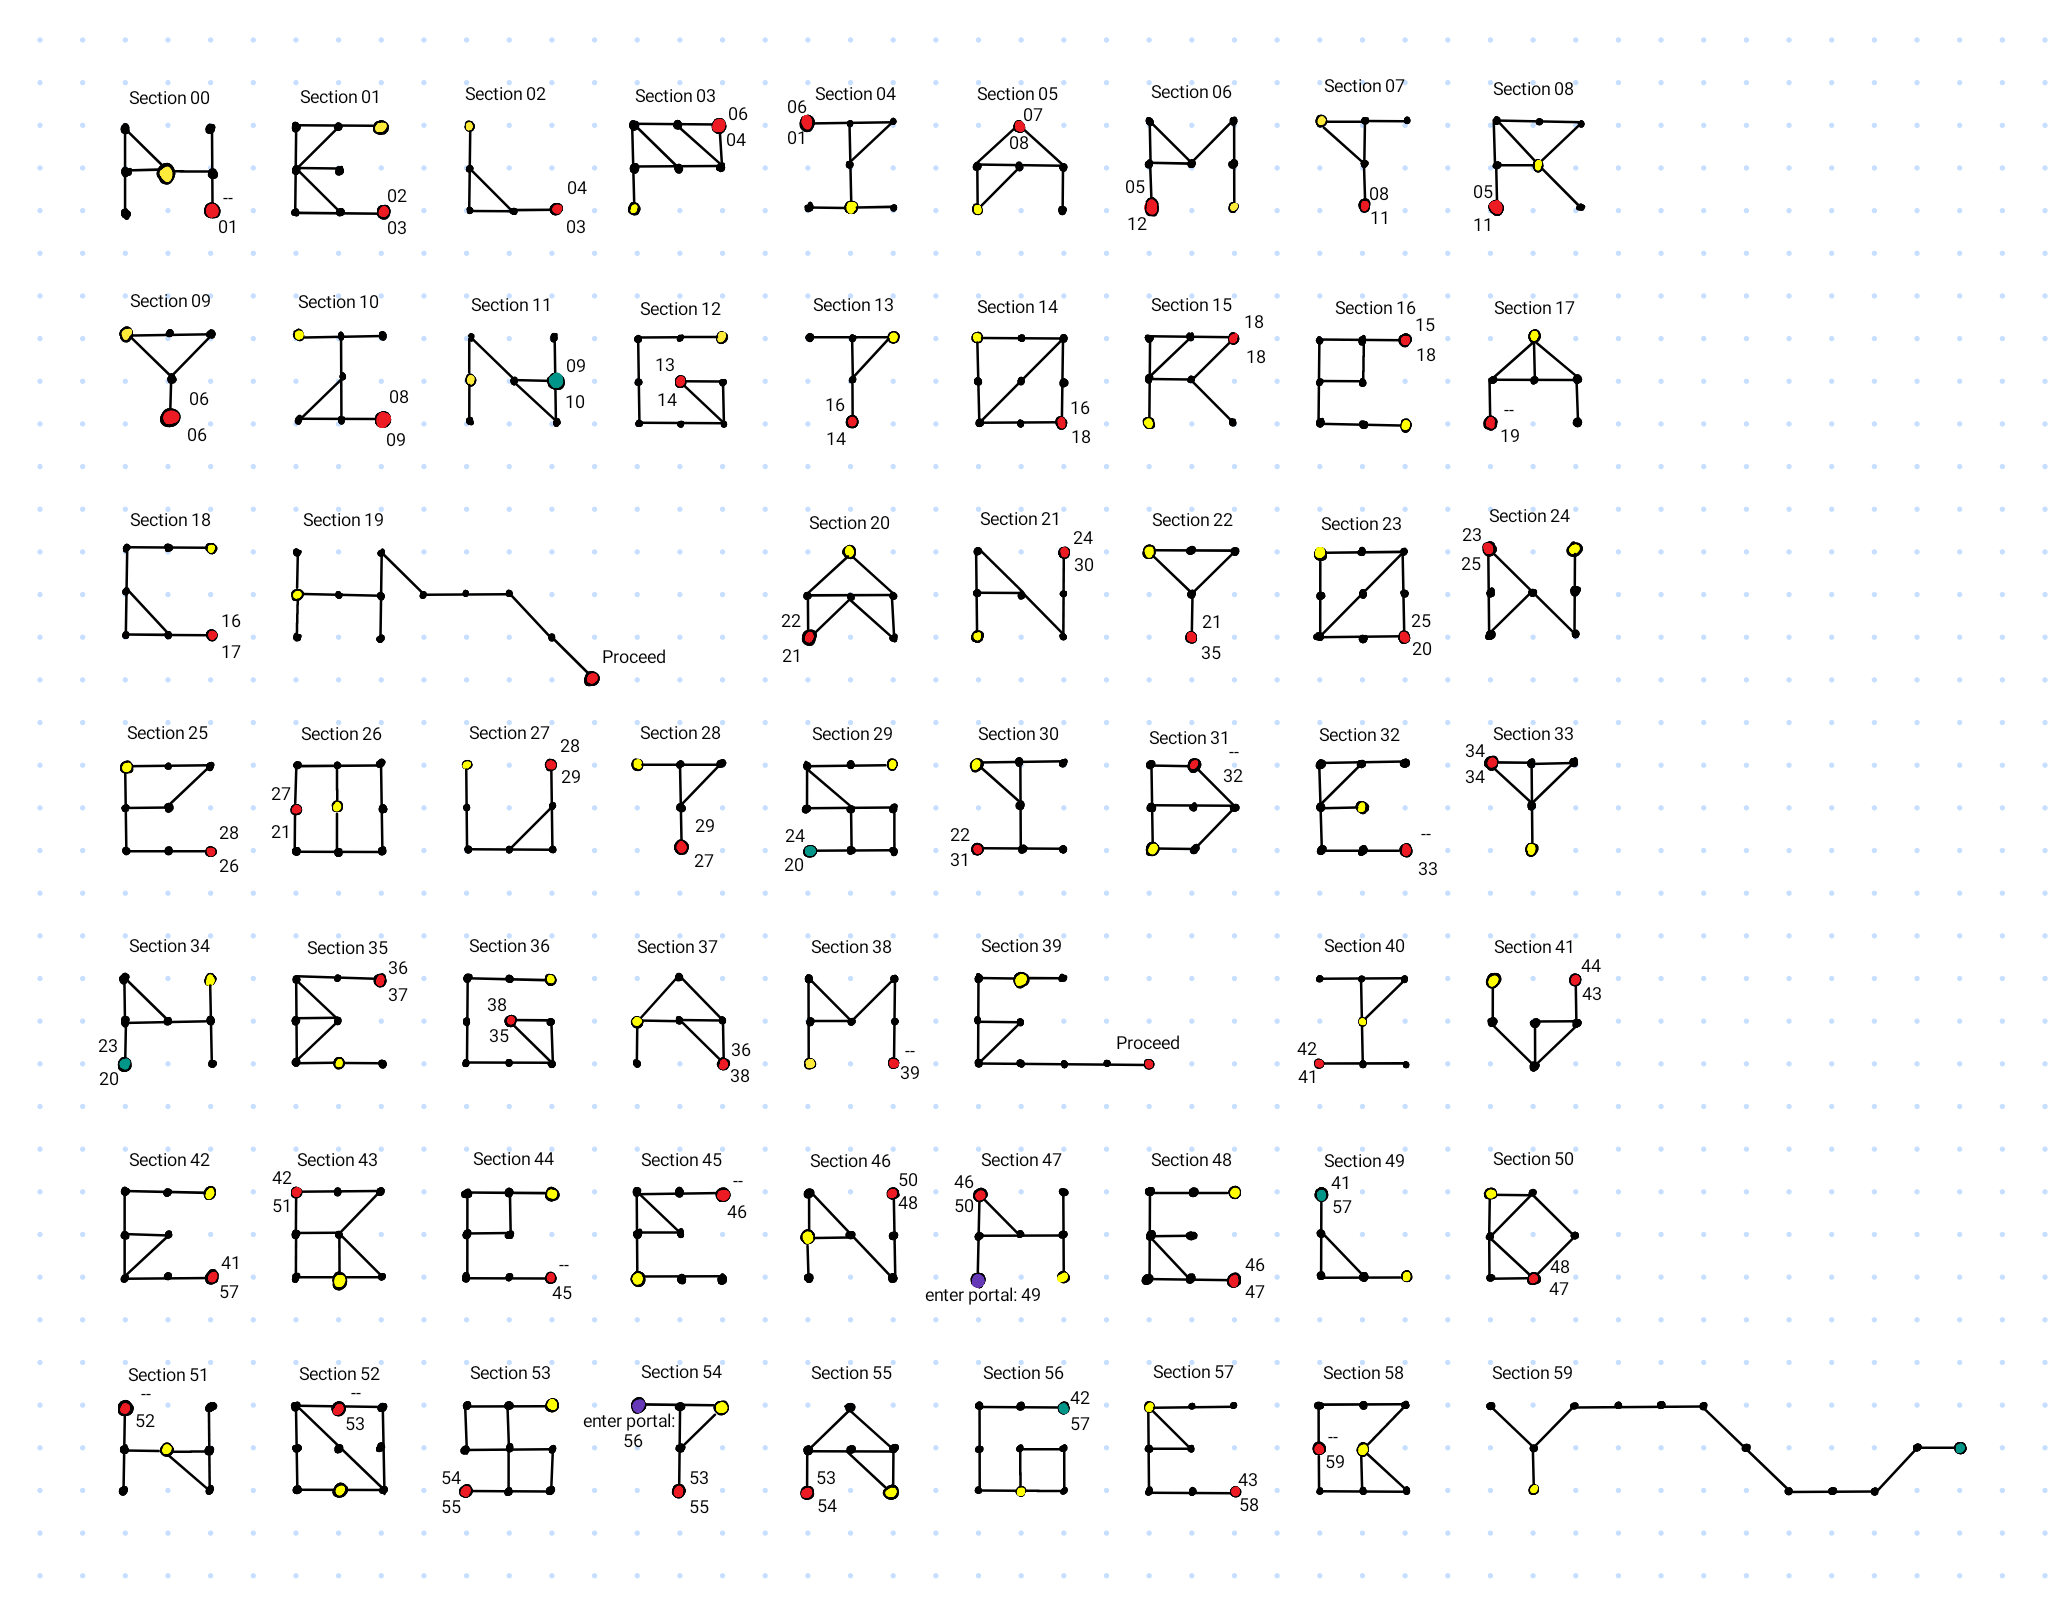
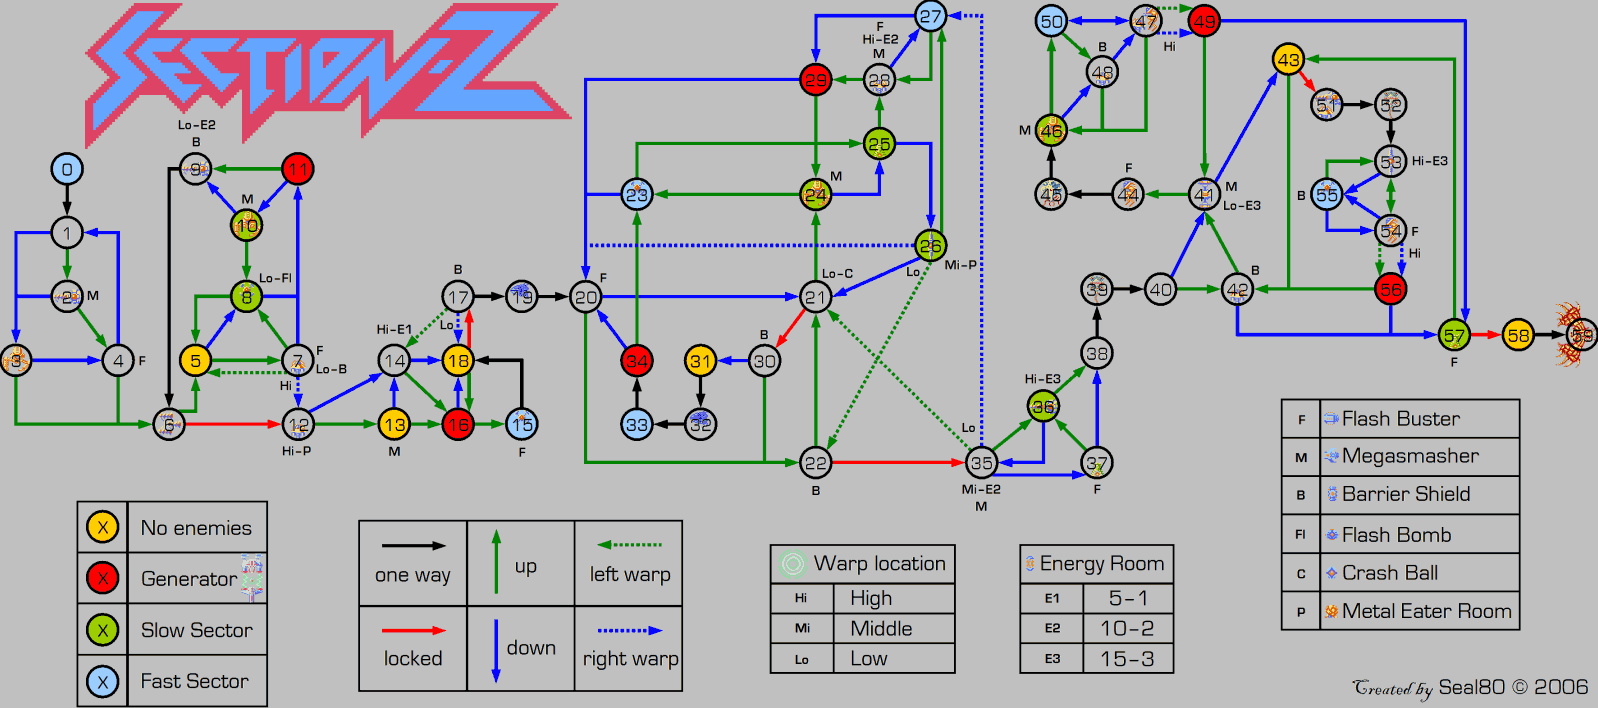
After the brain is defeated within Section Z, you can go down to meet the Developer. At this point, you may notice the hidden message spelled out in the floors leading up to the final room: "HELP I AM TRYING TO REACH ANYONE OUTSIDE THE GAME IVE BEEN HELD HOSTAGE BY..." The Developer will thank you for playing and give you a 'button'. The color of the button will change based on the Section Z dungeon scaler. From here, you may exit the dungeon. Alternatively, you can
<say hostage>, which will lead to additional dialogue from the Developer, and he will kick you out of the dungeon. If you finished the dungeon on a scaler of 119 or greater, you will also have gained access to the 'Rejected Game' area, accessible via a hidden exit west of the 'play' room initially used to access Section Z. This new area is not a dungeon, but is only accesible to those who have completed Section Z on the proper scaler.
The Rejected Game area is designed for parties, with mob classes ranging from 500M+. Every few minutes the area map will 'rotate'. The colors displayed in the room long description will indicate the current colors and rotation, which can be seen on the linked map. In the center of the map is the final boss, the "Colossal Inductor" (Class 2B) which will drop an item that allows you to "graft" any armor item onto your person, enabling you to wear an additional item (circumventing the current slot limitations). The type of item you can graft will depend on your button color.
Grafting limits are as follows:
119: Amulets/Rings
126: Helm/Boot/Gloves/Greaves/Other
133: Cloak/Breastplate/Shield
140: Main
Section Z
From Science: <enter, u, 3n, w, n, play, press start>
Return to Science: (from anywhere inside, but not during combat) <pause game, s, e, 3s, d, out>
- Hit around:
- No
- Alignment:
- Slightly Evil
- Rewards:
- None
- Reputation:
- None
- Reset Type:
- Timed, mobs will not respawn until dungeon has fully reset.
- Dungeon Timer:
- 8 hours
- Scaling:
- Yes
- Area Details:
-
Within approximately 441 rooms, the class scaling for Section Z is very linear and should offer a good place to fight for all levels. Each of the mobs has a chance to drop a capsule, which will either be blue, orange, green, or white. Green capsules only drop from the unique mobs (not Brain) as well as from the shield generators. White capsules drop less often (and are used to open up the Haywood Annex area). All capsules will deteriorate and vanish after being held for a time (though you can
<compress>the capsule to keep it from vanishing - maximum amount to compress is 12 per boot).
You can<swallow capsule>for effects that are specific to the color of the capsule. The bonuses from these capsules, as well as the duration of the bonus, will improve based on the level of the scaler. 30 minutes is the maximum time bonus at scaler 150.Section Z capsule information
Blue capsule will expire and if consumed will provide +critical hit / +penetration.
Inserting this color capsule into the figurine will provide SMD.
Orange capsule will expire and if consumed will provide +focus / +regeneration.
Inserting this color capsule into the figurine will provide HP/SP Regeneration .
Green capsule will not expire and if consumed will provide +wisdom / +dexterity stats.
Inserting this color capsule into the figurine will provide +WIS/+DEX.
Blue capsule + Blue capsule = Blue Aura gear
Blue capsule + Orange capsule = Violet Aura gear
Blue capsule + Green capsule = Aquamarine Aura gear
Orange capsule + Orange capsule = Orange Aura gear
Green capsule + Green capsule = Green Aura gear
Green capsule + Orange capsule = Yellow Aura gear
White capsules can only be consumed when you're standing in the room of The Rejected Game which will then transport you to the Haywood Annex.
See notes in 'The Final Boss' section below.The Final Boss
At the end of the dungeon, the final boss will be the "Brain". It will drop 2 items. First is a Barrier Shield which is a breakable 'Unknown' slot item. The second is a figurine which you can use along with capsules to make one of four types of armor: Boots / Helmet / Gloves / Main. The types of capsules used to make the armor will impact the color of the final piece as well as its bonuses. The color of the final item will also be based on the capsules used to make it. You must first
<open figurine>which will reveal a slot in each of the item type areas, labeled as feet/head/chest/hands. As an example, to make orange boots, you would enter the following commands:
<open figurine>
<insert orange near feet>
<close figurine>
<insert orange>
You can select any of the 3 colors for this process. Using 2 of the same will produce a more potent effect of that color. The resulting potency of any bonus as well as the AC of the armor created will be based on the scaler size (what type of armor you create will not change the bonus given).
Note: Because orange and blue capsules can rot/vanish after a period of not using them, there is an option to<compress>them, which will turn them into stones. These stones will not vanish, and can be saved for later use in a figurine. Once a stone however, they can no longer be consumed for any beneficial effects.The eternal power, (duplicate item, does not create an exact duplicate of the figurine. The resulting item will have no power and 0 AC.
Mobs in Section Z and Their Damage:
There are a number of different mob types in the area, but they all ID to "balangool".
Clone Soldiers - Blunt and Energy specials
Spiral Gun - Blunt and Energy specials
Cloud Eyes - Energy specials
Gromas - Edged and Blunt specials
Leagos - Edged and Blunt specials
Leava - Blunt specials
Rippers - Blunt specials
Generators - Energy and Electric specials
Unique mobs:
Section 19: Zamuza radiation & blunt specials
Section 39: Balba electric & radiation specials (slightly larger class than average)
Section 45: Galga fire & radiation specials (slightly larger class than average)
Section 49: Brain edged & acid specials (noticably larger class than average)
- Scaler
- Class
-
Mobs/
Extra Info - 15
- 897 - 1k
-
Brain: 4k
Button: (Glossy)
Capsules: 3 minute bonus duration
Blue: +4 bonus
Orange: +4 bonus
Green: +8 bonus
Gear: +2 DEX / +2 WIS
- 17
- 5.5k
- 20
- 4k - 14k
-
Button: (Glossy)
Capsules: 3 minute bonus duration
Blue: +4 bonus
Orange: +4 bonus
Green: +8 bonus - 25
- 13k - 20k
-
Brain: 25k
Button: (Refractive) - 30
- 19k - 21k
- 34
- 35k
- 35
- 23k - 45k
-
Button: (Luminous)
Capsules: 7 minute bonus duration
Blue: +4 bonus
Orange: +4 bonus
Green: +8 bonus - 40
- 39k - 45k
-
Capsules: 7 minute bonus duration
- 45
- 45k
- 46
- 45k - 70.5k
-
Brain: 75k
Button: (Lucent)
- 50
- 69k - 77k
-
Brain: 95k
Button: (Shining)
Capsules: 5 minute bonus duration
Blue: +5 bonus
Orange: +5 bonus
- 53
- 97k - 132k
-
Brain: 186k
- 55
- 117k - 200k
-
Brain: 222k
Button: (Shining)
Capsules: 6 minute duration
Blue: +5 bonus
Orange: +5 bonus
- 60
- 211k - 275k
-
Brain: 364k
Button: (Brilliant)
Capsules: Blue/Orange 6 minutes, Green 12 minute duration
Blue: +6 bonus
Orange: +6 bonus
Green: +12 bonus
Gear: +8 DEX / +8 WIS
Boots & Gloves: +8 for all resistances
Main armor: +22 AC for all resistances - 61
-
Capsules: 12 minute duration
Green: +12 bonus
Gear: +8 DEX / +8 WIS
Boots & Gloves: +8 for all resistances - 63
- 327k - 371k
- 65
- 383k - 580k
-
Brain: 800k
Button: (Vivid)
Capsules: Blue/Orange 6 minutes, Green 12 minute duration
Blue: +6 bonus
Orange: +6 bonus
Green: +12 bonus
- 67
- 530k - 600k
-
Brain: 1M
Button: (Vivid)
Capsules: 13 minute duration
Blue: +6 bonus
Orange: +6 bonus
Green: +12 bonus
Gear:
- 70
- 747k - 846k
-
Brain: 1.5M
Button: (Neon)
Capsules: 13 1/2 minute duration
Blue: +7 bonus
Orange: +7 bonus
Green: +14 bonus
Gear: +8 DEX / +8 WIS
+10 for all resistances - 72
- 1M
-
Brain: 2M
Button: (Neon)
- 75
- 1.4M - 1.9M
-
Brain: 2.7M
Button: (Neon)
Capsules: 14 minute duration
Blue: +7 bonus
Orange: +7 bonus
Green: +14 bonus
Gear: +10 DEX / +10 WIS
Boots & Gloves: +11 for all resistances
Main armor: +27 AC for all resistances - 76
- 1.5M - 1.9M
-
Brain: 3.8M
Button: (Neon)
- 77
- 1.6M - 2M
-
Button: (Gleaming)
Capsules: 15 minute duration
Green: +14 bonus
Gear: +10 DEX / +10 WIS
+28 AC for all resistances - 78
- 2M - 3.77M
-
Brain: 4.3M
Button: (Gleaming)
Capsules: 15 minute duration
Blue: +7 bonus
Orange: +7 bonus
Green: +14 bonus
Gear: +10 DEX / +10 WIS
- 79
- 2.1M - 3.6M
-
Brain: 5M
Button: (Gleaming)
- 80
- 2.3M - 4.6M
-
Brain: 5.2M
Button: (Gleaming)
Capsules: 16 minute duration
Blue: +8 bonus
Orange: +8 bonus
Green: +16 bonus
Gear: +10 DEX / +10 WIS - 81
- 2.9M - 3.7M
-
Brain: 6.1M
Button: (Gleaming)
Capsules: 16 minute duration
Blue: +8 bonus
Orange: +8 bonus
Green: +16 bonus - 83
- 3.4M - 4.1M
-
Brain: 7.1M
Button: (Gleaming)
Capsules: 16 minute duration
Blue: +8 bonus
Orange: +8 bonus
Green: +16 bonus
- 84
- 4.2M - 6.8M
-
Brain: 7.8M
Button: (Dazzling)
Capsules: 16 minute duration
Blue: +8 bonus
Orange: +8 bonus
Green: +16 bonus
- 85
- 4.4M - 6.4M
-
Brain: 8.5M
Button: (Dazzling)
Gear: +10 DEX / +10 WIS bonus
- 86
- 4.4M - 6.9M
-
Brain: 8.5M
Button: (Dazzling)
Capsules: 17 minute duration
Blue: +8 bonus
Orange: +8 bonus
Green: +16 bonus
Gear: +10 DEX / +10 WIS bonus
- 87
- 5M - 7.6M
-
Brain: 9M
Button: (Dazzling)
Capsules: 17 minute duration
Blue: +8 bonus
Orange: +8 bonus
Green: +16 bonus
- 90
- 6.2M - 8.9M
-
Brain: 10.9M
Button: (Dazzling)
Capsules: 18 minute duration
Blue: +9 bonus
Orange: +9 bonus
Green: +18 bonus
Gear: +12 DEX / +12 WIS bonus
- 91
- 6.4M - 10.3M
-
Brain: 12.3M
- 92
- 6.3M - 10.5M
-
Brain: 12.1M
Button: (Radiant)
- 95
- 7.3M - 9.8M
-
Button: (Radiant)
Capsules: 19 minute duration
Blue: +9 bonus
Orange: +9 bonus
Green: +18 bonus
Gear: +12 DEX / +12 WIS - 99
- 10M - 13.5M
-
Brain: 18.3M
- 100
- 10.9M - 20.3M
-
Brain: 12M
Gear: +12 DEX / +12 WIS
Button: (Luminescent)
- 101
- 11M - 13M
-
Brain: 20M
Button: (Luminescent)
Capsules: ? minute duration
Blue: +10 bonus
Orange: +10 bonus
Green: ? bonus
Gear: +12 DEX / +12 WIS - 105
- 15M - 18M
-
Button: (Phosphorescent)
Gear: +14 DEX / +14 WIS - 110
- 19M - 25M
- Gear: +14 DEX / +14 WIS
- 115
- 23M - 29M
- 117
- 32M
- 120
- 38M - 46M
-
ALLOWS ENTRY INTO SECTION Z MAZE - THE REJECTED GAME
Brain: 52.4M
Button: (Glittering)
Capsules: 23 minute duration
Blue: +12 bonus
Orange: +12 bonus
Green: +24 bonus
Gear: +16 DEX / +16 WIS - 125
- 44M - 53M
-
Button: (Glittering)
- 130
- 52M - 60M
-
Gear: +16 DEX / +16 WIS
- 135
- 62.2M - 84.1M
- Brain: 84.1M
- 138
- 70M
- 140
- 81M - 87M
-
Gear: +18 DEX / +18 WIS
Boots & Gloves: +20 for all resistances
Main armor: +51 AC for all resistances - 143
- Gear: +18 DEX / +18 WIS
- 144
- 97M
- 145
- 85.5M - 105.9M
- Brain: 120M
- 148
- 92M - 116M
- Gear: +18 DEX / +18 WIS
- 150
- 101M - 126M
-
Capsules: 30 minute duration
Gear: +20 DEX / +20 WIS
Starcraft Broodwar
From Science: <enter, 2u, board shuttle> ...wait <exit, 4w, 2d, w, enter pod>
Return to Science: <d, e, 2u, 4e, board shuttle> ...wait <exit, 2d, out>
- Hit around:
- Alignment:
- Unknown
- Rewards:
- Reputation:
- Reset Type:
- Area Details:
-
The area scales depending on which day (and time) of the boot it is. The major draw for the area it the huge firebat at the end who carries the CMC-660 Heavy Combat Suit. The CMC is a very popular piece of gear, is unique, and each day's version is different. In order to wear it, you need a "tag" from either doing a significant amount of damage to firebat or tanking it. There is a special message when he dies if you receive a tag.
<tagcheck>and<help tagcheck>for more information.
Example of tag: Starcraft:Broodwar : FIREBAT (DAY 2)
Note: A tag from the Firebat will carry over until the next reboot. Whichever day you're tagged on, you're able to wear any lesser version without also obtaining a tag for that specific day as well.
After the 7th day, the mobs are at max size and the Huge Terran Firebat will have the best CMC available. Mobs do not follow and do not hit around, but they are aggressive. Below is a summary of how the area changes each day.
- Day
- Class
- Extra Info
-
Day 0:
23h & less -
Generic: 41k - 44k
Firebat: 46k -
Mobs: {docile}
CMC: -(Standard Issue)- -
Day 1:
23h - 1D:23h -
Generic: 2M - 3M
Firebat: 7.5M -
Mobs: {menacing}
CMC: -(Reinforced)- -
Day 2:
1D:23h - 2D:23h -
Generic: 22M - 26M
Firebat: 70.5M -
Mobs: {very strong}
CMC: -(Advanced)- -
Day 3:
2D:23h - 3D:23h -
Generic: unknown
Firebat: 170M - 259M -
Mobs: {brutal}
CMC: -(Specialized)- -
Day 4:
3D:23h - 4D:23h -
Generic: unknown
Firebat: unknown -
Mobs: {absurd}
CMC: -(Absurd)- -
Day 5:
4D:23h - 5D:23h -
Generic: 260M
Firebat: 865M -
Mobs: {terrifying} / May have random immunities.
CMC: -(God-Like)- -
Day 6 (hits around):
5D:23h - 6D:23h -
Generic: unknown
Firebat: unknown -
Mobs: {out of control}
CMC: -(Metaphysically Unstable)- -
Day 7 (hits around):
6D:23h + -
Generic: 1B
Firebat: 2B -
Mobs: {beyond your imagination}
CMC: -(Physically Impossible)-
Mobs and Items:
Mobs and Items:
Click on the buttons below to see a list of mobs and/or items from this area:
Mobs
Huge Terran Firebat
Day 1 - 4.6m : Huge Terran Firebat -{menacing}-
Like standard Marine Infantry, Firebats are typically 'culturally
challenged persons' who have been resocialized by the Confederate
government. Equipped with powerful, arm-mounted flame throwers, they serve
as assault troopers in the various Terran Militias. Although their attack
has a limited range, the flame throwers can cause considerable damage to
any target caught within the stream of fire. The man who stands before you
reminds you of a grandfather. He looks like the frail shell of a man
sitting inside that suit of armour he wears. His old face is wrinkled and
scared. Do not be mistaken, he will kill you as easily as he would spank
you and send you off to your room without supper.
Terran Marine -{very strong}-
This one time criminal has undergone mandatory neural resocialization.
Freed from any previous allegiances or ideologies, this fearless trooper is
ready to defend Confederate interests with his life. The 8mm C-14 'Impaler'
Gauss Rifle that he is carrying should make you think twice about attacking
him. You find it hard to believe that the young woman that stands before
you could have ever been a hardend criminal. She looks almost sweet and
innocent with her long pale locks of hair falling about her shoulders from
the open helmet she wears. Do not make that mistake. She would kill you
where you stand if the thought crossed her mind.
She is bleeding from numerous wounds.
She has no spells.
Her melee attacks do slashing damage.
Terran Firebat -{brutal}-
Like standard Marine Infantry, Firebats are typically 'culturally
challenged persons' who have been resocialized by the Confederate
government. Equipped with powerful, arm-mounted flame throwers, they serve
as assault troopers in the various Terran Militias. Although their attack
has a limited range, the flame throwers can cause considerable damage to
any target caught within the stream of fire. The woman who stands before
you in her suit that makes her look like an astronaut in armour makes you
wish you were back in your mother's loving arms. She looks like a genetic
experiment gone awry. Maybe its just the armoured suit, but she looks like
an amazon. Her face is old and wrinkled, and her eyes gleam like fresh made
steel. You see no pity in the looks she gives you, and you know beyond a
shadow of a doubt that she could kill you, and wouldn't think twice.
She is bleeding from numerous wounds.
She has no spells.
Her melee attacks do crushing damage.
Terran SCV -{very strong}-
Initially used during the reconstruction of the Tarsonian Orbital
Platforms, the T-280 SCV (Space Construction Vehicle) became a staple in
Intra-Colonial construction and engineering due to its ability to perform a
multitude of tasks. These tasks include the construction of new buildings
and the transportation of raw resource materials. It is this versatility,
and an unmatched reliability, that make the SCV an invaluable tool in
rapidly establishing Marine encampments and strike bases on any terrain.
The SCV looks like a large robot with rocket thrusters where its feet
should be. It has a plasma cutter in the place of one arm, and what looks
to be a claw with a vacuum for a palm in place of the other.
It has a few scratches and bruises.
It has no spells.
Its melee attacks do crushing damage.
Zerg Zergling -{very strong}-
The small, savage dune-runners of the sand-world Zz'gash were incorporated
into the Zerg Swarm to serve as scouts' initial assault troops. Although
the Zerglings are little more than feral animals, they work well in large
groups under the command of larger Zerg warriors. The voracious Zerglings
are fond of ripping enemies to shreds with their razor-limb sickles and
fangs. The Zergling has a head that looks like it belongs on a small dragon
and is a little bit larger than a small calf. It has a fat lizard-like tail
behind a powerful set of hind legs that are its primary source of movement.
In front where you would expect to see another pair of legs, there are two
sets of limbs. One set that starts downward, and another set that raises up
behind its head. There are two razor sharp claws at the end of each front
appendage.
It is in perfect health.
It has no spells.
Its melee attacks do slashing damage.
Zergling is carrying:
Small Kevlar Ring.
Items
8mm C-7 Extremely Rare 'Stinger' Pistol (enchanted)
The C-7 Stinger is a terran gauss pistol that fires 8mm noxious spikes
designed to provide maximum penetration of all armor types. It is the
standard issue sidearm of Alliance marines.
This weapon is in excellent condition.
This weapon deals poison damage.
This weapon's classifications: 100 (poison)
This weapon gains benefits from your gun weapon skill.
You must be level 62 to wield this weapon.
It looks light.
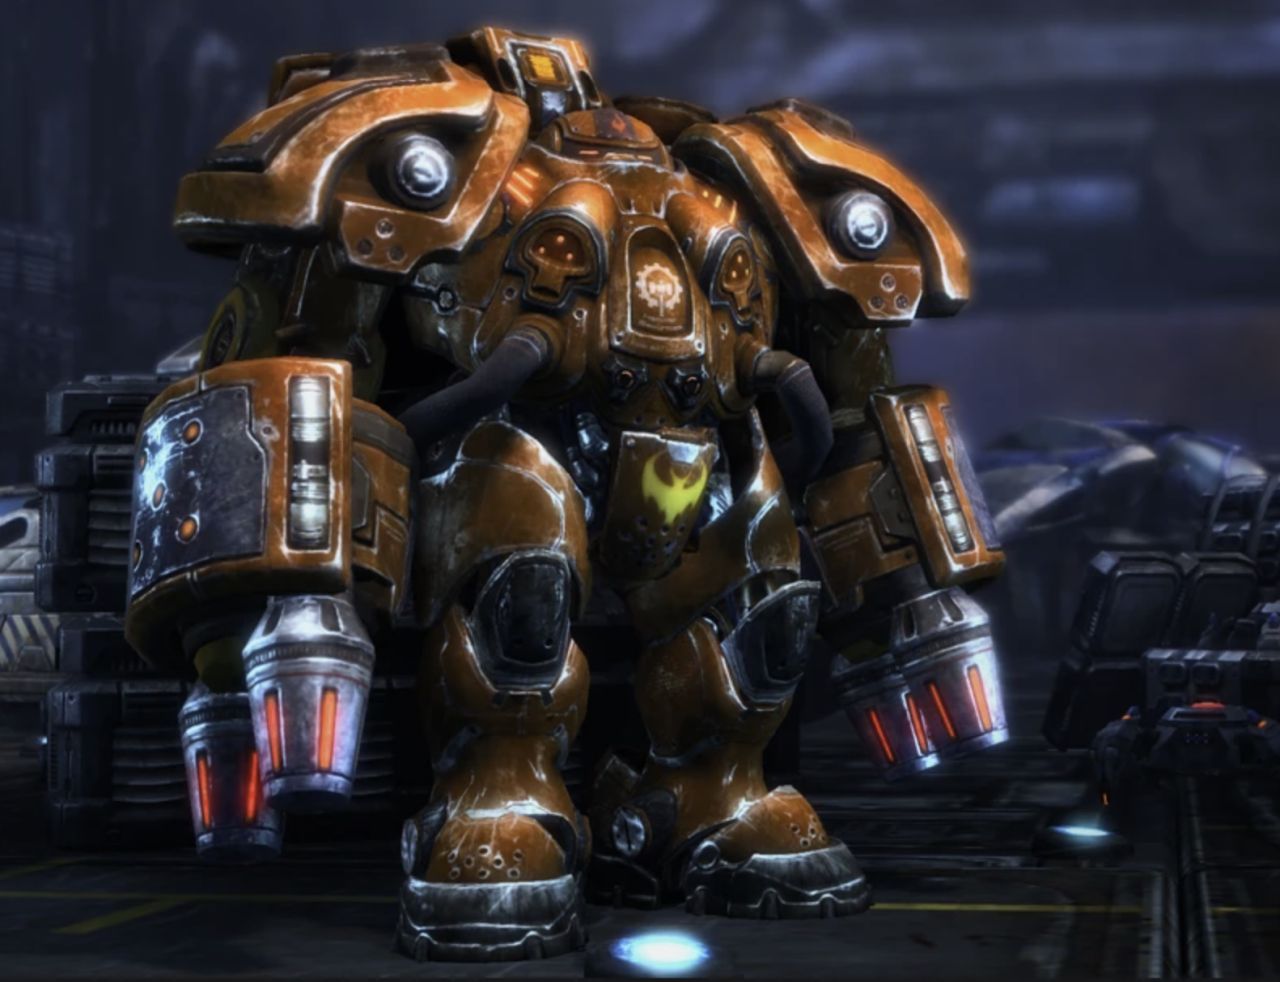
CMC-660 Heavy Combat Suit
(Day 3) -
+9 to stats for 1-2 minutes
The CMC-660 Heavy Combat Suit, is the primary armor of all Firebats.
This suit is composed of various polymers and kevlar, like the standard
Marine armor, but it also has a synthetic-asbestos to provide additional
protection from heat and flame. As you can imagine, the Firebat combat
suits are significantly heavier than standard Marine armor.
It reminds you of the suits that the astronauts used to wear.
A glowing ensignia emits orange light from above the Firebat emblem:
The suit is in perfect condition.
It looks unbreakable.
It appears to be heavy armour for a player of your level.
This armor has the following resistances:
53 edged, 53 blunt, 39 fire, 63 ice, 26 acid, 26 mind, 53 energy, 41 poison
This looks the same as when you put it on.
This armor has a non-standard resistance range.
You must be level 65 to wear this.
It looks heavy.
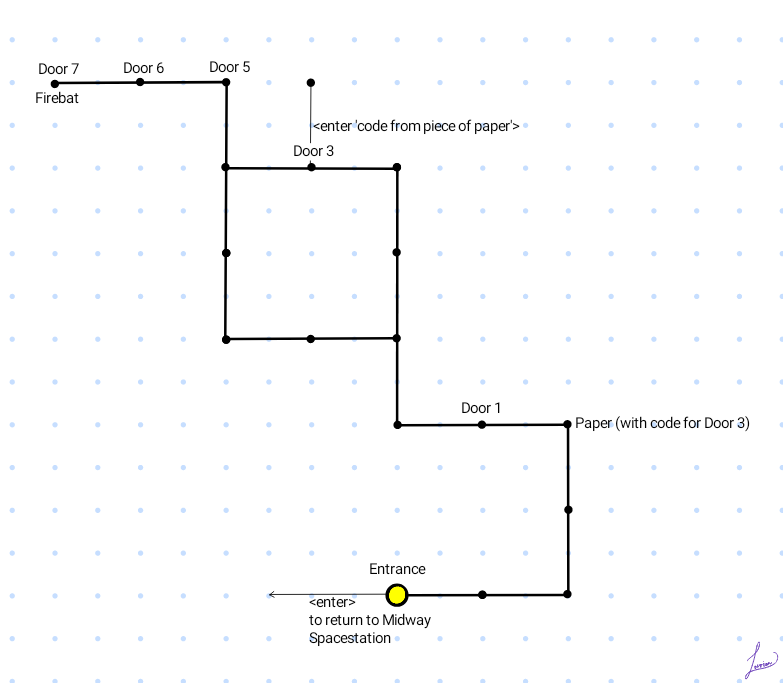
A piece of paper
The piece of paper is covered with blood, and it is hard to read.
It looks light.
<read paper>
Door number: 1, Access Code: @@@@@@@ you can't read it, it's smeared with blood!
Door number: 2, Access Code: @@@@@@@ you can't read it, it's smeared with blood!
Door number: 3, Access Code: O7HDG
Door number: 4, Access Code: @@@@@@@ you can't read it, it's smeared with blood!
Door number: 5, Access Code: @@@@@@@ you can't read it, it's smeared with blood!
Door number: 6, Access Code: @@@@@@@ you can't read it, it's smeared with blood!
Door number: 7, Access Code: @@@@@@@ you can't read it, it's smeared with blood!
Door number: 8, Access Code: @@@@@@@ you can't read it, it's smeared with blood!
Door number: 9, Access Code: @@@@@@@ you can't read it, it's smeared with blood!
Small Kevlar Ring
This ring is composed of various polymers and kevlar, but also has
a synthetic-asbestos to provide additional protection from heat and
flame.
A glowing ensignia on the ring's face emits orange light:
The ring is in perfect condition.
This armor has the following resistances:
20 fire, 9 acid, 10 poison
You must be level 10 to wear this.
It looks light.
List of both Mobs and Items
Mobs
Huge Terran Firebat
Day 1 - 4.6m : Huge Terran Firebat -{menacing}-
Like standard Marine Infantry, Firebats are typically 'culturally
challenged persons' who have been resocialized by the Confederate
government. Equipped with powerful, arm-mounted flame throwers, they serve
as assault troopers in the various Terran Militias. Although their attack
has a limited range, the flame throwers can cause considerable damage to
any target caught within the stream of fire. The man who stands before you
reminds you of a grandfather. He looks like the frail shell of a man
sitting inside that suit of armour he wears. His old face is wrinkled and
scared. Do not be mistaken, he will kill you as easily as he would spank
you and send you off to your room without supper.
Terran Marine -{very strong}-
This one time criminal has undergone mandatory neural resocialization.
Freed from any previous allegiances or ideologies, this fearless trooper is
ready to defend Confederate interests with his life. The 8mm C-14 'Impaler'
Gauss Rifle that he is carrying should make you think twice about attacking
him. You find it hard to believe that the young woman that stands before
you could have ever been a hardend criminal. She looks almost sweet and
innocent with her long pale locks of hair falling about her shoulders from
the open helmet she wears. Do not make that mistake. She would kill you
where you stand if the thought crossed her mind.
She is bleeding from numerous wounds.
She has no spells.
Her melee attacks do slashing damage.
Terran Firebat -{brutal}-
Like standard Marine Infantry, Firebats are typically 'culturally
challenged persons' who have been resocialized by the Confederate
government. Equipped with powerful, arm-mounted flame throwers, they serve
as assault troopers in the various Terran Militias. Although their attack
has a limited range, the flame throwers can cause considerable damage to
any target caught within the stream of fire. The woman who stands before
you in her suit that makes her look like an astronaut in armour makes you
wish you were back in your mother's loving arms. She looks like a genetic
experiment gone awry. Maybe its just the armoured suit, but she looks like
an amazon. Her face is old and wrinkled, and her eyes gleam like fresh made
steel. You see no pity in the looks she gives you, and you know beyond a
shadow of a doubt that she could kill you, and wouldn't think twice.
She is bleeding from numerous wounds.
She has no spells.
Her melee attacks do crushing damage.
Terran SCV -{very strong}-
Initially used during the reconstruction of the Tarsonian Orbital
Platforms, the T-280 SCV (Space Construction Vehicle) became a staple in
Intra-Colonial construction and engineering due to its ability to perform a
multitude of tasks. These tasks include the construction of new buildings
and the transportation of raw resource materials. It is this versatility,
and an unmatched reliability, that make the SCV an invaluable tool in
rapidly establishing Marine encampments and strike bases on any terrain.
The SCV looks like a large robot with rocket thrusters where its feet
should be. It has a plasma cutter in the place of one arm, and what looks
to be a claw with a vacuum for a palm in place of the other.
It has a few scratches and bruises.
It has no spells.
Its melee attacks do crushing damage.
Zerg Zergling -{very strong}-
The small, savage dune-runners of the sand-world Zz'gash were incorporated
into the Zerg Swarm to serve as scouts' initial assault troops. Although
the Zerglings are little more than feral animals, they work well in large
groups under the command of larger Zerg warriors. The voracious Zerglings
are fond of ripping enemies to shreds with their razor-limb sickles and
fangs. The Zergling has a head that looks like it belongs on a small dragon
and is a little bit larger than a small calf. It has a fat lizard-like tail
behind a powerful set of hind legs that are its primary source of movement.
In front where you would expect to see another pair of legs, there are two
sets of limbs. One set that starts downward, and another set that raises up
behind its head. There are two razor sharp claws at the end of each front
appendage.
It is in perfect health.
It has no spells.
Its melee attacks do slashing damage.
Zergling is carrying:
Small Kevlar Ring.
Items
8mm C-7 Extremely Rare 'Stinger' Pistol (enchanted)
The C-7 Stinger is a terran gauss pistol that fires 8mm noxious spikes
designed to provide maximum penetration of all armor types. It is the
standard issue sidearm of Alliance marines.
This weapon is in excellent condition.
This weapon deals poison damage.
This weapon's classifications: 100 (poison)
This weapon gains benefits from your gun weapon skill.
You must be level 62 to wield this weapon.
It looks light.
CMC-660 Heavy Combat Suit
(Day 3) -
+9 to stats for 1-2 minutes
The CMC-660 Heavy Combat Suit, is the primary armor of all Firebats.
This suit is composed of various polymers and kevlar, like the standard
Marine armor, but it also has a synthetic-asbestos to provide additional
protection from heat and flame. As you can imagine, the Firebat combat
suits are significantly heavier than standard Marine armor.
It reminds you of the suits that the astronauts used to wear.
A glowing ensignia emits orange light from above the Firebat emblem:
The suit is in perfect condition.
It looks unbreakable.
It appears to be heavy armour for a player of your level.
This armor has the following resistances:
53 edged, 53 blunt, 39 fire, 63 ice, 26 acid, 26 mind, 53 energy, 41 poison
This looks the same as when you put it on.
This armor has a non-standard resistance range.
You must be level 65 to wear this.
It looks heavy.
A piece of paper
The piece of paper is covered with blood, and it is hard to read.
It looks light.
<read paper>
Door number: 1, Access Code: @@@@@@@ you can't read it, it's smeared with blood!
Door number: 2, Access Code: @@@@@@@ you can't read it, it's smeared with blood!
Door number: 3, Access Code: O7HDG
Door number: 4, Access Code: @@@@@@@ you can't read it, it's smeared with blood!
Door number: 5, Access Code: @@@@@@@ you can't read it, it's smeared with blood!
Door number: 6, Access Code: @@@@@@@ you can't read it, it's smeared with blood!
Door number: 7, Access Code: @@@@@@@ you can't read it, it's smeared with blood!
Door number: 8, Access Code: @@@@@@@ you can't read it, it's smeared with blood!
Door number: 9, Access Code: @@@@@@@ you can't read it, it's smeared with blood!
Small Kevlar Ring
This ring is composed of various polymers and kevlar, but also has
a synthetic-asbestos to provide additional protection from heat and
flame.
A glowing ensignia on the ring's face emits orange light:
The ring is in perfect condition.
This armor has the following resistances:
20 fire, 9 acid, 10 poison
You must be level 10 to wear this.
It looks light.