These are the help files that become accessible when you create a wizardling character. Files are still being acquired and the steps are still being added.
Tips from Rastafan:
1. Before you start, have an idea of what you're building
2. Ideally draw yourself a map (using graph paper or whatever)
3. Describe your entrance before going any further, so that others
know what they're stepping into, plus it helps remind you
4. Start SMALL. Planning a 900 room area sounds *great* but you
will burn out around room 27. Aim for 30 rooms or less for your
first area and realize that you can always continue building later.
5. Regarding #4, it might be prudent for your first 5 or so rooms to
be strung out so that you can have areas branch off as you come
up with new ideas. Otherwise your only building point is from
within your first area.
6. Flesh it out. Make sure to 'badditem' a decent amount of stuff.
7. Be realistic. Don't request all your monsters be worth 100M xp
and hit for 8 damage/round.
8. When you're HAPPY with a room and CONFIDENT that you're not going
to change the description any further, please use 'bdescr SAVE' to
lock it in. This cleans up your directory, making it easier for
a wizard to help you towards completion.
9. All room descriptions need to be 'bdescr SAVE'd eventually...
10. You are forcibly limited to 250 rooms+monsters. This limit can
be increased if you've proven worthy.
11. Your area will receive a final review from both wizard and
standard player review processes once monsters and items are
added. Issues will need to be addressed before the monster and
item content will become active.
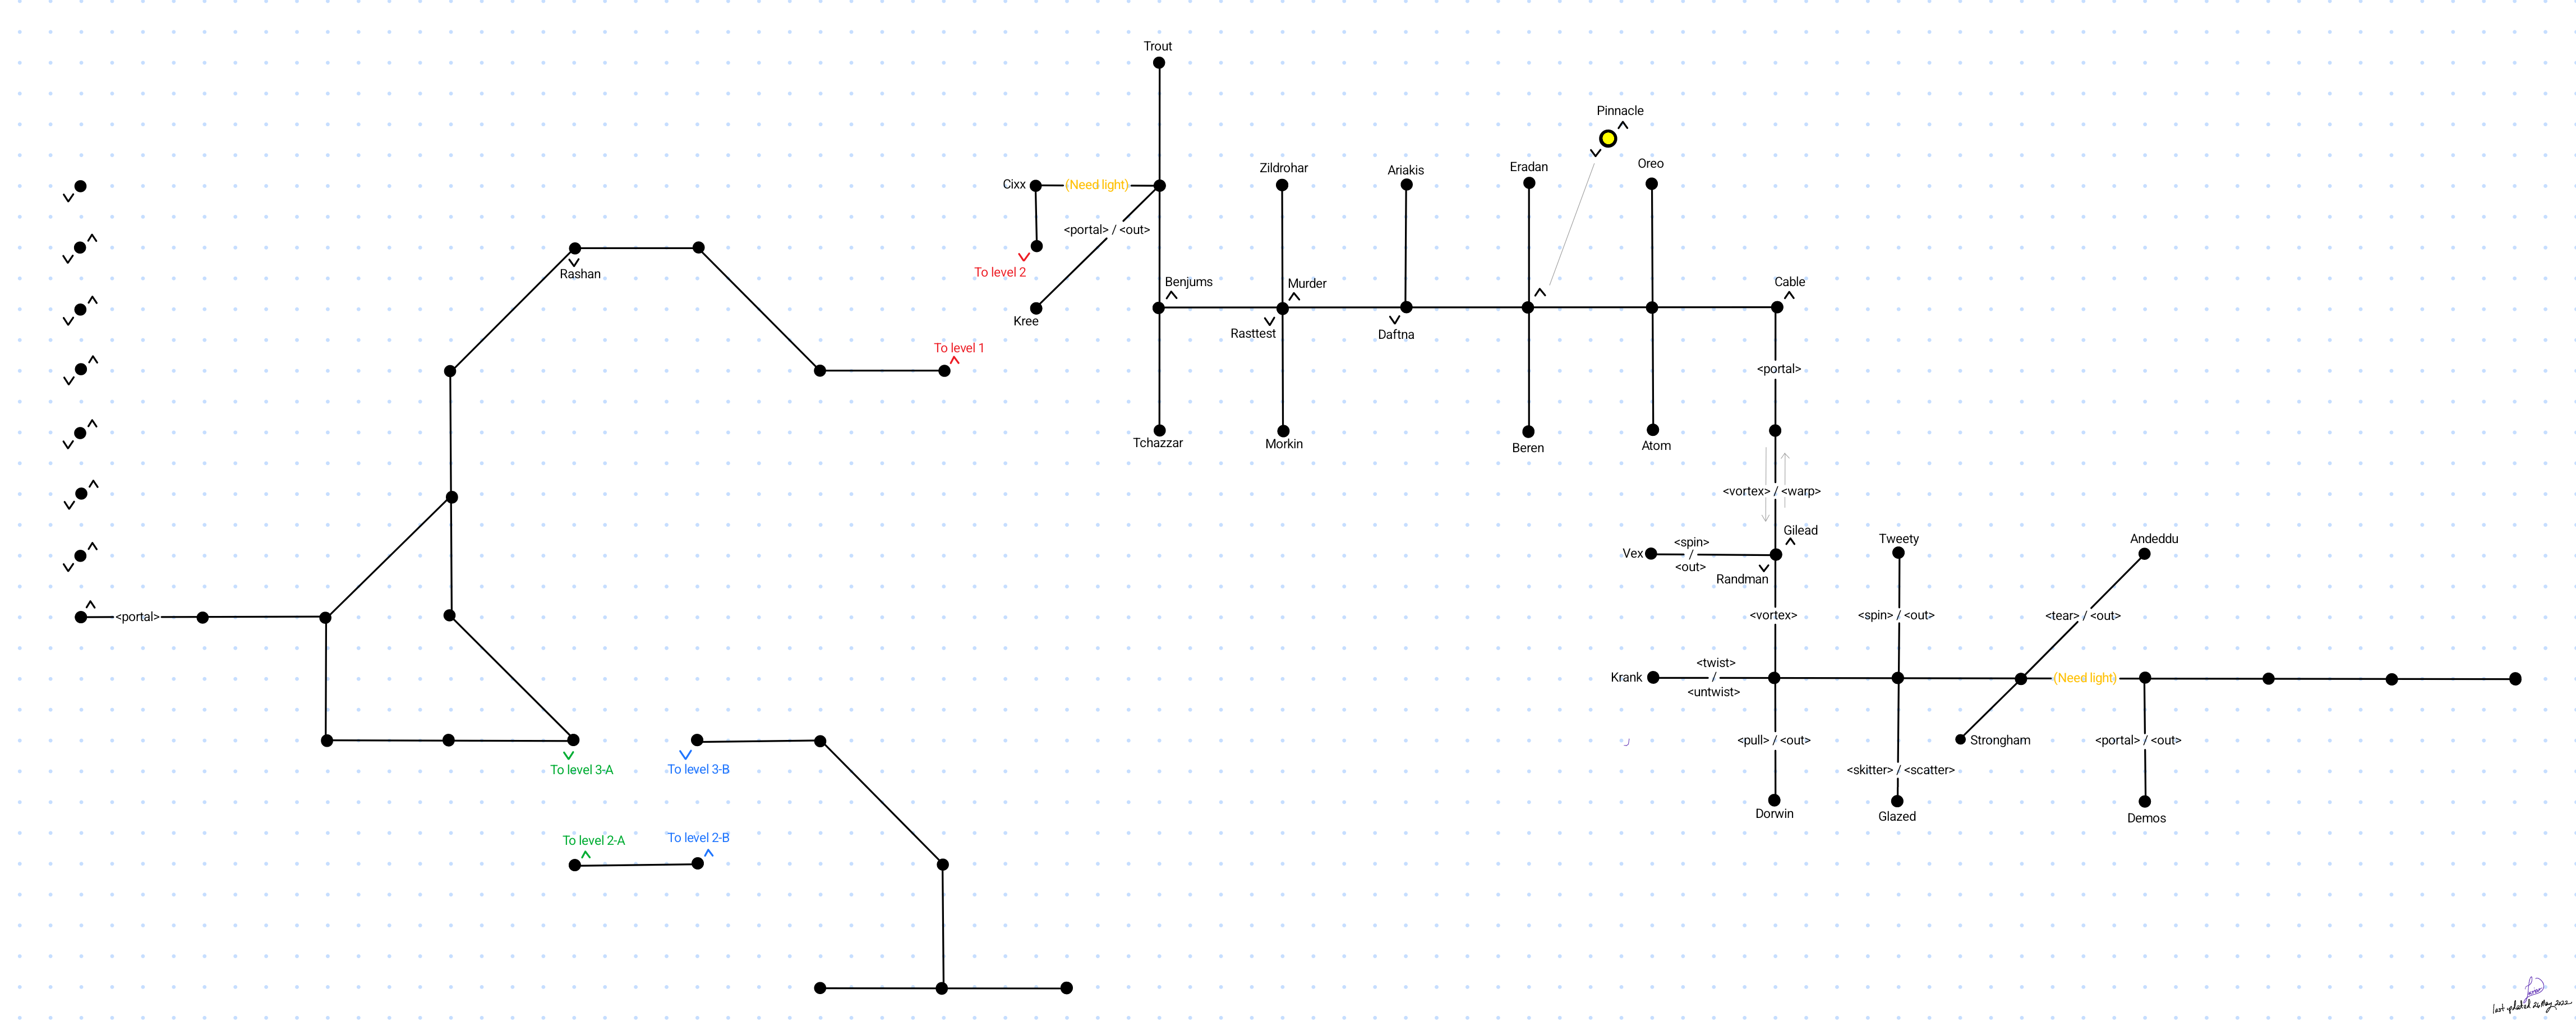
Map of Area
Click on row to expand for more information.
Help Files
Entrance
This information is located on the Infinity area board.
If you plan to build multiple areas with the same character, you
should start by building multiple 'entrance*' rooms. That word is
a key word for auto-locking and thus a good idea.
So if you know you want to build a dog area, a cat area, and a
bird area, you might start from your first/given entrance and
dig out something like:
build west entrance_dog
build west entrance_cat
build west entrance_bird
Now you have 4 rooms, all with 'entrance' in the name.
Then you'd go back to each and add appropriate further exits
to the rooms. Each of those entrance rooms would always be
locked until you unlock them (or a wizard did.)
help badditem
<help badditem> Note: This help file is only available if you've created a wizardling character.
Topic: Badditem
Did you forget an additem again? Don't feel like editing the file and
searching for where it goes? Then remembering the syntax? Do you
mostly just hate life? Yea, me too. Now you can use this command
to add NEW add_items to the room you're in. Simply type:
badditem [-s] <comma separated list of items>
And then you'll be prompted for the item description, and blammo, you
have yourself a fancy new add_item() in your room. Check it out.
You can use the '-s' flag to add a search item instead.
Used without an argument, it will list all additems in the room.
Surgeon General's Warning: Use of this function may cause unexpected
appearances of Rumor behind you, naked.
Example: badditem tree,trees,green trees
These are lush green trees, with many leaves.
badditem -s leaves
As you search the leaves you discover they are covered in bugs!
Caveats: Early add-items will trump later add items, that means if you
typo'd a description, it will be forever typo'd until a wizard
intervenes. (You can short-term fix it with this command, but
as soon as the room unloads, it will revert.)
Example:
badditem letters
Please describe this item:
Soft green block letters with gold and purple outlines giving them a
three-dimensional aspect.
Is this what you want?
Soft green block letters with gold and purple outlines giving them a
three-dimensional aspect.
Save? (Y) : y
Item added.
help bdelete
<help bdelete> Note: This help file is only available if you've created a wizardling character.
Topic: Bdelete
This command will delete an exit or collection of add items that have
been added to a room you created via the 'build' command. To delete
an exit, please type: bdelete exit/<direction to delete>
To delete an item use: bdelete item/<name of item>
Please note: Deleting an item will delete ALL of the items that
are associated with that item as well.
Example: build east roomxyz
(oops): west (to get back) bdelete exit/east
badditem lights,camera,action
You see lights, a camera, and some action.
(oops): bdelete item/camera (removes all 3 since they point at one desc)
When deleting exits, if you want both sides deleted, you need to do each
one separately.
You can use this to make a room dark, or light again too.
Use 'bdelete light/light' to toggle between light and dark.
<help build> Note: This help file is only available if you've created a wizardling character.
Topic: Build
Well, you've done it. You've discovered the secret to unbridled
area creation power.
Using this command you can build rooms on the fly, as you wander around.
Need to wander around your area a bit before you find a suitable place
to expand it? Want to just make a whole new area without having to edit
dozens of files by hand? Well, this is your ticket.
Syntax: build <dir> <filename>
build list (show all my files)
build (show syntax plus which room I'm in now)
Creates a new room in direction 'dir' from the room you're in now.
It creates the exits in your source room and destination room and
gives the new room a filename that's cartesionly coordinated from
the one you're in now. Or named 'filename' if you provide it.
A named 'file' is just a filename, no path, no ., space, /, \
(Valid dirs: the 8 cardinal, in/out, up/down, enter/exit, portal)
Dual-direction hidden exits can be made with a preceding '@' character.
Single (exiting) hidden exits can be made with a preceding '#' character.
Single (return) hidden exits can be made with a preceding ' character.
example: build west street_corner
build @north back_hidden_room (hidden in both ways)
build #north other_hidden_room (hidden out of this room only)
build $north third_hidden_room (hidden only from the other side)
Do not use special characters in the destination room except underscore.
Once in your new room you can use 'bdescr' and 'badditem' commands to
add real flavor to it.
CAREFUL: Random use of this command is going to add exits to the
room you are in! Your area is automatically 'in game', so you will be
giving access to all players. Be aware of this.
See also:bdescr badditem bmob bdelete
Note from Rastafan:
Obviously 'build' is your room construction tool.
When you build, you provide a direction and a filename.
Example: build west kitchen1
That would create an exit from your current room to 'kitchen1' and it
also moves you to that room.
Let's pretend I'm building a 4 room square kitchen. I would type
the following commands:
build west kitchen1
build north kitchen2
build east kitchen3
build south kitchen1
Note that you're linking the last room (kitchen3) at the end there back
to kitchen1 creating your loop.
You can link any room back to any other room also. So I could do
something like:
build west hallway1
build west hallway2
build west hallway3
build west hallway4
build north bedroom1
build west br1closet
build $down hallway1
Now I've linked the closet in the bedroom back to the beginning of the
hallway. This example makes for a crappy map, but obviously you can
use this to build an upstairs, or twisting dungeon, or even intentional
confusion into your area.
(The "$" preceding the down exit means that the exit will be hidden from
the hallway but visible in the closet. See 'help build' for more info.)
Note from Wasp:
The command to open/close your infinity areas (discussed in note 14),
is "unblock all" or "block all" in any room that is named with an
"entrance" in the name.
help bdescr
<help bdescr> Note: This help file is only available if you've created a wizardling character.
Topic: Bdescr
This command aids a high mortal in developing his/her area by allowing a
quick and easy way to provide a short and long description to your room.
Syntax: bdescr [-s] [text]
bdescr SAVE
With no arguments the 'bdescr' command will show the current short and
long description of the room and the source of those values.
When you're done burning through your area in this manner, you can use
the SAVE directive to merge the short and long descriptions back into
the room's '.c' file permanently.
Example: bdescr -s My Room
bdescr You are standing in my room. Please leave.
(oops) bdescr You are standing in my room. Get naked.
bdescr SAVE (not necessarily required, but no going back now)
(makes your directory cleaner and prevents you from
making further changes without wiz interaction.
Necessary before your area becomes public domain.)
Note from Rastafan: For 'bdescr SAVE' it cleans up the directory (a lot!) which makes it
easier for a wizard to navigate. However, it prevents you (just you)
from changing the short and long description at all. If you're really
confident you've spelled everything correctly and that the description
is as you want it, you should go ahead and SAVE it.
If you do not SAVE, you will not lose your descriptions.
However, a SAVE is required before your area would pass final review
and be open to the public.
help bmob
<help bmob> Note: This help file is only available if you've created a wizardling character.
Topic: Bmob
In conjuction with the 'build' command and related utilities, this command
allows you to add a monster to your room. It adds the most basic of
monsters with your fully fleshed out descriptions and a full set of
comments on how you want a WIZARD to finish coding it. You cannot
add more than one monster per room.
A monster needs a file name, a name, a short description, a long
description, a set of aliases, and commentary. So, make sure you
have that information ready before you start this command. It will run
you through many prompts to get this information.
Further information:
file name : your unique filename, no player sees it
name : What you'd see in combat, such as 'red dragon', 'jake' etc
short: What you see in the room, such as 'a large red dragon'
long: The full description you'd see when examining the monster
aliases: any of the other words a player could look at to see your mob
comments: Anything/everything necessary to turn this monster into what
you want it to be. 'class 50k, aggro, summons rats...'
(This should be a terse but concise list, as exampled above.)
Note from Flaxen
Just a quick note to let everyone know that although infinity area
creators will not necessarily be held to the same descriptive or
interactive standards as traditional wiz-created areas, your areas
will still be held to certain game balance standards like mob density,
for example (currently 1 mob per 3 rooms).
If you have any questions about what other standards you may need
to follow for your area to be open to others and for it to be finalized,
please ask away!
Flax
help wizardling
<help wizardling>
Topic: Creating a Wizardling
SYNTAX: wizardling [charname] - links up [charname] to your main character
no argument will toggle your location between town/your area
This command allows you to link a new (non-second) character to you so
that you can create infinity areas without being restricted or penalized
for having two characters on at once. If you should choose to wiz
then at that time the normal wizard rules about multiplaying would apply.
This new character, your wizardling, exists separately from your character
list and is only identified by its title to be related to you. This
character will only have access to rooms in town, rooms in infinity,
and rooms that may have made it in game under your name.
In short: This is designed to create a character for you that's sole purpose
is to create new content and/or pursue being a wizard.
To use this, create a new character and type 'wizardling <newchar>' to link
it to your name.
Just typing 'wizardling' with no argument will teleport your wizardling
character to town from your area, or to your area from town.
When you want your area linked into the infinity realm, be it immediately
or after you've built it, just ask a titled wizard to create the entrance
for you from The Beginning of Infinity in whatever direction you choose.
See also: build, characters, infinity, wizard.
Type <help archon> on the mud to see a list of titled wizards.
help wizzing
<help wizzing>
Candidate players for wizardhood must be at least level 30, with the
required number of quest points (type 'required' in the level advancement
room of your guild). Players of level 50 and above do NOT need to meet
quest point requirements, however, the number of quest points you have
accumulated will have a significant impact on our consideration and
generally the only way you're advancing from non-HM to wizard-ship is
if you've demonstrated significant worth to the community or past
experience as a wizard. Additionally, levels gained via the big red
button will reflect negatively towards this consideration.
Candidates should also have a clean record. A history of rule breaking and
poor behaviour will not stand you in good stead.
Candidates may withdraw their application at any time by simply notifying
a Solar+ however if this is done, any future 'wizmenow' attempts will
be starting all over.
The process for wizzing varies based on a few factors but starts the same:
1) Qualify for wizzing as outlined in the requirements above.
At this point the procedure diverges:
2) If you have wizzed on 3Kingdoms before:
A) Type 'wizmenow' in your guild advancement room, then proceed to
the room north of the Chamber of the Players' Council (w,w,n from CoT)
and speak with Marsden to conduct an interview.
B) When done, speak to a Solar+. Your new interview and your request
will be posted for the wizard community to approve. Your acceptance
will be weighed on how long it has been since you left, how long
you've been active immediately prior to your request (i.e. did you
not play for 5 years, come back, and request to wiz the next day,
or have you been playing actively prior to requesting), and the terms
you departed the wizard ranks on. In addition to accepting or
rejecting your application, the wizard ranks may return to you with
a conditional approval, such as playing actively for a bit longer if
you have just returned, or similar constraints (including going
the traditional route as described in section 4 below), at which
point you may elect to pursue such requests, or withdraw your
application.
3) If you have never wizzed here but are familiar with LPC coding
and will not need to learn from the ground up, you may be eligible to
skip the Infinity area requirements in section below:
A) Type 'wizmenow', then proceed to the room north of the Chamber of
the Players' Council (w,w,n from CoT) and speak with Marsden to
conduct an interview.
B) When done, send a tell to a Solar+ indicating that you have done
'wizmenow' and your interview, and that you have not coded on 3K
previously but have experience with LPC.
C) The Solar+ will then ask you to provide a single file of code
created to their specifications. It will not be terribly indepth,
it may be a room, an item, or a monster. It may have custom code
required but nothing terribly difficult. As your prior codebase
may not be identical to 3Ks (and likely will not be) it does not
need to compile here, it just needs to demonstrate that you
understand the basic methodologies and have a firm grasp of coding.
D) If such evidence is sufficient, your interview and request will be
posted by the Solar+ for approval by the wizard community.
E) Your application may be approved, denied, or you may be required
to complete the traditional path outlined in section 4 below.
4) If you have never wizzed here before and are not adequately familiar
with LPC coding, you will need to perform the following actions:
A) Speak with a Solar+ to ensure there is nothing in your record that
may prevent you from becoming a wizard so you don't waste your time
or that of the wizarding community.
B) Create a new character for the express purpose of being a
wizardling ('help wizardling'). At the completion of this entire
section and approval for wizarding, you may either use this
character OR one of your player characters to transfer into a
wizard character. If you utilize one of your existing players,
the wizardling will be deleted upon successfully wizzing.
It is imperitive that on your main player character you type
'wizardling <new character name>' after creating the wizardling
character to properly link it to your player character.
C) Create an infinity area. First, from CoT, travel 's,w,s,s,d'
and read the board there. Then, once you've formulated an
idea for an area that conforms to the guidelines on the board,
you may reach out to a Solar+ to create an entrance for you
to begin working. Your first area will need to be a minimum
of 10 rooms (it is highly recommended you keep it under 20
rooms to ensure the process that ensues is timely). This is
your chance to show the wizards your ability with descriptions,
theme, concepts, so on. However, be mindful that the area
should be designed for lower levels (under level 30) and
requests for crazy items, marbles, quests, or similar will
be denied.
D) When you have finished your work on the area, contact a
Solar+ to have the area reviewed and have a wizard assigned
to finish fleshing the area out into a live area.
E) Once that is completed, on your main (as wizardlings cannot
go to guild rooms), go to your guild advancement room and
type 'wizmenow' and proceed to the room north of the Chamber
of the Players' Coucil (w,w,n from CoT). Speak with Marsden
to be interviewed, and notify a Solar+ on completion. Your
application will be posted for conditional approval to the
wizarding community. Note: Despite 'wizmenow'ing on your
main character, you may still use your wizardling as the
character that is made a wizard.
F) If your application is conditionally accepted, then you will
discuss with the Solar+ your idea for a second area. This area
need not directly tie into the first area or even be related
to it, however it must be at least 25 rooms (it is recommended to
keep this area under 50 rooms at a maximum). This area will
be a new exit from your existing infinity entrance room.
Again, this area should be designed for lower levels and
nothing crazy will be approved.
F) Once the second area is complete, contact a Solar+ to notify
them (ideally the same one you dealt with before) and they
will review your area for relatively condition and to view
how thorough you were in its creation.
G) If everything looks acceptable, and nothing has changed in the
other facets of your existance on the MUD that would prohibit
your wizzing, your conditional acceptance will be converted into
a full acceptance, and you will be moved to level 510 to begin your
wizarding career. Your very first 'job' will be to take this
second infinity area and flesh it out into actual code, much
as the assigned wizard did in step 4(D) above when you
completed your first area. This will be your first foray into
seeing how LPC works and what you need to do to make a
functional area, as well as your entrance to more formal
training and mentoring. All progress from this point forward
will be explained in detail directly via wizard communication.
When the interview is posted for approval to the wizard community in the
sitautions above, a response is generally provided within one (1) week,
however this is not set in stone and the decision may require additional
time. Some of the reasons for a player's application being denied include:
* A record of quest cheating
* A record of botting
* A record of harassment
* A record of bug abuse
* A record of any infraction deemed illegal (see help rules)
* A record of being a jackass
* Too many other people are in the queue already
The titled wizards of the 3 Kingdoms reserve the right to deny wizhood to
any player requesting wizhood at any time for any reason. They may also
request additional follow up questions to any applicant for information
not covered in the itnerview.
Archons may also elect, at their whim, to allow prospective wizards to
bypass certain steps or procedures outlined above, or add additional
steps or procedures, as they see fit.
*Be warned, upon acceptance of an application and being promoted to 510:
Your first task will to be to spend as much time as it takes you to read
all the wizard help files available to familiarize yourself with the
MUD from a wizard perspective, emphasis on the files which outline rules
and expectations of wizard behavior, performance, and policies.
All your player characters are frozen. You will not have them returned to
you until you reach at least level 550 thru hard work and not all characters
may be returned at one time. Which characters and how many will be decided
by your sponsor and the Solar+ staff based on how dedicated to your work
you have been up to that point.
You will not be able to log in a wizard and player character at the same
time unless you are a Solar+.
You will be expected to have no communcation with players and focus soley
on your work until you reach level 520.
Once you commit, you will be responsible for completion of reasonable wizard
work within 6 months. If you fail to do so within that time, you will be
removed. The definition of "reasonable wizard work" can be loosely defined
by at least one non-trivial wizard area along with plans for advancing
yourself within the wizard ranks beyond these areas.
If, at any time before the 6 month timeframe is complete, you are determined
to have abandoned your wizard duties without just cause, your character will
be removed. Determination of this will be done primarily by your sponsor,
with other titled wizard input.
Bottom line, wizzing is a wonderful thing that allows you to actually
contribute to making 3K a permanently better place. However, you should
not do it unless you are willing and able to put in the work to make it
worthwhile. Above all, don't wiz because you view it as some sort of
"retirement" from playing, which it most certainly is not.
Last Updated: 2023/09/02 - Adalius
See also: highmortal, method, milestones, quest, rules, wizard.
Locking
Your area is locked by default (at boot and unload.)
To open your area while it's in development you must 'unblock'
the exit(s) you desire. You can "block" to re-block exits.
You can use this to lock off certain parts of your area as well.
This does NOT save, though as mentioned, your entire area is locked
until you unlock it. So if you're working on a secret portion and
the mud reboots, no one but you can get into the area before you
unlock it. So, go in, block off the secret part, then go back
and open it up.
Use the 'block' and 'unblock' commands in any of your rooms.
<unblock>
Unlock which dir?
<unblock out>
Currently all exits are locked from this room. In order to lock or
unlock an individual exit, you must 'unblock all' first.
<unblock all>
Ok, *EVERY* exit is now unlocked. Please re-lock any individual exits that you want to keep closed
Whosin
Along the lines of needing to lock/unlock, plus general curiosity,
you can type 'whosin' at the first entrance room to your area to
see who's poking around within.
Step by Step
Create your new character that you want to become a wizard.
Don't remember how to create a new character? Refer to our 'How to Get Started' section on the Newbie page.
Note: Refer to the <help entrance> file.
Open a new window and login with your main character. (You should now have two mud-windows open.)
Now, <wizardling [new characters name that you just created]>
You have turned Mimic into your wizardling.
Creating area directory...
Creating entrance room...
Creating board directory...
Creating board...
Area for mimic prepped.
On your wizardling characters screen, you should see:
You have been turned into Locrian's wizardling!
*** Please type 'help build' to get started! ***
*** You must log out and back before you can build. ***
On your wizardling characters screen, <quit>
Log back in with your wizardling character.
Type <wizardling> to be transported to the area you'll start creating in. If you're not automatically transported, send a tell to a titled wizard to help you out.
<none, from file>
There is one obvious exit: out
Comment Board for Mimic containing no messages.
To begin giving your new area "life", build your entrance. <build [direction you want] [name of file]>
Example:
build down entrance_cereal
Give the current room you're in a short description (so that instead of <none, from file>, you'll see the name of the room when you enter it). <bdescr -s [name that you want this room to be]>
Example:
bdescr -s House of Trix
Continue with building your area as desired. Keep in mind that some things you will not be able to edit if you accidentally make a typo. Keep a record of these so that the wizard who is helping you can assist in fixing these or, once you're granted access (become a wizard), you can fix the typo yourself.